
Installation Guide

ASSEMBLY AND INSTALLATION
INSTRUCTIONS
NOTES: 1. Before installing, consult local electrical codes for wiring and grounding requirements.
2. READ AND SAVE THESE INSTRUCTIONS.
H0149
WARNING:
TO AVOID RISK OF ELECTRICAL SHOCK, BE SURE TO SHUT OFF
POWER WHILE INSTALLING OR SERVICING THIS FIXTURE.
Turn off the power at fuse or circuit box.
141210
Page 1
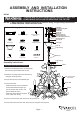
Mounting Strap (A)
Mounting Screw (B)
Green Grounding
Screw (C)
Hex Nut (D)
Wire Nut (E)
Canopy (G)
Top Loop (H)
Collar (I)
Hardware Package (included):
Assembly Instructions:
Threaded Pipe (F)
Washer (J)
1. Attach the threaded pipe to the mounting strap,
then secure it with a washer and hex nut.
2. Attach the mounting strap to the outlet box by
using two mounting screws.
3. Secure the top loop to the threaded pipe.
4. Connect the chain:
- Determine length of chain needed to
achieve desired fixture height. (To
remove excess chain section, use
pliers to bend link open.)
- Weave the fixture wires through the
chain, collar, and canopy.
5. Connect one end of the chain to the loop using a loop lock.
6. Connect the other end of the chain to the top loop using the other loop lock.
Loop Lock (K)
Chain (L)
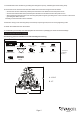
Loop
Outlet Box
House Grounding Wire
Wire Nut (E)
Fixture Wire
Mounting Strap (A)
Green Grounding Screw (C)
Mounting Screw (B)
Threaded Pipe (F)
Canopy (G)
Top Loop (H)
Hex Nut (D)
Washer(J)
Collar (I)
Loop Lock (K)
Loop Lock (K)
Chain (L)
Fixture
Bulb Type B Max.60W
(not included)
Candle Tube
Socket