
Installation Guide

ASSEMBLY AND INSTALLATION
INSTRUCTIONS
NOTES: 1. Before installing, consult local electrical codes for wiring and grounding requirements.
2. READ AND SAVE THESE INSTRUCTIONS.
T0516
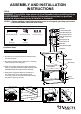
Hardware Package (included):
191123
Turn off the power at fuse or circuit
box.
Installation Steps
Max.60W Type A Bulb
(not included)
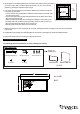
Fig.1
Bigger Flat Glass
Frame
Fig.3
Small Flat Glass
Frame
Fig.4
Clip
Frame
Fig.2
Frame
Slot of “S” Clip
“S” Clip
(E)
1. Unscrew the set screws and remove the frame away
from the ceiling pan.
2. Unscrew the two bolt nuts (D). Remove the mounting
strap unit (A) from the ceiling pan.
3. Attach the mounting strap unit (A) to the outlet box by
using two mounting screws (B). Adjust the length of the
preinstalled fixture mounting screws if necessary.
4. Gently place a bigger flat glass into the bottom of
the interior frame, secure it by placing 8 pieces
of “S” clips (I) (two on each side of the interior frame)
into position. (See Fig.1 & Fig.2)
TO AVOID RISK OF ELECTRICAL SHOCK, BE SURE TO SHUT OFF
POWER BEFORE INSTALLING OR SERVICING THIS FIXTURE.
WARNING: Turn off the main power at circuit breaker before installing fixture.
AVERTISSEMENT: Coupez la source d’alimentation principale au panneau
central de disjoncteurs avant d’installer le luminaire.
Lock Nut
Green Grounding Screw
Wire Connector (C)
House Grounding Wire
Fixture Grounding Wire
Outlet Box
Fixture Wire
Mounting Strap Unit (A)
Fixture Mounting Screw
Mounting Screw (B)
Ceiling Pan
Socket
Bolt Nut (D)
Frame
Set Screw
Mounting Screw (B)
Wire Connector (C)
Bolt Nut (D)
Mounting Strap Unit (A)
“S” Clip (E)
X 8