
Installation Sheet

ASSEMBLY AND BATTERY REPLACEMENT INSTRUCTIONS
171207
T
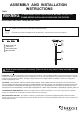
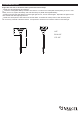
ASSEMBLY (Figure 1)
• Carefully remove your solar light from the box.
• Do not press on the surface of the solar panel because this can cause
damage to solar module.
Note: Please remove the clear mylar before using.
• Attach the solar panel unit (Part A) to the plastic lens (Part B).
• Connect one end of the connection tube (Part C) with the plastic lens (Part B),
then connect the other end with the ground stake (Part D) .
• Gently insert the ground stake (D) into the ground .Never push the fixture into
the ground by the fixture head.
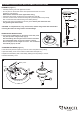
CHANGING BATTERIES (Figure 3)
1
3
3
OPERATIONAL INSTRUCTIONS
• Remove the insulated paper on the bottom of the solar panel
unit (Part A) before using this lamp (Fig.2).
After assembling, take the light to direct sunshine that allows
the rechargeable battery to reach its maximum capacity.
Ensure the light is in full sunlight for 8 hours. The unit will then
automatically light up at dusk.
A
A
A
B
B
C
D
Battery
Battery Cover
Insulated Paper
2
A
CAUTION: In compacted soil, clay, or hard soils, moisten the ground with water before
inserting the stake into the ground to avoid breakage.
• Twist the solar panel unit (Part A) to remove it from the plastic lens (Part B) .
• Open the battery cover on the bottom of Solar Panel Unit (Part A) .
• Replace the old battery with a new battery making sure the polarity is correct.
• Restore the battery cover.