Ethernet TV VOD-WM Video on Demand Server VBrick v4.2.
Copyright © 2008 VBrick Systems, Inc. All rights reserved. 12 Beaumont Road Wallingford, Connecticut 06492, USA www.VBrick.com This publication contains confidential, proprietary, and trade secret information. No part of this document may be copied, photocopied, reproduced, translated, or reduced to any machine-readable or electronic format without prior written permission from VBrick.
Contents VOD-WM v4.2.1 Admin Guide Organization . . . . . . . . . . . . . . . . . . . . . . . . . . . . . . . . . . . . . . . . . . . . . . . . . . . . . . . . . . . . . . v Font Conventions . . . . . . . . . . . . . . . . . . . . . . . . . . . . . . . . . . . . . . . . . . . . . . . . . . . . . . . . . . v Related Publications. . . . . . . . . . . . . . . . . . . . . . . . . . . . . . . . . . . . . . . . . . . . . . . . . . . . . . . . . v Printer-Friendly . . . . . . . . . . . . . . . . . . . . . . . . .
6. Restoring Windows Media Services Introduction . . . . . . . . . . . . . . . . . . . . . . . . . . . . . . . . . . . . . . . . . . . . . . . . . . . . . . . . . . . . . . 21 Restoring Windows Media Services . . . . . . . . . . . . . . . . . . . . . . . . . . . . . . . . . . . . . . . . 21 7. Reinstalling the Software Reinstalling the Software . . . . . . . . . . . . . . . . . . . . . . . . . . . . . . . . . . . . . . . . . . . . . . . . . . . . 23 Initializing the Server . . . . . . . . . . . . . . . . .
VOD-WM v4.2.1 Admin Guide This VOD-WM Server Admin Guide is written for anyone who will be using or configuring a VBrick EtherneTV VOD-WM Video on Demand Server. This includes system administrators, network technicians, and others. This document explains how to set up and configure the VOD-WM server and how to perform initial administration tasks. For most common tasks like ingesting content, use the ETV Portal Server and refer to the ETV Portal Server Admin Guide for details.
Printer-Friendly VOD-WM Server Release Notes VOD-WM Server Admin Guide vi Preface
Chapter 1 Server Overview VBrick's VOD-WM Server has been integrated with the EtherneTV family of products including the Portal Server, the WM Network Video Appliance, the Scheduler, and the Network Video Recorder (NVR). The VOD-WM delivers stored Windows Media assets as unicast/multicast streams across an Ethernet network and is built on a Dell hardware platform. Other features include the ability to schedule asset playback, asset searching, user and system statistics, and more.
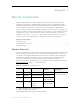
Table 2. VOD-WM Server Throughput VOD-WM Server Max Throughput † VOD-WM Basic (Standard) 125 Mbps VOD-WM Basic (Enterprise) 125 Mbps VOD-WM Advanced (Standard) 300 Mbps VOD-WM Advanced (Enterprise) 300 Mbps † These are qualified throughput measurements. Actual throughput depends on bitrate, number of connections, disk fragmentation, and other factors, and may be higher. Figure 1.
Server Overview External Storage VBrick's SAS (serial attached SCSI) ES5, ES10, and ES15 external storage arrays are fully compatible with all VOD-WM servers. VOD-WM Server Software All server software is pre-installed by VBrick. If, for some reason, you ever need to reinstall the software, use the Dell recovery CDs to reinstall the Windows Server 2003 (Standard or Enterprise) operating system. Contact VBrick Support Services if you need help. Each VODWM server has the following software pre-installed.
Technical Support If you can’t find the information you need from the documentation or from your reseller, you can contact VBrick Support Services on the web at www.VBrick.com/support The Support Services website has downloads, FAQs, documentation, support guidelines, and an on-line form you can use to submit questions. VBrick will make every effort to answer your technical questions in 24 business hours or less. 4 © 2007 VBrick Systems, Inc.
Chapter 2 Getting Started Installing the VOD-WM Server The hardware installation of the VOD-WM server is straightforward. Unpack the server and connect the cables as described below. Note that all server software is pre-installed before being shipped. T To install the server onsite at your location Step 1. Unpack the Server . . . . . . . . . . . . . . . . . . . . . . . . . . . . . . . . . . . . . . . . . . . . . . . . . . . . 5 Step 2. Connect the Server . . . . . . . . . . . . . . . . . . . . . . . . .
Figure 3. VOD-WM (Dell 1950 – Rear View) Figure 4. VOD-WM (Dell 2950 – Rear View) 2. If rack mounting the unit, mount the VOD-WM server in the rack, using the rack mount kit provided. 3. Connect the VOD-WM server to the network by plugging the 10/100/1000 BaseT Ethernet cable into the Ethernet port 1 on the rear of the unit. 4. Connect the monitor cable to the blue video port (front or rear) on the VOD-WM server. Turn the monitor on. 5.
Getting Started 7. Turn the VOD-WM server's main power on by pressing the power switch at the front of the unit. Figure 5. VOD-WM (Dell 1950 – Front View) Figure 6. VOD-WM (Dell 2950 – Front View) 8. The VOD-WM server will boot and automatically load using the default settings. Wait 5–8 minutes for the unit to fully power up. As new hardware is attached (for example a keyboard and mouse) the operating system will automatically find and install the drivers. Step 3.
Step 4. Configure the IP Address You need to configure the IP address as explained below on the server machine. When done, be sure to reboot the machine before configuring the server in the ETV Portal Server. VBrick strongly recommends that you use a static IP address rather than a dynamically-configured DHCP. The use of a DHCP server creates a number of issues when the IP address changes. For example clients configured to point to the VOD-WM server's IP address may need to be re-configured.
Getting Started Step 5. Configure the ETV Portal Server The VOD-WM server must be configured in VBrick's ETV Portal Server before it is recognized as part of the ETV system. T To configure the VOD-WM server in ETV Portal Server: 1. 2. Launch ETV Portal Server and login as an administrator. Go to Global Settings > Servers and select VOD-WM-STANDARD or VOD-WMENTERPRISE from the dropdown list. 3.
T To verify the installation: 1. 2. Ping the IP address of the VOD-WM server from any PC in the same network. Launch an ETV Portal Server client. Open a browser and enter the ETV Portal Server hostname or IP address (e.g. http://portalserveripaddress ) in the address bar. Go to the Asset Library and launch any of the Windows Media (wmv) videos available in the Demo folder. If it runs, you have successfully completed the installation. 3. 10 © 2007 VBrick Systems, Inc.
Chapter 3 Managing the Server Topics in this chapter Overview . . . . . . . . . . . . . . . . . . . . . . . . . . . . . . . . . . . . . . . . . . . . . . . . . . . . . . . . . . . . . . . . 11 Managing the Server . . . . . . . . . . . . . . . . . . . . . . . . . . . . . . . . . . . . . . . . . . . . . . . . . . . . . . . 11 Windows Event Viewer . . . . . . . . . . . . . . . . . . . . . . . . . . . . . . . . . . . . . . . . . . . . . . . . . . . . .
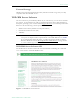
This page has four tabbed windows as follows. 12 Getting Started Displays various help topics to help you get acquainted with the system. Properties Displays various server properties such as Logging, Event notification, etc. Highlight any property in the Category list, then right-click and select Properties in the Plug-in list (or use the View properties icon at the bottom of the page) Advertising Used to add advertising content. Monitor Information only.
Managing the Server Server Properties Note The default Publishing Point on the VOD-WM server is VBP and it must match the server configuration in ETV Portal Server. You can change the Publishing Point name but VBrick strongly recommends you keep the default. T To display or set logging properties: 1. 2. 3. Select Logging in the Category list. Select WMS Client Logging and right-click to Enable/Disable logging.
Performance Monitor Click on the Monitor tab for a quick read-only view of bandwidth and usage metrics. Use the icon to Start/Stop services, reset counters, or to launch the Performance Monitor. 14 T To view the Performance Monitor: 1. Click the View Performance Monitor icon 2. Use the toolbar controls above the display area to add or remove counters. at the bottom of the window. © 2007 VBrick Systems, Inc.
Managing the Server Windows Event Viewer The Windows Event Viewer is available on Windows Server 2003 Standard or Enterprise Edition and other operating systems. Use this tool to review any system-level messages written to the Windows system event log. T 1. To launch the Windows event viewer: Go to Start > Control Panel > Administrative Tools > Event Viewer and click on to populate the viewer with messages.
2. 16 For more details, double-click on any event to launch the Event Properties window. Use the arrows buttons on this window to page through the log. © 2007 VBrick Systems, Inc.
Chapter 4 Creating Publishing Points The WM Server can also be configured with publishing points to be used as a reflector server. When used in this manner, live WM streams reflected from the WM Server can be selected and viewed from the ETV Portal Server. To have the reflected stream appear on the Live Broadcasts page of the Portal Server, go to the Configuration: Encoder > Server page in IWS and complete the Announce External Server section.
Adding users and privileges at the server level will allow all inherited publishing points to acquire the same security privileges. To add individual privileges for a specific publishing point, select the Publishing Point , click Properties, select Authorization , and right-click WMS Publishing Points ACL Authorization . To add users and subsequently, permissions, the user must already exist as a domain user or as a local user on the server.
Chapter 5 Adding Content VBrick strongly recommends that you use the EtherneTV Portal Server exclusively to ingest all VOD-WM content. With the ETV Portal Server you can add individual files or you can FTP or copy pre-recorded content to the ETV Portal Server for easy ingestion to the VOD-WM server. The ETV server periodically (every 5 minutes) polls certain folders for presence of content and if found ingests the content onto multiple VOD-WM servers.
20 © 2007 VBrick Systems, Inc.
Chapter 6 Restoring Windows Media Services Introduction Windows Media Services are installed and a publishing point is configured on the server prior to shipment. The Computer Name of the VOD-WM Server is VODWM . If you subsequently change this name, the Windows Media Services branch in the Microsoft Management Console (MMC) shows no server and all Windows Media Services configuration, such as Publishing Points, are missing. Windows Media Services management is unavailable.
4. In the Add Server popup enter localhost or the new name of the server. 5. The new server name will appear under Windows Media Services. Expand the tree under the new server name and the previous configurations including Publishing Points will be visible and accessible. This completes the restore procedure. Now you can launch the ETV Portal Server, go to Global Settings > Servers, and configure the VOD-WM Server with the new server name if necessary. 6. 22 © 2007 VBrick Systems, Inc.
Chapter 7 Reinstalling the Software Topics in this chapter Reinstalling the Software . . . . . . . . . . . . . . . . . . . . . . . . . . . . . . . . . . . . . . . . . . . . . . . . . . . . 23 Adding Content to the Server . . . . . . . . . . . . . . . . . . . . . . . . . . . . . . . . . . . . . . . . . . . . . . . . 30 Reinstalling the Software The VBrick EtherneTV VOD-WM server is shipped with Windows 2003 Server (Standard or Enterprise Edition) already installed and configured.
Configuring the Server T 1. To configure the server: Login and go to Control Panel > Add/Remove Programs > Add/Remove Windows Highlight and select "Application Server". Components. 24 2. Select Details then select "ASP.NET." 3. Highlight Internet Information Services (IIS), select Details and then select "File Transfer Protocol (FTP) Service". After selecting "FTP" press OK to close the IIS window, then press OK to close the Application Server Window. © 2007 VBrick Systems, Inc.
Reinstalling the Software 4. In the Windows Components Wizard, highlight and select Windows Media Services and then click Details. 5. In the Windows Media Services dialog box, verify the "Windows Media Services" and "Windows Media Services snap in" components are selected. Press OK in the "Windows Media Services" box and Next " in the Windows Components Wizard. The Windows Components will now be installed.
6. Using Windows Explorer, browse to drive D:\ and create a folder named wmpub. Then create another folder inside of wmpub named WMRoot . Verify the correct path was created as D:\wmpub\WMRoot (verify the correct case for WMRoot ). Highlight the WMRoot folder, right-click and select Properties. In the Properties box select the Security tab and highlight Users (VODWM\Users) . Then select Full Control in the Allow column and press OK . 26 7.
Reinstalling the Software 9. Highlight WMP HTTP Server Control Protocol , then right-click and select Enable. If there is an error popup verify the Default Web Services were stopped properly as explained above. 10. Highlight the server name, then right-click and select Add Publishing Point (Advanced)… [ 11. Select On-demand and Browse to the directory D:\wmpub\WMRoot for Location of Content and press OK . 12.
13. Right-click on the "Default FTP Site" and select Properties. In Security Accounts change the User name to VODWM\vbrickuser, set the password to vbrickuser, and then click Apply and confirm. Then uncheck "Allow anonymous connection" and "Allow only anonymous connections" and click Apply. Press the Home Directory tab and enter vbrickuser to verify the password. 28 © 2007 VBrick Systems, Inc.
Reinstalling the Software 14. In the Home Directory tab, change the Local path: to D:\wmpub\WMRoot and select the check box next to "Write". Click OK to close the "Default FTP Site Properties". 15. Go to Start > All Programs > Administrative Tools > Computer Management to open the "Computer Management" window. Select "Local Users and Groups" and highlight "Users". Then right-click on "Users" and select "New User". 16. In the "New User" box enter User name: vbrickuser and the password vbrickuser.
The Windows Media Server configuration is now complete. Adding Content to the Server T To add content to the VOD-W server: 1. Insert the Documentation CD into the CD-ROM drive of the server. 2. Copy the video demo files from the CD-ROM (E:\video\*.wmv ) to D:\wmpub\WMRoot\ Viewing and Verifying the Content 30 T To view and verify the content: 1. 2. 3. 4. 5. 6. 7. Launch Internet Explorer and open the Admin console of the EtherneTV Portal Server. Click on Global Settings > Servers.
VBrick Systems, Inc.