VBrick EtherneTV Portal Server ETV v4.
Copyright © 2007 VBrick Systems, Inc. All rights reserved. 12 Beaumont Road Wallingford, Connecticut 06492, USA www.VBrick.com This publication contains confidential, proprietary, and trade secret information. No part of this document may be copied, photocopied, reproduced, translated, or reduced to any machine-readable or electronic format without prior written permission from VBrick.
Contents Portal Server v4.2 User Guide Organization . . . . . . . . . . . . . . . . . . . . . . . . . . . . . . . . . . . . . . . . . . . . . . . . . . . . . . . . . . . . . . v Getting Help . . . . . . . . . . . . . . . . . . . . . . . . . . . . . . . . . . . . . . . . . . . . . . . . . . . . . . . . . . . . . . v Font Conventions . . . . . . . . . . . . . . . . . . . . . . . . . . . . . . . . . . . . . . . . . . . . . . . . . . . . . . . . . vi Related Documents . . . . . . . . . . . . . . . . . . . . . .
Schedule Privileges . . . . . . . . . . . . . . . . . . . . . . . . . . . . . . . . . . . . . . . . . . . . . . . . . . . . . 31 Viewing the Schedule . . . . . . . . . . . . . . . . . . . . . . . . . . . . . . . . . . . . . . . . . . . . . . . . . . . 32 Scheduling an Event . . . . . . . . . . . . . . . . . . . . . . . . . . . . . . . . . . . . . . . . . . . . . . . . . . . . 32 Recurrence. . . . . . . . . . . . . . . . . . . . . . . . . . . . . . . . . . . . . . . . . . . . . . . . . . . . . . . . . . . .
Portal Server v4.2 User Guide This Portal Server User Guide is written for anyone who will be using or evaluating the VBrick EtherneTV Portal Server. This includes system administrators, software developers, network technicians, and end users in a variety of business environments. The EtherneTV Portal Server is a web-based portal for accessing and managing video assets including both live or stored audio and video files.
usually answer your technical questions in 24 business hours or less. Also note that our publications team is committed to accurate and reliable documentation and we appreciate your feedback. If you find errors or omissions in any of our documents, please send e-mail to documentation@vbrick.com and let us know. For more information about any VBrick products, all of our product documentation is available on the web. Go to www.vbrick.com/ documentation to search or download VBrick product documentation.
Chapter 1 Introduction Topics in this chapter Overview . . . . . . . . . . . . . . . . . . . . . . . . . . . . . . . . . . . . . . . . . . . . . . . . . . . . . . . . . . . . . . . . . 1 Portal Server Home Page . . . . . . . . . . . . . . . . . . . . . . . . . . . . . . . . . . . . . . . . . . . . . . . . . . . . . 3 Overview The VBrick EtherneTV Portal Server is a web-based portal for accessing Live and OnDemand audio and video files.
Table 1. Desktop Requirements PC Type Requirements Windows PCs • • • • • • • • • Windows 2000, XP (Service Pack 2), or Vista. 300 MHz Pentium II processor for MPEG-1 streams. 500 MHz Pentium III processor for MPEG-2 streams. 500 MHz (minimum), 750 MHz Pentium III processor (recommended) for MPEG-4 streams. 128 MB RAM. SVGA video card 640x480, 256 colors, video card acceleration recommended. Minimum 10 MB hard disk space for installation. Microsoft Internet Explorer 6.0 or higher.
Introduction answer Yes to security requests when prompted to download components. The ETV Portal Server may require the installation of up to five components. If you check the box Always trust content from VBrick Systems Incorporated , any required components will be automatically downloaded the next time they are needed. After a download, you don’t have to restart your computer—just close the browser.
4. 5. Depending on how your system is configured, the Portal Server may need to download additional components the first time you access the server. If prompted to download components, you must answer Yes to the security requests. Use the navigation bar at the bottom of the page to access other Portal Server pages. All Portal Server features and functions are briefly described below and explained in detail later in this guide.
Introduction Presentations Launches a page from which you can access legacy rich media presentations that were published to an earlier version of the Portal Server. See Presentations on page 28. If you have no have legacy presentations, this hyperlink is not shown. Playlist Opens the Playlists page from which you can create and manage playlists. See Playlists on page 25. Help Get help for any Portal Server feature or function. See Getting Help on page v. Logout Always log out when done.
6 © 2007 VBrick Systems, Inc.
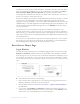
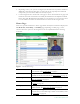
Chapter 2 Using the Portal Server Some Portal Server functionality may be restricted to certain users. If you are not authorized to launch an Emergency Broadcast or Add Video, for example, those menu items will not be displayed on the navigation footer on the Portal Server home page as shown in Figure 2. Your system may also have a hand-held remote control device. The VB-PC Remote is a handheld infrared device that can be used to control (stop/start/pause etc.) any stream running on the Portal Server.
Channel Guide The Live Broadcasts page has a list of streams and stations. The "Channel Guide" is simply the list of stations (both custom stations and TV stations) shown at the top of the list. Custom Stations are defined by an administrator at your site. TV Stations already have program information provided by a third-party content provider. Other auto-discovered streams on your network may be displayed but these do not include "programming" data and are not considered to be part of the Channel Guide.
Using the Portal Server Find Find content using specific search criteria. Enter characters or text, for example type "CNN," in the text field on the left and click Search . You can search by All , Title, Keyword , Description , or any custom fields created by an administrator. The results of the search are displayed in a new window. To return to the original program listing, click Live Broadcasts. Date/Time Box Use to display programming for a different date and time in the Channel Guide.
Icons The Live Broadcasts page shows stations and streams that can be requested and played. Each item has its own icon and is preceded by a channel number. Custom icons can be assigned by an administrator to each station. A station may, or may not, have programming data. This icon denotes standard live streams. For example TV channels, without programming data, may have this icon. This icon denotes rich media presentations (those that have both video and PowerPoint slides, for example).
Using the Portal Server Control Buttons The icons on the bottom of the Preview Window control the video. (Note that the controls shown here for live broadcasts are different from those used for stored videos.) The buttons shown are for the Windows-based player. (Macintosh users may see the QuickTime Player buttons.) Mouseover each button to see the tool tip title. • • • • • • • • • • • ETV Portal Server User Guide – Slider at top. Not used with live video.
Messages The Messages area under the control panel displays any Global Message entered by the administrator; it will also display additional information about the selected video if it was customized by an administrator. The video title is shown above the Preview Window. Viewing Multiple Streams The video player can be configured by an administrator so that you can view multiple streams in separate windows.
Using the Portal Server 2. Press the red "record" button under the preview window. A message will note that a recording is in progress. Optionally, you can mouseover the program name and select Record Program . A red ball in the Channel Guide (Figure 2) indicates that a recording is in progress. T To stop recording: 1. Press the red "record" button again. A message will note that the recording has been stopped.
access to that device) unless it is reserved for a scheduled event. If reserved for a scheduled event and in order to avoid conflicts, only the user who created the schedule can access the device. (Mouseover the hyperlink for a schedule event to see the owner.) Once defined, you can control a device using a graphical control panel. On the Live Broadcasts page, any stream originating from a control device is distinguished by a special icon.
Using the Portal Server Figure 3. Asset Library Title The title of the video clip is displayed after the icon indicating it is a video clip. A a thumbnail which provides a visual preview as to what is in the clip. Search Find videos using search criteria. Enter characters or text, for example type "CNN," in the text field on the left. You can search by All , Title, Keyword , Description , or any custom field created by an administrator.
Content The Asset Library folders have streams that can be requested and played. Each listing displays either a default file icon or a thumbnail image of the clip (see Creating Thumbnails on page 19), as well as information about the clip such as duration and keywords. This icon denotes standard video content. It can be replaced by an image or a thumbnail. This icon is used for bookmarks and playlists.
Using the Portal Server Control Buttons The icons on the bottom of the Preview Window control the video. (Note that the controls here are different from those used for live broadcasts, for example, there is no Record button.) Mouseover each button to see the button title. • • • • • • • • • • • • • Messages – Use slider at top of control panel to move forward or backward in the video. MPEG-1, MPEG-2, and WM only. Play – Starts the video stream if it was previously stopped.
T To delete a stored video: 1. 2. Click on the Info button to the right of any stored video. Click Delete Video and confirm. This will permanently remove the video from the Portal Server. T To customize a stored video: 1. 2. Click on the Info button to the right of any stored video. Click Modify Info to display the customization page. 3. Change the Name, or Folder, and add a Description and Keywords as appropriate.
Using the Portal Server Link Title The title actually displayed on the Info page, for example "Click Here for More Information." Link Type • Web page URL – Enter a valid URL or copy and paste one from your web browser. • Uploaded File – Browse to select an upload file. This can be a PowerPoint, an image, or any file you want to make available to end users. Creating Thumbnails You can create thumbnails for all videos stored in the Asset Library that were recorded on the Portal Server.
3. 4. To edit the playlist, go to MyMedia , mouseover the playlist you just created, and click Edit Playlist . You can change the name, folder, duration, etc. using the editing options explained below. Note Use the Mark button to bookmark a stream. This creates a playlist in MyMedia with one bookmark. To add additional streams, open this bookmark from the Playlists page. Press Mark again only if you want to create another bookmark to the same video file. For more about playlists, see Playlists on page 25.
Using the Portal Server Click the Cancel icon to the left of each to cancel a recording or ingestion in progress. This also cancels the recording on the Live Broadcasts page. Emergency Broadcast An emergency broadcast can be launched by any ETV Portal Server user with appropriate permissions. It broadcasts a live or stored emergency broadcast to specified VBricks or STBs in case of an emergency. The broadcast is launched instantly, for a specified duration, and preempts all other broadcasts.
2. 3. 4. Click a previously-defined template name. Set the broadcast Duration in minutes (or click No Limit (Stop Manually) . Click Start Emergency Broadcast and confirm. (A message will indicate the broadcast is in progress. Any streams currently in progress will be preempted and replaced by the emergency broadcast.) If necessary, click Stop Emergency Broadcast when done. Template Name Pre-defined template created by an administrator.
Using the Portal Server T To add a video: 1. 2. 3. Click Add Video on the navigation bar. Browse to a Source File for the video content. Select a Destination folder. You can add the video to any folder shown in the dropdown list. Enter a required Name and optional Keyword and Description . (The name will be shown on the Asset Library page; the keyword and description will be shown on the Info page.) Optional. Complete Additional Info, Reference Links, and Advanced as explained below.
Additional Info A window similar to this is shown only if an administrator has added Custom Field(s). It can be used to provide additional descriptive information about a video. Reference Links Use this window to add or delete related web page links on the Info page associated with a video. Advanced Shown only if you have Expiration Privileges. Use to set expiration date, viewing period, and copyright restrictions.
Using the Portal Server Playlists Playlists are saved in the Asset Library. A playlist is a mechanism to consolidate multiple video files, or video file segments, regardless of format, into a virtual file. A playlist is a list of video streams, or parts of streams, that can be played as if they were a single video file. Playlists can include files encoded in different formats and at different bit rates including MPEG-1, MPEG-2, MPEG-4, and WM (Windows Media).
Creating Playlists T To create a playlist from the Playlists page: 1. 2. Click Playlists on the navigation bar at the bottom of the page. Mouseover any video from the folders you have permission to access and select Add to Playlist . This adds the selected stream to the new playlist. By default, it starts at the beginning of the file and ends at the end of the file. Repeat for each stream you wish to add. Edit the start and end times or reorder the playlist as necessary.
Using the Portal Server 4. To add additional items to a playlist, mouseover any file in the Available Content list and click Add to Playlist. Info Each playlist has its own searchable metadata. You can add/change the name, the folder, keywords, etc. For example you can add a description or keywords that can be used for searching, as well as links to external web sites and desktop files. See Customizing Stored Videos on page 17. Up Move clip up one position in playlist.
End † † Sets the bookmark end time (default = end of file). There are two ways to set End time. (1) Launch the clip in the preview window and click End at the point where the clip will end. Use the Forward/Rewind buttons to advance through the video as necessary.
Using the Portal Server Logout This command logs you out of the application and lets you log back in as a different user. This may be necessary to gain access to certain functionality. For example, some users may not be allowed to create thumbnails and you may want to login as a user who has the permissions to do this. The Logout hyperlink is only shown when Access Control is enabled by an administrator.
30 © 2007 VBrick Systems, Inc.
Chapter 3 Using the Scheduler Topics in this chapter Introduction . . . . . . . . . . . . . . . . . . . . . . . . . . . . . . . . . . . . . . . . . . . . . . . . . . . . . . . . . . . . . . 31 Live Broadcast . . . . . . . . . . . . . . . . . . . . . . . . . . . . . . . . . . . . . . . . . . . . . . . . . . . . . . . . . . . . 37 Stored Broadcast . . . . . . . . . . . . . . . . . . . . . . . . . . . . . . . . . . . . . . . . . . . . . . . . . . . . . . . . . . 40 Conference . . . . . . . . . . . . . . . . .
down and modify a schedule they "own" (i.e. one they created). Mouseover any scheduled event on the calendar page to view the owner. Table 5. Schedule Privileges User Privileges Super Create/modify/delete all schedules and access all features. Full Create/modify/delete owned schedules. Partial Create/modify/delete owned schedules; no Advanced Settings. None No schedule privileges; no Add button shown on Scheduling page.
Using the Scheduler from anywhere in the application. Any scheduled programs currently in progress will display a TV icon and can be launched by clicking the icon or from the Live Broadcasts page. (They can also be viewed from a PC if VBrick's StreamPlayer is installed) The first steps in creating a schedule are the same for all types of schedules. T To schedule an event: 1. Click Scheduling on the Portal Server home page to display the "calendar" page shown below.
3. Enter a Schedule Name and complete the Start and End fields. (To avoid format errors, click in the date and time fields and use the calendar and dropdown list respectively.) Depending on the view you selected above, these fields may be pre-filled. Schedule Name Alphanumeric, no special characters, must be unique. Maximum 128 characters. Start Use the calendar and the dropdown menu respectively to select start date and time.
Using the Scheduler Schedule time Set start, end, and duration. Duration cannot exceed 24 hours. Recurrence pattern Use the radio buttons and check boxes to set a Daily, Weekly, or Monthly recurrence pattern. A recurring event is shown on the scheduler with a special icon. Range of recurrence Describe the start and end of the range. End can be none, number of occurrences, or a specific date. 5. Select a Schedule Type.
When done, the named schedule is added to the calendar page of scheduled events. Any scheduled links use color-coded text as shown in Table 6. Table 6. Color-coded Scheduled Events Text Color Description Red Expired. The scheduled event is over. Yellow Future. The scheduled event will occur in the future. Green Active. The scheduled event is currently in progress. If the event is viewable (for example a stored video), a TV icon is displayed and you can click on it to launch the stream.
Using the Scheduler Create Schedule The final step in creating a schedule is to review and confirm the settings. If you are satisfied with the schedule and/or the recurrence pattern, click Create Schedule. If not click Modify and change the settings as necessary. Note that if you schedule a recording with a recurrence pattern, the filenames shown on the following window are automatically appended with the date and time, for example: filename>d>t.
T To schedule a live broadcast: 1. 2. Select a schedule name, dates, and (optionally) recurrence pattern (see Scheduling an Event). For Schedule Type, select Live Broadcast and click Next . 3. In Select Video Source, choose one of the following and click Next . VBrick Select a live stream by VBrick name. Program Name Select a live stream by Program Name from all available. Enter Manually Enter an MPEG source. T To use a VBrick as the Video Source : 1. 2. Select VBrick as the Video Source.
Using the Scheduler 3. 4. Select the destination VBrick(s) or STB(s) that will receive the video and click Finish . Verify the information and click Create Schedule to add the new schedule to the calendar. T To use Enter Manually as the Video Source. 1. Select Enter Manually and click Next . 2. Enter the Schedule Start Options and click Next . The options vary as follows depending on the Source device type. Source MPEG-1, MPEG-2, or MPEG-4.
Connection Mode (MPEG-4 only) Enter the video source location to connect to using one of the following. No special characters are allowed. If you enter the IP Address or Hostname of a VBrick encoder managed by the Portal Server, the availability will be verified. • IP Address/Host Name – must include Slot number (if dual encoder/decoder) and Management Port. • URL – use VBHTTP or RTSP format. For example: vbhttp://MPEG4Unit1/vbs1d1.sdp rtsp://172.2.3.
Using the Scheduler 3. Select the source of the stored broadcast. It can be either a VBrick VBStar (with a hard drive) or a VOD server. Each has a different icon. This icon denotes a VOD Server with a specific IP address. Navigate through the file system to a source video on the VOD server. This icon denotes a named VBStar with a hard drive (MPEG-2 only). Navigate through the file system to a source MPEG-2 video on the VBStar. T To use a stored video on a VOD server: 1.
Conference Use these steps to create a video conference between two encoders/decoder pairs at different locations. This means that at the scheduled date and time a video conference will automatically be launched using two specified VBricks—one at each end. T To schedule a video conference: 1. 2. Select a schedule name, dates, and (optionally) recurrence pattern (see Scheduling an Event). For Schedule Type, select Conference and click Next . 3.
Using the Scheduler Record Use these steps to create a schedule that will initiate the recording of live content. This means that at the scheduled date and time the live content will be recorded, optionally ingested and FTPed, and made available on the Asset Library page to authorized users for viewing. T To schedule a recording: 1. Select a schedule name, dates, and (optionally) recurrence pattern (see Scheduling an Event). For Schedule Type, select Record and click Next . 2. 3.
VBrick The recording will be saved to an MPEG-2 or WM VBStar. Record to NVR T To use an NVR to save the recording: 1. Select NVR and click Next . Use the tabbed windows explained below to define specific attributes for the recording. Some of these attributes (e.g. Custom Fields and Links ) will be displayed on the Info page for the recording on the Asset Library page. Others (e.g. Expiration and Copyright ) are used solely for administrative purposes. General Filename Name of file to be recorded.
Using the Scheduler Field name Shown only if custom fields are defined by an administrator. Dropdown list Shown only if custom dropdown lists are defined by an administrator. Links Title Link title shown on the Info page for the recording. Web Page URL Actual web URL displayed when you click on the title. Expiration Expiration Date Shown if current user has copyright and expiration privileges. Content will expire after specified date in format: mm/dd/yyyy hh:mm AM.
2. Select a VBrick ServerName. This is the MPEG-2 or WM VBStar that will save the recording. Then click on the Advanced tab, and complete the following . Filename Filename of new recording. If you append >d or >t to filename, it will include the date and time in mmddyy and hhmm format. For example, if you enter the record filename as history>d>t.mpg , the recorded file will be history0608051105.mpg if the recording started at 11:05 AM on 06/08/05.
Using the Scheduler MPEG-1 Enter a Program Name or IP Address and Port number. MPEG-2 Enter a Program Name or IP Address and Port number. MPEG-4 Enter a Program Name or URL. If URL, use VBHTTP or RTSP in following format: vbhttp://MPEG4Unit1/vbs1d1.sdp rtsp://172.2.3.4/vbrickvideo1 WM 3. Enter a Program Name or URL. Select and define MPEG-1 , MPEG-2 , MPEG-4 , or WM as the record source and click Next .
4. 5. Use the tabbed windows to define specific attributes for the recording. These are the same fields described above in Record by Program Name. When done click Finish , then verify the information and click Create Schedule to add the new schedule to the calendar. Script Scripts and Script Devices are created by Portal Server administrators. Use the following steps to create a schedule that will execute a previously-defined script on a previously-defined script device such as a camera or a VCR.
Using the Scheduler special icon on the Live Broadcasts page indicates that you can control a stream from the device using a graphical control panel similar to the one shown here. This panel is displayed when you launch the stream and you can use it for supported functions like Start , Stop, Fast Forward , etc. T To schedule a control device: 1. 2. Select a schedule name, dates, and (optionally) recurrence pattern (see Scheduling an Event). For Schedule Type, select Control Device and click Next . 3.
4. 5. 50 Select the destination VBricks that will receive the video and click Finish . Verify the information and click Create Schedule to add the new schedule to the calendar. © 2007 VBrick Systems, Inc.
Chapter 4 Using the Remote Controllers Topics in this chapter Using the VB-PC Remote . . . . . . . . . . . . . . . . . . . . . . . . . . . . . . . . . . . . . . . . . . . . . . . . . . . 51 Using the Amino STB Remote . . . . . . . . . . . . . . . . . . . . . . . . . . . . . . . . . . . . . . . . . . . . . . . 52 Using the WM IPR Remote . . . . . . . . . . . . . . . . . . . . . . . . . . . . . . . . . . . . . . . . . . . . . . . . . .
Table 7. VB-PC Remote Control Functions† Button Function Live Stream Stored Stream Mute Mute volume X X Vol +, Vol - Adjust volume X X Play Start playback X X Pause Pause playback Stop Stop playback X X Full Screen Go full screen X X Fast-Forward Fast-Forward X Rewind Rewind stream X Record Record stream X X † Only the buttons listed here are operational on the VB-PC Remote control. Remember that your computer has the primary volume controls.
Using the Remote Controllers Table 8. Amino Remote Control Functions Button Function Power Power on/off. STB/TV † Press STB for normal operation to communicate with the STB. Use TV to communicate with the TV. 0–9 PIN entry only. Do not use to select channels. Left arrow Enter. Mute† † Not used. (Use volume controls on TV). AV Not used. Vol +/- † Not used. (Use volume controls on TV). CH +/- Increase/decrease channel number.
viewing the menu, click MENU again. Note that you must have a wireless keyboard in order to use the Search command. Table 9. Amino Menu Commands Command Description Search Search for live or stored content using text or keywords. You must have a wireless keyboard to use this function. Live Broadcasts View live streams (or rich media presentations) on the network. Video Library View pre-recorded content from VOD servers on the network.
Using the Remote Controllers Button Function Guide Got to fullscreen; exit fullscreen. Menu Toggle the Menu on or off in Portal Server mode. Vol Adjust the audio up or down. F1–F4 Reserved for future use. Page Move toward top or bottom of current page. Live Portal Server mode. Go to Live Broadcasts page. VOD Portal Server mode. Go to Asset Library page. Sched Display scheduled streams available for viewing. Search Portal Server mode. Display the search window.
56 © 2007 VBrick Systems, Inc.
VBrick Systems, Inc.