
Specifications


81 Implementation of a Low Cost Video Wall using Raspberry Pi devices
CHAPTER 9. VIDEO WALL CONTROL SYSTEM
Pipelines have been used all along this project: pipelines for emmiting and pipelines for
receiving video flows. A lot of testing has been done. Changes from one pipeline to
another, as well as verifying different scenarios.
Obviously, the future user of the implemented system wants the system to be very
simple and easy to use. It is not expected that the client will change from one pipeline
to another, as the different test cases explained in chapter 4.
Therefore, once the project is finished, how to provide a real case commercial scenario
will be the next step.
9.1. Control system description
In this case, it is thought that this project can be built in different small stores since a
2x2 videowall is the best approach for the project due to the quality when splitting. If a
Full HD video is divided into 4 screens, quality is still good enough.
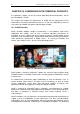
The idea is to provide freedom to the person in charge of the content of the VideoWall.
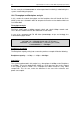
The following figure provides an idea of the scenario:
Figure 55. Commercial use scenario
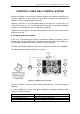
To make it simple, a control system has been implemented. Its functions will be the
following:
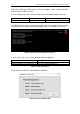
1. In the Raspberry Pi startup, three different pipelines contained in different Shells
scripts (.sh) will be executed:
Pipeline
Description
Information message
Clean the screen and print a welcome message
H.264 & WebCam receiver
Milestone 4 Pipeline (GStreamer)
H.264 & WebCamCropping receiver
Milestone 10 Pipeline (GStreamer)
Table 4. Initial Scripts in Raspberry Startup