Printed on 100% recycled paper. Printed in Japan 402520600 02.03-.
About The Manuals and Notations Used Types of Manual The documentation for your EPSON projector is divided into the following three manuals. The manuals cover the following topics. • User’s Guide (this manual) This Users Guide contains information on installing the projector, basic operation, using the projector menus, troubleshooting and maintenance.
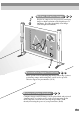
Unpacking the Projector When you unpack the projector, make sure that you have all these components. If any of the components are missing or incorrect, please contact the place of purchase. Projector Remote control (with lens cover attached by a cord) At the time of purchase, there is packing attached to the rear adjustable foot. Remove this packing before using the projector. (for the remote control) Power cord (3 m (9.8 ft.
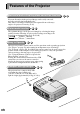
Features of the Projector Horizontal and vertical keystone correction function Keystone distortion in the projected image can be easily corrected, not only vertically but horizontally also. This allows even images which have been captured from a sideways angle to be projected correctly. (P. 44) Color mode function The optimum images can be projected simply by selecting the image quality from the following six pre-recorded settings according to the projection environment being used. (P.
Brilliant, Attractive Images Despite its compact size, the projector can display images at high resolutions with a high degree of luminance, providing beautifully clear images even in bright environments. 80 proje ctor 70 60 50 40 F 30 D 20 C 10 B 0 Jan A Feb Mar Jun Jul Presentation Support Functions Effect options such as indicating important points using a pointer, positioning stamps and drawing lines can be used to provide effective support for presentations. (P.
Contents Unpacking the Projector .......................................................................... 1 Features of the Projector......................................................................... 2 Before Using the Projector Part Names and Functions...................................................................... 8 Front/Top......................................................................................................................8 Control panel..................................
Adjusting the Image Size ...........................................................................................41 Adjusting the Image Angle ........................................................................................42 Correcting Keystone Distortion .................................................................................44 Adjusting the Image Quality .................................................................. 46 Focusing the Screen Image ....................................
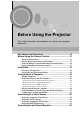
Before Using the Projector This chapter describes the procedures for setting up the projector before use. Part Names and Functions .................................................8 Before Using the Remote Control ....................................13 • • • • Inserting the Batteries ......................................................................... 13 Battery Replacement Period and Cautions ....................................... 13 Using the Remote Control and Remote Operating Range .............
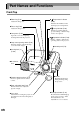
Part Names and Functions Front/Top • Zoom ring (P.41) • Adjusts the image size. • Focus ring (P.46) Adjusts the image focus. • • Lamp cover (P.94) Open this cover when replacing the lamp unit inside the projector. • Lamp cover opening switch (P.94) Slide this switch to unlock the lamp cover when removing it. • Security lock ( • Temperature indicator (P.80) Indicates abnormalities in the internal projector temperature. Lamp indicator (P.
Control panel • [Power] (P.37) • [Help] (P.78) Turns the projector power on and off. Displays the online help menu to assist you if you have a problem. • [Video] (P.38) • [Computer/YCbCr] (P.38) Switches the input source between the Computer 1 port and the Computer 2/Component Video port each time the button is pressed. • [Menu] (P.75) Displays or hides the menus. Switches the input source between the Video port and the S-Video port each time the button is pressed.
Part Names and Functions Rear • Audio Out port (P.34) Outputs the audio signal being input to the projector. * If a stereo mini jack is connected here, the sound stops coming out from the projector's built-in speaker. • Monitor Out port (P.28) Outputs the projected analog video signal from a computer to an external monitor. This is not available for digital video signals being input to the Computer 1 port or signals from other video sources. • Control (RS-232C) port (P.
Base • Front adjustable foot • Air filter (air inlet) (P.92, 97) Prevents dust and other foreign particles from being drawn into the projector. When replacing the lamp, replace the air filter also. • Suspension bracket fixing points (4 points) • Rear adjustable foot (P.16) Install the optional ceiling mount here when suspending the projector from the ceiling.
Part Names and Functions Remote control • Remote control transmitter (P.14) Outputs infrared remote control signals. • Indicator • [Power] (P.37) Lights when a remote control signal is being output. Turns the projector power on and off. • [↑]/[↓] (P.26) When the projector is connected to a computer using the accessory USB cable, these keys function in the same way as the [↑]/[↓] keys on the USB keyboard. • [Freeze] (P.54) Keeps the current computer or video image on the screen. • [A/V Mute] (P.
Before Using the Remote Control Inserting the Batteries The batteries are not inserted into the remote control at the time of purchase, and so you need to insert them before the remote control can be used. Procedure 1 Remove the battery compartment cover. While pushing the catch of the battery compartment cover, lift the cover up to remove it. 2 Insert the batteries. Make sure the polarities of the batteries are correct. 3 Replace the battery compartment cover.
Before Using the Remote Control Using the Remote Control and Remote Operating Range Using the Remote Control The remote control is used in the following way. Procedure 1 Set the R/C switch on the remote control to the ON position. 2 Point the remote control transmitter toward one of the remote control receivers on the projector and operate the remote control buttons.
Approx. ±30° horizontally Remote control receiver Approx. 30° Approx. 30° Approx. 10 m (30 ft.) Approx. 30° Approx. 30° Power A/V Mute Power Freeze A/V Mute E-Zoom Freeze E-Zoom Remote control transmitter Esc Menu Help Comp1 Comp2/YCbCr Esc Menu Help Comp1 Source Video Comp2/YCbCr Source S-Video Video S-Video Auto Resize Auto Resize P in P Preset P in P Preset Volume Volume Approx. ±15° vertically Approx. 15° Approx. 15° Approx. 15° Approx.
Installation Setting Up the Projector The projector supports the following four different projection methods, allowing you to choose the best method for displaying your images. When setting up the projector, be sure to first read the Safety Instructions/ World-Wide Warranty Terms for information on the safety precautions that must be observed at this time. • Front projection • Front/ceiling projection * A special method of installation is required in order to suspend the projector from the ceiling.
• Rear projection using a translucent screen • Rear/ceiling projection using a translucent screen * A special method of installation is required in order to suspend the projector from the ceiling. Please contact the place of purchase if you would like to use this installation method.
Installation Screen Size and Projection Distance The distance between the projector and the screen determines the actual image size. Recommended distance 0.9m – 12.4m (3.0 – 40.7 ft.) While referring to the table below, position the projector so that the image size is smaller than the screen size. Screen size (cm (ft.)) Approximate projection distance* (m (ft.)) 30” (61 × 46 (2.0 × 1.5)) 0.9 – 1.1 (3.0 – 3.6) 40” (81 × 61 (2.7 × 2.0)) 1.2 – 1.6 (3.9 – 5.2) 60” (120 × 90 (3.9 × 3.0)) 1.8 – 2.4 (5.
Connecting to a Computer Caution : When connecting the projector to a computer, be sure to check the following. • Turn off the power for both the projector and the computer before connecting them. If the power for either device is on at the time of connection, damage may result. • Check the shapes of the cable connectors and the device ports before making the connections.
Connecting to a Computer Projecting Images from the Computer The shape and specifications of the computer’s monitor port will determine which projector port and what type of cable should be used. Check the following to see which type of port your computer has. If the monitor port is a mini D-Sub 15-pin port Use the accessory computer cable to connect the Computer 2/Component Video port at the rear of the projector to the monitor port of the computer.
If the monitor port is a digital RGB connector If the computer has a standard DVI or DFP -compliant digital video card or video output port, use an optional digital video cable or DVI analog cable to connect the monitor port of the computer to the Computer 1 port at the rear of the projector. The type of connection cable used will vary depending on the specifications for the computer's monitor port. See “Appendix: Optional Accessories” (P.
Connecting to a Computer If the monitor port is a 5BNC port Use the optional computer cable to connect the Computer 2/Component Video port at the rear of the projector to the monitor port of the computer. See “Appendix: Optional Accessories” (P.100) To monitor port Computer cable (optional) To Computer 2/ Component Video port Tip : • After making the connections, change the Comp2/YCbCr Input setting in the Setting menu to Analog-RGB. (P.
If the monitor port is a 13w3 port Some workstation-type computers have a 13w3 monitor port. Use a commercially-available 13w3 ⇔ D-Sub 15-pin adapter cable to connect the Computer 2/Component Video port at the rear of the projector to the monitor port of the computer. To monitor port 13w3 cable (commercially-available) To Computer 2/ Component Video port Tip : • After making the connections, change the Comp2/YCbCr Input setting in the Setting menu to Analog-RGB. (P.
Connecting to a Computer Playing Sound from the Computer The projector has a single built-in speaker with a maximum output of 5W. You can use this built-in speaker to output the audio signals from a computer by using any one of the following three connection methods, depending on the shape of the computer's audio output port and the type of cable you have.
Tip : • After making the connections, change the Audio Input setting in the Audio menu to either Audio1, Audio2 or USB, depending on which input port you are using. (P.67) • You can also connect external speakers to the projector in order to reproduce the audio signals. (P.34) • The USB cable can only be connected to computers with a standard USB interface. If using a computer which is running Windows, the computer must have had a full version of Windows 98/2000/Me installed.
Connecting to a Computer Example of USB mouse connection To USB mouse port USB cable (accessory) To USB port * If you make a USB connection, you can use the [↑] and [↓] buttons on the remote control. These buttons can be used to scroll back and forth through pages when projecting a PowerPoint presentation. Tip : • The USB cable can only be connected to computers with a standard USB interface.
Once the connection has been made, the mouse pointer can be operated as follows. Moving the mouse pointer Press the edge of the button to move the mouse pointer in the direction of the edge pressed. The button can be tilted in any one of 16 directions. Left click Press the [Left] button.
Connecting to a Computer Connecting to an External Monitor Images can be viewed on an external computer monitor at the same time they are being projected by the projector. Use the cable provided with the computer monitor to connect the monitor to the Monitor Out port at the rear of the projector. Monitor port Cable provided with monitor To Monitor Out port Tip : • Digital RGB signals that are being input to the Computer 1 port cannot be output to an external monitor.
Connecting to a Video Source Caution : When connecting the projector to other video sources, take the following precautions. • Turn off the power for both the projector and the video source before connecting them. If the power for either device is on at the time of connection, damage may result. • Check the shapes of the cable connectors and the device ports before making the connections.
Connecting to a Video Source Projecting S-Video Images • Use a commercially-available S-Video cable to connect the video source to the S-Video port at the rear of the projector. • If you would like the sound to come out of the projector's built-in speaker, use the accessory A/V cable (red/white) to connect the video source to the Audio 2 port at the rear of the projector. Alternatively, use a commercially-available audio cable to connect the video source to the Audio 1 port at the rear of the projector.
Projecting Component Video Images • Use the optional component video cable to connect the video source to the Computer 2/Component Video port at the rear of the projector. See “Appendix: Optional Accessories” (P.100) • If you would like the sound to come out of the projector's built-in speaker, use the accessory A/V cable (red/white) to connect the video source to the Audio 2 port at the rear of the projector.
Connecting to a Video Source Projecting RGB Video Images RGB video is used when RGB signals that have copy protection added are input and projected. • Use the accessory computer cable to connect the video source to the Computer 2/Component Video port at the rear of the projector. Alternatively, use the optional DVI analog cable to connect the video source to the Computer 1 port at the rear of the projector. See “ Appendix: Optional Accessories” (P.
Tip : • RGB video is only compatible with sync-on-green signals. This can be checked by looking at SYNC Mode in the About menu. • After making the connections, change the Comp1 Input or Comp2 /YCbCr Input setting in the Setting menu to RGB Video. For separate sync (separate H-SYNC and V-SYNC) signals, set to Analog-RGB. (P.69) This can be checked by looking at SYNC Mode in the About menu.
Connecting to an External Speaker You can connect the projector's Audio Out port to speakers with a built-in amplifier in order to enjoy even fuller sound. Use a commercially-available audio cable with pin jack ⇔ stereo mini jack 3.5 mm (0.14 inches) plugs or similar. Use an audio cable with a connector that matches the port for the audio equipment.
Basic Operations This chapter describes basic operations such as turning projection on and off and adjusting the projected images. Turning On the Projector ..................................................36 • Connecting the Power Cord................................................................ 36 • Turning On the Power and Projecting Images.................................. 37 Turning Off the Projector ..................................................39 Adjusting the Screen Image ..................
Turning On the Projector Turn on the power to start projecting images. Be sure to read the separate Safety Instructions/World-Wide Warranty Terms and check the points that must be noted before using the projector to project images. Connecting the Power Cord Procedure 1 Check that the power is turned off for the projector and all components connected to the projector. 2 Connect the computer or other video source to the projector. (P.19, 29) 3 Remove the lens cover.
Turning On the Power and Projecting Images Procedure 1 Turn on the power for all equipment connected to the projector. For a video source, press the [Play] button at the video source to start playback if necessary. 2 Check that the operation indicator has stopped flashing and lights orange. Operation indicator lights orange 3 If using the remote control, set the R/C switch on the remote control to the ON position.
Turning On the Projector 6 If more than one signal source has been connected, use the remote control or control panel buttons to select the port which the signal source that you would like to use is connected to, while referring to the following table.
Turning Off the Projector Follow the procedure below to turn off the power of the projector. Procedure 1 Turn off the power for the signal sources that are connected to the projector. Check that the power for all connected components has been tuned off. 2 Press the [Power] button on either the remote control or the projector's control panel. The following confirmation message will appear.
Turning Off the Projector 5 Unplug the power cord from the electrical outlet. Caution : Do not disconnect the power cord from the outlet while the operation indicator is still flashing orange. If you disconnect the power cord while the indicator is still flashing, it may result in errors in projector operation and reduce the lamp unit operating life. 6 Set the R/C switch on the remote control to the OFF position.
Adjusting the Screen Image You can adjust the screen image in order to obtain the best possible picture. Adjusting the Image Size The size of the projected image is basically determined by the distance from the projector to the screen. (P.18) The following procedures explain how to adjust the screen image once the projector itself has been set up. Tip : The E-Zoom function lets you enlarge parts of the image. (P.56) Procedure Turn the zoom ring on the projector to adjust the image.
Adjusting the Screen Image Adjusting the Image Angle You can change the projection angle for the projector. The projector should be as perpendicular to the screen as possible. Seen from the side Seen from above You can extend or retract the front adjustable foot to adjust the projection angle within a maximum range of 12°. Procedure While pressing the foot adjust button, lift up the front of the projector so that the front adjustable foot can extend.
If the projector cannot be set up so that it is perpendicular to the screen, you can use the keystone correction function which is described on the following page to adjust the projected images if the angle of the projector is within a range of approximately 30° vertically or approximately 10° horizontally from the perpendicular. The values given here are for when the image is at the smallest zoom setting (telephoto).
Adjusting the Screen Image Correcting Keystone Distortion In some cases it may not be possible to set up the projector so that the setting angle is perpendicular to the position of the screen. In such cases, a type of distortion known as "keystone distortion" may appear in the projected images. If keystone distortion occurs, you can correct it using the [Keystone] buttons on the projector's control panel.
Tip : • When keystone correction is carried out, the projected image will become smaller. • Procedure to follow if using both horizontal and vertical keystone correction: 1. With the front adjustable foot retracted, set the projector so that it is fully horizontal. 2. Extend the front adjustable foot to adjust the angle as necessary. 3. Adjust the vertical keystone distortion until both sides of the picture are vertical. 4.
Adjusting the Image Quality The quality of the screen images can be adjusted as follows. Focusing the Screen Image Procedure Turn the focus ring to adjust the image focus. Turn the focus ring of the projector until the projected images are in proper focus. Tip : • If the surface of the lens is dirty or misted over as a result of condensation, it may not be possible to adjust the focus correctly. If this happens, clean or de-mist the lens. (P.
Tip : • The [Auto] button on the projector's control panel does not work while a menu or help screen is being displayed. To use the [Auto] button on the projector's control panel, you need to first exit the menu or help screen. Alternatively, you can use the [Auto] button on the remote control instead.
Adjusting the Image Quality Adjusting the synchronization If flickering, fuzziness or interference appear in images that are input from the computer, and this cannot be fixed using automatic adjustment, you will need to adjust the synchronization manually using the following projection. Procedure While holding down the [Shift] button on the projector's control panel, press the [Sync +] button. The synchronization value will increase by one setting each time the [Sync +] button is pressed.
Adjusting the Volume You can adjust the volume for the sound from the projector's internal speaker or from the external speakers that are connected to the projector. Procedure Press the [Volume , ] button on either the remote control or the projector's control panel. When the button is pressed to [ ], the volume increases, and when the button is pressed to [ ], the volume decreases. The volume gauge appears on the screen when the volume has been adjusted.
Advanced Operations This chapter describes functions for enhancing the projection of images, and how to use the setting menus. Functions for Enhancing Projection................................52 • List of Functions................................................................................... 52 • Function Details ................................................................................... 52 • • • • • • • A/V Mute ...............................................................................
Functions for Enhancing Projection This section describes the various useful functions that can be used to enhance projection. List of Functions The following functions are available for enhancing projection. Function Description Reference page A/V Mute Momentarily pauses both the image and the sound. P.52 Freeze Pauses only the projected image. P.54 Wide-screen Projection When projecting video images, changes the aspect ratio from 4:3 to 16:9 to view the images in wide screen format. P.
Procedure Press the [A/V Mute] button on either the remote control or the projector's control panel. The image and sound will then be paused. Press the [A/V Mute] button on either the remote control or the projector's control panel to continue normal projection.
Functions for Enhancing Projection Freeze This function pauses only the projected images. The sound keeps playing without pausing. Furthermore, for moving pictures, the playback signal continues to be input even while the picture is paused, so playback will not resume from the point from where it was paused. Procedure Press the [Freeze] button on the remote control. The images will then be paused. To continue projecting the images, either press the [Freeze] button again or press the [Esc] button.
Wide-screen Projection This function changes the aspect ratio of video images from 4:3 to 16:9 when video images are being projected. Images which have been recorded in digital video or onto DVDs can be viewed in 16:9 wide-screen format. In the case of HDTV , the central part of the image can be displayed in the whole of the screen. Procedure Press the [Resize] button on either the remote control or the projector's control panel. The image size will change each time the button is pressed.
Functions for Enhancing Projection E-Zoom This function lets you enlarge and reduce a part of projected images such as graphs and tables. Procedure 1 Press the [E-Zoom] button on the remote control. A cursor (cross) indicating the center point for the area to be enlarged will appear on the screen. Power A/V Mute Freeze E-Zoom Remote control 2 Move the cross to the area of the image that is to be enlarged or reduced. Tilt the button on the remote control to move the cross.
Tip : • The selected area can be enlarged to between 1 – 4 times, in 25 steps of x 0.125. • If a sub-screen has been set using the P in P function, the enlargement function is applied to both the main screen and the sub-screen. • Effect functions cannot be carried out while the E-Zoom function is being used. Furthermore, keystone correction, tracking adjustment and sync adjustment cannot be carried out using the projector’s control panel buttons.
Functions for Enhancing Projection Effects The [1], [2] and [3] buttons on the remote control can be used to add display effects to images that are being projected during a presentation. This can be used to emphasize particular parts of the images. Effect 1 [1] Pointer/ stamp An icon appears on the screen and it can be moved around like a pointer. In addition, the icon can be made to appear on the image as a stamp. Effect 2 [2] Spotlight Parts of the projected image can be spotlighted.
3 Tilt the button on the remote control up, down or to the left or right to move the item displayed around the screen. Effect 1: The pointer icon moves. Effect 2: The spotlight moves. Effect 3: Horizontal bars are moved vertically, and vertical bars are moved horizontally. 4 For effect 1, move the icon to the place where you would like it to be stamped, and then press the button. Tip : • Only one type of effect can be displayed at any one time.
Functions for Enhancing Projection Picture in Picture (P in P) This function lets you simultaneously display computer or component video images on the main screen and video images (Video or S-Video) in a subscreen. The video images in the sub-screen can be selected using the P in P command in the Setting menu. (P.70) Tip : • The P in P function cannot be used if the refresh rate for the computer images is set to interlaced.
The size of the sub-screen can be changed to one of five different sizes. The following values are the ratios for the vertical and horizontal lengths of the sub-screens to those of the main screen when the lengths of the main screen sides are 1. Size 1 Approx. 1/3.2 Size 2 Approx. 1/2.8 Size 3 Approx. 1/2.5 Size 4 Approx. 1/2.3 Size 5 Approx. 1/2.1 When the [P in P] button is pressed, the initial sub-screen appears in size 2.
Using the Projector Menu Functions The setting menus can be used to carry out a variety of settings and adjustments. The menus have a hierarchical structure, with a main menu that is divided into sub-menus, which are further divided into other sub-menus. Refer to “Using the Menus” (P.75) for details on using the menus. Main menu Sub-menu List of Functions Video menu • The functions in the Video menu cannot be adjusted while no video signal is being input.
Computer (Analog-RGB, Digital-RGB) Main menu Video Sub-menu Default setting Function Position (Analog-RGB only) Moves the image display position vertically and horizontally. • Press the button and make the adjustment using the display position adjustment screen which appears. Depends on connection Tracking (Analog-RGB only) Adjusts computer images when vertical stripes appear in the images. Depends on connection Sync.
Using the Projector Menu Functions Main menu Video Sub-menu Reset Default setting Function Resets all adjustment values for the Video menu functions to their default settings. • Press the button to display the confirmation screen, and select Yes. • Select Reset All to return all menu settings to their default settings. (P.74) - * If set to sRGB, the color temperature for the Color Adjustment command in the Advanced menu will be set to 6500K.
RGB-Video Component (YCbCr, YPbPr) S-Video,Video Video (RGB-Video, YCbCr, YPbPr, S-Video, Video) Main menu Video Sub-menu Function Default setting Position Moves the image display position vertically and horizontally. • Press the button and make the adjustment using the display position adjustment screen which appears. Depends on connection Brightness Adjusts the image brightness. Median value (0) Contrast Adjusts the difference between light and shade in the images.
Using the Projector Menu Functions Main menu Video Sub-menu Default setting Function Color Mode Corrects the vividness of the image color. The settings can be saved separately for each type of source (computer or video source). You can select from six different quality settings depending on the surroundings. : Images conform to the sRGB standard.* • sRGB • Normal : For presentation in bright rooms where brightness is emphasized.
Audio menu Main menu Audio Function Default setting Audio Input Sets the audio input port from Audio 1, Audio 2 or USB to match the current video source. Depends on connection Volume Adjusts the volume. 15 Treble Adjusts the treble setting. Median value (0) Bass Adjusts the bass setting. Median value (0) Reset Resets all adjustment values for the Audio menu functions to their default settings. • Press the button to display the confirmation screen, and select Yes.
Using the Projector Menu Functions Effect menu Main menu Effect 68 Sub-menu Function Pointer/Stamp Sets the three types of pointer icon which appear when the [1] button on the remote control is pressed from the eight available types, and sets the display ratio. • Press the button, and choose the setting from the Pointer/Stamp sub-menu which appears. • The pointer and stamp function can be used by pressing the [1] button on the remote control. (P.
Setting menu Main menu Setting Sub-menu Function Default setting V-Keystone Corrects vertical keystone distortion in images. • When keystone correction is carried out, the projected image will become smaller. • If using both horizontal and vertical keystone correction, first make the vertical correction and then make the horizontal correction in that order.
Using the Projector Menu Functions Main menu Setting 70 Sub-menu Default setting Function P in P Sets the input source for the sub-screen of the Picture in Picture function to either Composite Video or S-Video. • The Picture in Picture function can be used by pressing the [P in P] button. (P.60) Composite No-Signal Msg. Sets the message status and background color at times such as when no video signal is being input. • To change the user's logo, you need to record and set your own logo. (P.
User's Logo menu Main menu User's Logo Sub-menu Execute Function Records a user's logo. (P.98) • Press the button and follow the procedure appearing on the screen.
Using the Projector Menu Functions Advanced menu Main menu Advanced 72 Sub-menu Default setting Function Language Sets the language for message displays. • Press the button and select the language from the selection menu that appears. English Startup Screen Sets whether the startup screen is displayed or not. • To change the user's logo, you need to record and set your own logo. ON Color Adjustment Adjusts the color temperature and intensity of each RGB color in the image. Color Temp.
About menu • The About menu shows the setting details for the current video source. • The Lamp setting appears as 0H for 0 – 10 hours, after that, it appears in units of 1 hour. Computer Computer (Digital-RGB, Analog-RGB, RGB-Video, YCbCr, YPbPr) Main menu About Sub-menu Default setting Function Lamp Displays the cumulative lamp operating time. • When the lamp warning period is reached, the display characters appear in red. 0H Reset Lamp Timer Initializes the lamp operating time.
Using the Projector Menu Functions Video Video (S-Video, Video) Main menu About Sub-menu Default setting Function Lamp Displays the cumulative lamp operating time. • When the lamp warning period is reached, the display characters appear in red. 0H Reset Lamp Timer Initializes the lamp operating time. When this command is selected, the cumulative lamp operating time is reset to the initial default value. - Video Source Displays the input source which is currently being projected.
Using the Menus The menus can be operated using either the remote control or the projector's control panel. Procedure 1 Press the [Menu] button on either the remote control or the projector's control panel. The Main menu will be displayed. Computer/YCbCr Video Menu Auto Comp1 Tracking + Select a menu item. If using the control panel, press the [Sync +] or [Sync -] button. If using the remote control, press the top or bottom of the button. 3 Confirm the selection.
Using the Projector Menu Functions 5 Select a setting value. If using the control panel, press the [Tracking -] or [Tracking +] button. If using the remote control, press the left or right edge of the button. Tip : • Sub-menu items which cause another sub-menu to be displayed when they are selected have (Enter) after them. If you select such menu items and press the button, you can then change the settings in the next sub-menu which appears.
Appendices This chapter provides information on troubleshooting and maintenance procedures to ensure the best level of performance for the projector for a long time. Troubleshooting.................................................................78 • Using the Help ...................................................................................... 78 • When Having Some Trouble ............................................................... 80 • When the Indicators Provide No Help .......................
Troubleshooting This section describes how to identify problems and what to do if a problem is found. Using the Help If a problem occurs with the projector, the Help function uses on-screen displays to assist you in solving the problem. It uses a series of menus in a question and answer format. Procedure 1 Press the [Help] button on either the remote control or the projector's control panel. The Help menu will be displayed. Esc Power Help Computer/YCbCr Video 3 Select a menu item.
4 Repeat the operations in steps 2 and 3 to proceed through the menu to more detailed items. You can exit the Help menu at any time by pressing the [Help] button. Tip : If the Help function does not provide a solution to the problem, refer to "When Having Some Trouble" (P.80) or "When the Indicators Provide No Help" (P.83).
Troubleshooting When Having Some Trouble If you are having a problem with the projector, first check the projector's indicators. The projector is provided with the following three indicators. These indicators alert you to problems with projector operation. Operation indicator Lamp indicator Temperature indicator The following tables show what the indicators mean and how to remedy problems that they indicate.
Indicator status red red red red Projector status Problem and remedy Lamp operating error This can happen when the power cord was disconnected from the electrical outlet before the cool-down period had finished the last time the projector was turned off. When turning off the projector, wait 2 minutes. After about 2 minutes, the cooling fan will stop. When the cooling fan stops, disconnect the power plug and then re-insert it.
Troubleshooting Indicator status red orange Projector status High-speed cooling in progress Problem and remedy (This is not an abnormality, but if the temperature rises too high again, projection will stop automatically.) Reference page P.18 P.92 • Set the projector up in a place which is well-ventilated, and so that the air inlet and exhaust vents are clear. • Clean the air filter. orange Lamp will soon need to be replaced. Have a new replacement lamp ready.
When the Indicators Provide No Help If any of the following problems occur and the indicators do not offer a solution, refer to the pages given for each problem. • No images appear • Poor image quality • Only part of the image is displayed (Large/small) • Images appear dark (P.83, 84) (P.85, 86) (P.87) (P.87) • The image colors are not right • No sound can be heard • The remote control does not work • The power does not turn off (P.88) (P.89) (P.90) (P.
Troubleshooting No images appear (Messages do appear) • Check the mode which corresponds to the frequency of the image signals being output from the computer. Refer to the documentation provided with your computer for details on changing the resolution and frequency of the image signals being output from the computer. (P.106) "Not Supported" is displayed.
Poor image quality • Has the focus been adjusted correctly? (P.46) • Has the front adjustable foot been adjusted so that the image angle is too big? If the image angle is too big, the image will be out of focus vertically. (P.42) • The image is fuzzy • Part of the image is out of focus • The whole image is out of focus • Is the projector at the correct distance? The recommended distance from the projector to the screen is within 0.9 – 12.4 m (3.0 – 40.7 ft.).
Troubleshooting • Are the cables connected correctly? (P.19 – P.33) • Image is distorted • Image contains interference • Has the correct resolution been selected? Set the computer so that the signals that are output are compatible with this projector. Refer to the documentation provided with your computer for details on changing the settings. (P.106) • Have the synchronization , tracking and display position been adjusted correctly? Press the [Auto] button to adjust these settings.
Only part of the image is displayed (Large/small) • The [Resize] setting may not be selected correctly. Press the [Resize] button. (P.41, 55) • Has the Position setting been adjusted correctly? Use the Position command in the Video menu to adjust. (P.63) Only part of the image is displayed Small • Has the correct resolution been selected? Set the computer so that the signals that are output are compatible with this projector.
Troubleshooting The image colors are not right • Has the image brightness been adjusted correctly? Video - Brightness (P.63) • Are the cables connected correctly? (P.19 – P.33) • Has the image contrast Video - Contrast (P.63) been adjusted correctly? • Has the color been adjusted correctly? Video - Color Mode (P.
No sound can be heard • Is the audio source connected correctly? (P.24) • Has the correct audio input port been selected? Use the Audio Input command in the Audio menu to set the port for audio signal input. (P.67) • Is sound being output from the audio source? Check the volume for the audio source. • Has the volume been adjusted to the minimum setting? (P.49) • Has the A/V Mute function been turned on? The projector may be in A/V Mute mode.
Troubleshooting The remote control does not work • Is the R/C switch on the remote control set to the ON position? (P.14) Power Freeze A/V Mute E-Zoom Esc Menu Help Comp1 Comp2/YCbCr Source Video • Is the remote control being pointed in the right direction? The operating angle for the remote control is approximately ±30° horizontally and approximately ±15° vertically.
Maintenance This section describes maintenance tasks such as cleaning the projector and replacing consumable parts. Cleaning You should clean the projector if it becomes dirty or if the quality of projected images starts to deteriorate. Be sure to read the separate Safety Instructions/World-Wide Warranty Terms for details on safe handling of the projector during cleaning. Cleaning the Projector Case Clean the projector case by wiping it gently with a soft cloth.
Maintenance Cleaning the Air Filter If the air filter becomes clogged with dust, it can cause overheating and damage the projector. Stand up the projector in order to prevent dust getting inside the projector, and then use a vacuum cleaner to clean away the dust from the air filter. Tip : • If the air filter is difficult to clean or if it is broken, it should be replaced. Contact your dealer for a spare air filter. • Replacement lamps are provided with a spare air filter.
Replacing Consumables This section describes how to replace the lamp and the air filter. Lamp Replacement Period It is time to replace the lamp when: • The message "Lamp Replace" appears on the screen for 30 seconds when projection starts. A message will be displayed. • The lamp indicator flashes orange or lights red. Lamp indicator flashes orange or lights red • The projected image gets darker or starts to deteriorate.
Maintenance Replacing the Lamp Caution : If the lamp stops working and needs to be replaced, there is the danger that the lamp may break when handled. If replacing the lamp of a projector which has been installed to the ceiling, you should always assume that the lamp is broken and handle it with extreme care during removal. Furthermore, you should stand to the side of the projector, not underneath it.
4 Take out the lamp. Hold the lamp by the two recesses on the side to lift it up and out from the projector. 5 Install the new lamp. Hold the lamp so that it faces the correct way to fit into the projector, and then insert the lamp until it clicks into place and tighten the two fixing screws. 6 Install the lamp cover. Insert the two cover tabs into the projector, and then press the other side of the lamp cover until it clicks into place. Tip : • Install the lamp securely.
Maintenance Resetting the Lamp Operating Time The projector has a built-in counter which keeps track of the lamp operating time. When the cumulative operating time reaches a certain point, it causes the replacement warning message to be displayed. Therefore, the counter needs to be reset after the lamp has been replaced with a new one. You can do this using the projector menu. Procedure 1 Press the [Menu] button on either the remote control or the projector's control panel.
Replacing the Air Filter Procedure 1 Turn off the projector power, wait for the cool-down period to end, and then disconnect the power cord. The cool-down period lasts for about 2 minutes. The actual time will vary depending on the external air temperature. 2 Put your finger into the recess in the air filter hook, and lift up the air filter to remove it. In order to prevent any dust on the air filter from getting into the projector, be sure to stand up the projector so that the handle is at the top.
Saving a User's Logo You can record the image that is currently being projected as a user's logo. Procedure 1 Project the image that you would like to use as a user's logo, and then press the [Menu] button on the projector’s control panel or the remote control. 2 Select the User's Logo menu, and then press the button. Tip : If keystone correction has been carried out, it will be canceled when the User's Logo menu is selected. 3 Select Yes in the sub-menu, and then press the button.
5 Select Yes at the confirmation screen, and then press the button. 6 Select the zoom rate in the Zoom rate setting screen, and then press the button. 7 Select Yes at the confirmation screen, and then press the button. The image will then be saved. Once the image has been saved, the message "Saving the user's logo is completed." will be displayed. Tip : • Saving the user's logo may take a few moments (about 40 seconds).
Optional Accessories The following optional accessories are available for purchase if required. This list of optional accessories is current as of April 2002. Details of accessories are subject to change without notice. Hard travel case ELPKS26 Soft carrying case ELPKS27 Use this case if you need to carry the projector by hand. Digital video cable ELPKC21 (3 m (9.8 ft.) - for DVI-D/DFP 20-pin) DFP cable for connecting the projector to a computer with a digital RGB output interface.
Glossary Following is an explanation of some of the terms used in this guide which may be unfamiliar or which were not explained in the manual itself. Further information can be obtained by referring to other commercially-available publications. 5BNC A port used to input analog video signals. A/V Mute The momentary canceling of audio and video output. This projector has an [A/V Mute] button which you can press to momentarily stop the projection of pictures and sound.
Glossary 102 Interlaced scanning A method of image scanning whereby the signal bandwidth used is approximately half that required for sequential scanning when images with the same still picture resolution are broadcast. Refresh Rate The light-emitting element of a display maintains the same luminosity and color for an extremely short time. Because of this, the image must be scanned many times per second in order to refresh the light emitting element.
List of ESC/VP21 Commands Command List When a power ON command is sent to the projector, the power for the projector turns on. When the projector is in a command ready state, it returns the '3Ah' (:) code. Furthermore, when command processing is complete, the projector also returns a ":" code. The ":" code status can be used to determine whether the projector is ready or busy. If command processing terminates with an error, an error message is output and then the ":" code is sent.
List of ESC/VP21 Commands Communication protocol • Standard baud rate • Data length • Parity • Stop bit • Flow control : 9600 bps : 8 bits : None : 1 bit : Xon/Xoff USB Connection Setup This projector is controlled by ESC/VP21 commands, so if using a USB cable to connect the projector to a computer, you must carry out the following preparations beforehand. Procedure 104 1 Download the "EMP Link21L" utility software from the EPSON website.
Cable layouts Serial connection • Connector shape • Projector input connector : D-sub 9 pin (male) : Control (RS-232C) (PC serial cable) GND 5 5 GND RD 2 3 TD TD 3 2 RD Signal GND TD RD Function Signal wire ground Transmit data Receive data DTR 4 6 DSR DSR Data set ready DSR 6 4 DTR DTR Data terminal ready USB connection • Connector shape : USB (type B) 105
List of Supported Monitor Displays Signal Refresh rate (Hz) Resolution (dots) Resolutions for resized display Resolutions for (resizing ON) normal display (dots) (resizing OFF) (dots) EMP-820/811 EMP-600 PC98 640x400 1024x640 800x500 640x400 EGA 640x350 1024x560 800x438 640x350 640x480 1024x768 800x600 640x480 VGACGA VGA 60 640x400 1024x640 800x500 640x400 VGAEGA 640x350 1024x560 800x438 640x350 720x400 1024x568 800x444 720x400 720x350 1024x498 800x388 720x350 VESA 72/
Specifications Product name Multimedia projector EMP-820/811/600 Model EMP-810UG/800UG/600 Dimensions 348 (W) x 104 (H) x 274 (D) mm (13.7 (W) x 4.1 (H) x 10.8 (D) inches) (not including feet) Panel size 0.
Safety USA UL1950 3rd Edition Canada CSA C22.2 No.950 -95 (cUL) European Community The Low Voltage Directive (73/23/EEC) IEC60950 2nd Edition, +Amd.1, +Amd.2, +Amd.3, +Amd.
Appearance 104 114 348 33.4 187 73 R3.8 18 M4x10 274 136 103.2 23 12.8 44.3 33.7 16.7 97.2 46.8 116.5 90.
Index Buttons General Terms (Enter) button. . . . . . . . . . . . . . . . . . 12 13w3 cable. . . . . . . . . . . . . . . . . . . . . . . 23 [↑], [↓] buttons. . . . . . . . . . . . . . . . . 12, 26 13w3 connector . . . . . . . . . . . . . . . . . . . 23 [1]/[2]/[3] (Effect) buttons . . . . . . . . 12, 58 5BNC connector . . . . . . . . . . . . . . . . . . 22 [Auto] button . . . . . . . . . . . . . . . . 9, 12, 46 [A/V Mute] button . . . . . . . . . . . . 9, 12, 53 A [Comp1] button . . . . . . . . .
Color mode. . . . . . . . . . . . . . . . . . . . 63, 66 Focus ring. . . . . . . . . . . . . . . . . . . . . . 8, 46 Color temperature. . . . . . . . . . . . . . 73, 102 Foot adjust button. . . . . . . . . . . . . . . . . . . 8 COM port . . . . . . . . . . . . . . . . . . . . . . . . 72 Foot adjustment . . . . . . . . . . . . . . . . . . . 42 Comp1 input. . . . . . . . . . . . . . . . . . . . . . 70 Freeze function . . . . . . . . . . . . . . . . . . . 54 Comp2/YCbCr input . . . . . . . . . . . . .
Index Lens cleaning . . . . . . . . . . . . . . . . . . . . . 92 Projection angle. . . . . . . . . . . . . . . . . . . 42 Lens cover . . . . . . . . . . . . . . . . . . . . . . . . 8 Projection distance . . . . . . . . . . . . . . . . 18 List of Functions . . . . . . . . . . . . . . . 52, 62 Prompt . . . . . . . . . . . . . . . . . . . . . . . . . . 70 PS/2 mouse . . . . . . . . . . . . . . . . . . . . . . 25 M PS/2 mouse cable. . . . . . . . . . . . . . . . 1, 25 Main menu . . . . . . . . . . . .
sRGB . . . . . . . . . . . . . . . . . . . . . . . . 63, 66 Stamp . . . . . . . . . . . . . . . . . . . . . . . . 58, 68 Startup screen . . . . . . . . . . . . . . . . . . . . . 72 Storage temperature . . . . . . . . . . . . . . . 107 Sub-menu . . . . . . . . . . . . . . . . . . . . . . . . 62 Supported displays . . . . . . . . . . . . . . . . 106 Suspension bracket fixing point . . . . . . . 11 SYNC Mode. . . . . . . . . . . . . . . . . . . . . . 73 W Warranty. . . . . . . . . . . . . . . . . . . .
DECLARATION of CONFORMITY According to 47CFR, Part 2 and 15 Class B Personal Computers and Peripherals; and/or CPU Boards and Power Supplies used with Class B Personal Computers We Located at Tel :EPSON AMERICA, INC. :3840 Kilroy Airport Way MS: 3-13 Long Beach, CA 90806 :562-290-5254 Declare under sole responsibility that the product identified herein, complies with 47CFR Part 2 and 15 of the FCC rules as a Class B digital device.
FCC Compliance Statement For United States Users This equipment has been tested and found to comply with the limits for a Class B digital device, pursuant to Part 15 of the FCC Rules. These limits are designed to provide reasonable protection against harmful interference in a residential installation. This equipment generates, uses, and can radiate radio frequency energy and, if not installed and used in accordance with the instructions, may cause harmful interference to radio or television reception.
All rights reserved. No part of this publication may be reproduced, stored in a retrieval system, or transmitted in any form or by any means, electronic, mechanical, photocopying, recording, or otherwise, without the prior written permission of SEIKO EPSON CORPORATION. No patent liability is assumed with respect to the use of the information contained herein. Neither is any liability assumed for damages resulting from the use of the information contained herein.
Printed on 100% recycled paper. Printed in Japan 402520600 02.03-.