
User`s guide


30
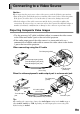
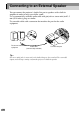
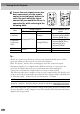
Projecting S-Video Images
• Use a commercially-available S-Video cable to connect the video source to
the S-Video port at the rear of the projector.
• If you would like the sound to come out of the projector's built-in speaker, use
the accessory A/V cable (red/white) to connect the video source to the Audio
2 port at the rear of the projector. Alternatively, use a commercially-available
audio cable to connect the video source to the Audio 1 port at the rear of the
projector. Use either method depending on the shape of the video source’s
audio output port and on the type of cable you have.
Tip :
After making the connections, change the Audio Input setting in the Audio menu to
either Audio1, Audio2 or USB, depending on which input port you are using. The
default setting is Audio2.
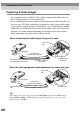
S-Video cable
(commercially-available)
To S-Video
port
A/V cable (white/red)
(accessory)
When connecting the audio output using an A/V cable
To video output
port
To audio output L port (white)
To audio output R port (red)
To Audio 2 port
(white/red)
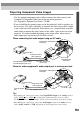
Audio cable (commercially-available)
To Audio 1 port
When the video equipment's audio output port is a stereo mini jack
To audio output
port
To video output
port
S-Video cable
(commercially-available)
To S-Video
port
Connecting to a Video Source