
User's Manual


tri2525b_ml_03_sd Approved: G.V. 9
Vecima Networks Inc.
2.0 INSTALLATION
2.1 Unpacking the Unit
Carefully remove the equipment from its packing material and set it on a solid surface, such as a table
or desk. If it appears damaged in any way, notify the carrier, and keep all packing materials for
inspection by the carrier’s agent.
2.2 Mounting the Unit
The following hardware is included in the box for mounting the brackets to the pole:
• 1 L-bracket (taped to one of the foam pieces inside the box)
• 1 pole catch
• 1 V-bolt
• 4 #10-32 flange locknuts for connecting L-bracket to cover
• 2 ¼ - 20 flange locknuts for connecting V-bolt and pole catch to the pole
The TRI2525B was designed for mounting on a pole with a diameter of 1.0” to 1.75”. Please ensure
that the pole used is attached securely to the building or other mounting location.
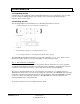
Step 1 – Attach L-Bracket to TRI2525B
Before the unit can be attached to the pole, the L-bracket must be attached in the correct orientation
according to the polarization required for the particular customer installation. Diagram 2.2A shows the
orientation of the bracket relative to the cover for both horizontal and vertical polarization.
The active or desired polarization is the one in which the arrow points up. For example, when the
TRI2525B is mounted on the pole, if the arrow pointing up on the back of the TRI2525B says “Horizontal
Polarization” then the horizontal polarization is the active polarization. When the TRI2525B is mounted
on the pole, if the arrow pointing up on the back of the TRI2525B says “Vertical Polarization”, the
vertical polarization is the active polarization
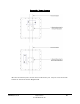
Secure the L-bracket to the cover using the #10-32 locknuts.