
System information


Programming Parameters for DSSI Devices
VAX 4000 Model 108 User Information
E-7
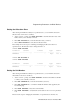
Setting the Allocation Class
After entering the DUP driver utility for a specified device, you can examine and set the
allocation class for the device as follows.
1. At the PARAMS> prompt, enter SHOW ALLCLASS to check the allocation class of the
ISE to which you are currently connected.
2. Enter SET ALLCLASS 2 (or enter the allocation class you desire).
3. Enter SHOW ALLCLASS to verify the new allocation class.
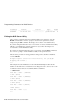
This example shows the steps for examining and changing the allocation class for a
specified device. The allocation class is changed from 0 to 2.
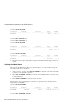
PARAMS>SHOW ALLCLASS
Parameter Current Default Type Radix
-------- ---------------- ---------------- -------- -----
ALLCLASS 0 0 Byte Dec B
PARAMS>SET ALLCLASS 2
PARAMS>SHOW ALLCLASS
Parameter Current Default Type Radix
--------- ---------------- --------------- -------- -----
ALLCLASS 2 0 Byte Dec B
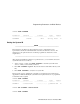
Setting the Unit Number
After entering the DUP driver utility for a specified device, you can examine and set the
unit number for the device as follows.
1. At the PARAMS> prompt, enter SHOW UNITNUM to check the unit number of the ISE
to which you are currently connected.
2. Enter SET UNITNUM 10 (or enter the unit number you desire).
3. Enter SET FORCEUNI 0 to override the default unit number value supplied by the
bus node ID plug.
4. Enter SHOW UNITNUM to verify the new unit number.
5. Enter SHOW FORCEUNI to verify that the current value for the FORCEUNI parameter
is 0.
This shows the steps for changing the unit number of a specified device from 0 to 10.