
User manual


5
Using Battery Power
• Open the battery cover (bottom of unit – see “Control and Function Guide,” page
2) and insert 9 dry cell “C” type batteries.
• Test by turning the TV ON before proceeding to general operation.
OPERATING THE TV
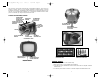
See the “Control and Function Guide” on page 2 to locate referenced controls, knobs
and selectors.
• Slide the TV/AM/FM/WEATHER Selector to the “TV” position.
• Slide the VHF-L/VHF-H/UHF TV Frequency Selector on the front of the unit (below
the TV screen) to choose the TV band.
• Turn the TV/Radio Channel Tuner and Fine Tuner Knobs to select the desired TV
channel.*
• Extend the Telescoping Antenna and adjust for best reception.
• Adjust the picture’s brightness, contrast and vertical hold (if necessary) using the
respective knobs on the back of the unit.
• Adjust the volume using the Volume Control Knob on the side of the unit.
• Insert earphones or headphones (not included) into the Earphone Jack for private
listening.
Note:
This unit was designed in accordance with North American Standards and may
not receive TV broadcasts in countries that have other broadcasting standards.
WARNING
Operation of a TV in a moving vehicle is not permitted if the driver can
view the screen while driving. Use this appliance in a responsible and
safe manner.
OPERATING THE AM/FM RADIO
See the “Control and Function Guide” on page 2 to locate referenced controls, knobs
and selectors.
• Slide the TV/AM/FM/WEATHER Selector to the desired frequency (the “AM” or
“FM” position).
• Turn the TV/Radio Tuner and Fine Tuner Dials to select the desired station.
• Extend the Telescoping Antenna and adjust for best reception.
• Adjust the volume using the Volume Control Knob on the side of the unit.
• Insert earphones or headphones (not included) into the Earphone Jack for private
listening.
OPERATING THE WEATHER RADIO
• Slide the TV/AM/FM/WEATHER Selector to the “WEATHER” position.
• With the ALERT pushbutton OFF, turn the TV/Radio Tuner and Fine Tuner Dials to
select the NOAA station with the strongest signal.
4
When no other power source is available, the Backup Power System consisting of
built-in rechargeable batteries allows the Radio, LED Emergency Light and Cell
Phone Charging Port to operate.
Note:
The TV can be powered by the 120 Volt AC and 12 Volt DC Adapters, as well as
“C” batteries. It cannot be powered by the Backup Power System.
CAUTIONS
Before first use, the unit’s rechargeable backup batteries should be
charged for a full 12 hours using the 120 Volt AC Adapter.
The rechargeable backup battery is not user-accessible.
The Backup Power System can
only
be used to power the Radio, LED
Emergency Light and Cell Phone Charging Port.
Charging/Recharging the Backup Power System
120 Volt AC Charging
You can watch TV or listen to the Radio while recharging the backup power batteries
using this method.
1. Plug the 120 Volt AC Adapter’s barrel connector into the 12 Volt DC Power/
Charging Outlet on the back of the unit.
2. Plug the 120 Volt AC Adapter’s plug into any standard 120 volt AC wall outlet.
3. Charge the backup power batteries for a full 12 hours before first use. Recharge
them regularly so the unit is always ready for emergency use.
Dynamo Hand Crank Charging
For ease of use, the crank handle can be “locked” into place. Flip the handle to
release and press it against the unit’s body to secure into position. Rotate the dynamo
crank handle clockwise (at a rate of approximately 1-2 rotations per second with all
functions turned OFF for best results) to generate power if battery power is low and
to recharge the backup power batteries.
Using the 120 Volt AC Power Adapter
• Plug the 120 Volt AC Adapter’s barrel connector into the 12 Volt DC Power/
Charging Outlet on the back of the unit.
• Plug the 120 Volt AC Adapter’s plug into a any standard 120 volt AC wall outlet.
• Test by turning the TV ON before proceeding to general operation.
Using the 12 Volt DC Adapter
• Plug the 12 Volt DC Adapter’s barrel connector into the 12 Volt DC Power/
Charging Outlet on the back of the unit.
• Insert the 12 Volt DC Adapter’s plug into the accessory outlet of your vehicle or
other 12 volt DC power source.
• Test by turning the TV ON before proceeding to general operation.
Note:
Always unplug the 12 Volt DC Adapter cord from your vehicle’s accessory
outlet BEFORE removing the plug from the unit.
VEC130B_Manual EN_030906 5/25/06 1:52 PM Page 4