User’s Guide
WARNING! NOTE! This manual is to be used with your scooter to improve your riding experience. Please read this manual completely before operating your scooter. If you should ever sell your scooter please pass this manual on to the new owner. Vectrix Corporation cannot be held responsible for any errors, omissions or mistakes associated with this manual.
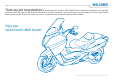
WELCOME! Thank you and congratulations for purchasing a Vectrix Electric MAXI-Scooter! You are helping the environment, and your daily commute as well! We hope that you enjoy the experience of the future in motion! If you need any repairs to your scooter or just want some friendly advice, please see your local service center. This manual is provided to help you get to know your Vectrix Scooter.
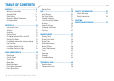
TABLE OF CONTENTS GENERAL .............................................. 5 Warranty Information 5 Symbol Guide 5 Safe Riding 6 Maximum Weight Allowance 7 VIN Information 9 CONTROLS ............................................ 10 Instrument Panel 11 Telltales 12 Switches 14 Setting Clock 14 Changing between Miles and KM 14 Setting Trip Meter 14 Dashboard information during charging 15 Key Function 16 Handlebar Switches Left 17 Handlebar Switches Right 18 MAIN COMPONENTS .............................
GENERAL WARRANTY Your Vectrix Electric MAXI-Scooter is warranted for forty-eight months through the Plug & Go Program. Standard warranty is twenty-four months. To maintain the warranty you must comply with the servicing requirements called out in the Vectrix Warranty Book. SYMBOLS CONTAINED IN THIS MANUAL: WARNING! When this symbol is shown it means that you must read this section.
SAFE RIDING In order to operate your scooter properly you must familiarize yourself with the scooter controls and movements. + ALWAYS ride with your license and insurance certificate in your possession. + You must ALWAYS wear your safety helmet. + ALWAYS hold both ends of the handlebar / handgrips. + ALWAYS remain seated while riding the scooter. Do not stand while riding. + ALWAYS obey state and local traffic laws.
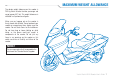
MAXIMUM WEIGHT ALLOWANCE The design weight allowance on the scooter is 250 Kg, which includes the rider, passenger and cargo (approx. 551 lbs). This weight allowance is reflected in all performance figures. Make sure any luggage put on the scooter is firmly placed and secured. Do not overload your scooter or arrange heavy items higher up on the scooter. Do not attach items to the handlebars. Do not have long or loose clothing on while riding, as the pieces could get caught in components of the scooter.
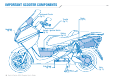
IMPORTANT SCOOTER COMPONENTS Instrument Cluster (Pg 11) Throttle (Pg 17) Headlight (Pg 36) Keylock / Ignition Switch (Pg 15) Side Stand (Pg 19) 8 Vectrix Electric MAXI-Scooter User’s Guide Trunk (Pg 20) Battery (Pg 24) Motor (Pg 23)
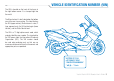
VEHICLE IDENTIFICATION NUMBER (VIN) The VIN is located on the back of the frame in the right bottom corner. It is stamped right into the metal. The Manufacturer’s Label is located on the bottom rear of the rear frame casting. This label displays the VIN (upper section), Manufacturer’s name, 2 type approval mark, the VIN printed again (lower section), and the Static Sound Level. The VIN is a 17 digit alphanumeric code, which uniquely identifies your scooter.
CONTROLS WARNING! In order to properly run your vehicle you must read and understand this section of the manual. It will help you get more familiar with your scooter.
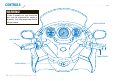
INSTRUMENT PANEL Fig 1.
INSTRUMENT PANEL FIG 1 ILLUSTRATES WHERE ITEMS 1–30 ARE LOCATED 1. TRIP AB INDICATOR This indicator allows the user to keep track of two trips: tripA and tripB. 2. ODOMETER INDICATOR The odometer indicator allows the user to keep track of the total mileage. 3. ODOMETER OR TRIP AB READING Shows number of miles or kilometers scooter has gone in the selected trip. 4. ESTIMATED RANGE READING Displays number of miles or kilometers that are estimated to be available from the last charge. 5.
INSTRUMENT PANEL 17. HIGH TEMP TELLTALE This will illuminate in red when the battery or key system components exceed safe temperature operation. WARNING! The scooter will not operate if the High Temp Telltale is illuminated. 18. SIDE/CENTER STAND TELLTALE An amber light will illuminate if the side or center stands are down or lowered. WARNING! Do not operate scooter when the side or center stands are in the down or lowered position.
SWITCH ASSEMBLY AND FUNCTIONS A1. KM/H – MPH SELECTOR This allows you to switch between kilometers and miles. The pushbutton is labeled “K/M” Simply push the button to switch to the desired measurement. Your desired measurement will be illuminated on the left LCD screen. NOTE! The default setting is kilometers. A2. TRIP A-B ODOMETER SELECTOR Labeled as an “S” on the switch assembly, it allows you to scroll through Trip A, Trip B, and the normal odometer settings.
SWITCH ASSEMBLY AND FUNCTIONS DASHBOARD INFORMATION DURING CHARGING During charging the following information is displayed on the dash. In the center of the dash, the charge current is displayed on the speedometer where each 10 k/h equals 1 amp charge current. For example a reading of 100 k/h equals 10 amps. Underneath the speedometer, in the odometer field, two things are displayed.
KEY Only one key is needed to start your scooter, get into the storage area, open your glove compartment, and lock your bike. The ignition switch is located in the center of the scooter in front of the stepthrough. The ignition features a number of positions that allow you to lock and unlock areas on the scooter. 4. GLOVE BOX In this position you will be able to pop open the glove box. To lock the glove box simply shut the door and it will automatically lock itself.
HANDLEBAR SWITCHES LEFT 1. MAIN/DIPPED BEAM SWITCH This switch allows the user to switch from high to low beam. Push up to select low beam to high beam, or push down to select high beam to low beam. 2. MAIN-BEAM PASS SWITCH This switch is used to let other drivers know that you are passing. Pulse the switch to flash your beams. The switch is located on the backside of the handlebar. 3.
HANDLEBAR SWITCHES RIGHT 1. THROTTLE/REGEN POSITION The throttle in the right handlebar is a distinctive feature of your Vectric Electric MAXIScooter. The throttle is the user interface, which determines forward motion as well as implementing regenerative braking and the reverse feature. This bi-directional throttle is very simple to use. + Roll the throttle downward (rearward) to accelerate in the forward direction.
MAIN COMPONENTS Rear View Mirrors Rear Shock Absorber Charging Cord Headlight Glove Box Battery Pack Side Stand Center Stand (optional) Brushless Motor Vectrix Electric MAXI-Scooter User’s Guide 19
SIDE AND CENTER STANDS SIDE STAND The side stand is located on the left side of the scooter. To lower the stand, push down on the side stand bar, which protrudes out from the side stand. Park on level hard surfaces. Avoid parking on hills, or unstable ground. To put the stand back up tilt the scooter to the right and lift the side stand bar with your foot. WARNING! Do not sit on the scooter while the stand is down.
STORAGE COMPARTMENTS UNDER SEAT HELMET STORAGE The scooter has a hidden storage area for your helmet located under the passenger seat. Your key controls the lock to the under seat storage compartment. Your key will open your glove box by turning the key to the glove box position. OPENING TRUNK Turn your key to the “Trunk” position while off of the seat to open the trunk area. The passenger seat will lift up. Pull the seat upward to get it off of the latch.
MOTOR CONTROLLER The motor controller is the “brain” of the scooter and provides the interface between the battery pack and the motor. The design uses a single circuit board for power system interconnections as well as control components and onboard power supplies. The motor controller incorporates Digital Signal Processing (DSP) technology as part of the proprietary Electronic Control System (ECS) which provides the flexibility to incorporate additional features as required.
REAR SHOCK ABSORBERS Your scooter is equipped with dual rear shock absorbers to enhance your riding experience. You should periodically inspect the exterior of the shocks for signs of fluid leakage. If a leak is indicated see your service agent at your earliest convenience.
REAR WHEEL DRIVE PLANETARY GEARBOX The single stage planetary gearbox is permanently sealed and lubricated. To vent the gearbox there is a small vent cap located on the topside of the motor side swingarm centered on the motor. This vent should be kept clean of dirt and debris. Motor / Gearbox Vent Cap BRUSHLESS DC MOTOR The brushless DC motor is mounted in the motor side swingarm with its shaft connected to the gearbox in the rear wheel. There is no need for the consumer to remove the motor cover.
BATTERY PACK DESCRIPTION OF BATTERY PACK The proper care of your battery pack is essential for maximum scooter performance. The battery has a nominal bus voltage of 125 volts DC which, if not respected, could result in serious injury. Only an authorized service agent is qualified to have access to the battery pack. The battery pack is connected to the motor controller with a 125 amp fuse. This fuse is only accessible to qualified service technicians.
USE WARNING! This scooter is designed for a top speed of 62 mph (100 km/h). Going over 100 km/h could cause damage to your scooter. You should avoid braking suddenly. Quick braking can cause you to become unstable and lose control of your scooter especially on loose pavement and/or wet road surfaces. INITIAL STARTUP For maximum performance from the battery pack the scooter needs to experience 5 initial charge / deep discharge cycles.
PRE-RIDE CHECKS WARNING! For safety reasons it is extremely important that you read and understand this section. Failure to perform these pre-ride checks could result in serious injury or death. CHARGE LEVEL Look at the charge level on the right LCD module. If it is in the lower part we suggest you recharge before use. STANDS UP Make sure both the side stand and center stand (if applicable) are up (retracted).
INITIAL USE OF THE SCOOTER With any new vehicle you must first get use to the feel of the vehicle before driving in any dangerous conditions. Bad weather can cause even an experienced driver to get into an accident. You should use caution at all times while riding your scooter. For maximum performance from the battery pack the scooter needs to experience 5 initial charge / deep discharge cycles. These cycles allow the battery to become fully conditioned and able to perform as designed.
BRAKING The Vectrix scooter includes a patented regenerative braking throttle which is easy to use and will improve your riding experience. In the regen mode the motor acts as a generator to apply a load/braking to the rear wheel while dumping energy into the battery pack. Once you become familiar with the regen braking action we encourage you to use it as your primary means of normal braking.
REVERSE FEATURE Your Vectrix Scooter has the ability to reverse at very low speeds to assist you with maneuvers such as backing out of parking spots. Reverse is only enabled when the scooter is completely stopped. To activate reverse from the stop position, roll the throttle forward (regen direction). The scooter will reverse at a slow speed limit of 1 km/h. Release the throttle and the reverse drive ceases.
CHARGING THE BATTERY The Vectrix Scooter includes a 2.4 meter (8ft) charging cord which is located in the trunk under the passenger seat. The male connector on the charging cord is specific to the country of use. For instance in Italy the plug consists of a 4 conductor assembly. This accommodates “hot”, “neutral”, “ground” and a “pilot” pin. In this case the pilot pin is used by the AC power source (charging station) to detect the presence of the scooter which in turn enables the stationary power outlet.
PARKING THE VEHICLE + Stop the scooter and put either the side or center stand down for support. + Turn the handlebar all the way to the left and block it there by turning the key to the “lock” position. + Park the scooter in a visible area to other motorists. + Never park on soft earth. WARNING! The use of padlocks that prevent motion is very dangerous and can effect the operation of the scooter. If you use a padlock to secure your scooter the padlock must be removed before operating the scooter.
MAINTENANCE Although your Vectrix Electric Scooter requires little maintenance, it is important that you read and follow closely the maintenance items identified on the following pages. WARNING! If you are unsure of the problem with your scooter take it to a service center to get it checked out.
BATTERY PACK If your Battery malfunction light comes on get your scooter checked out at a service center. If you notice any discharge coming from your scooter take it to a service center to get the system checked. WARNING! The Battery Pack is rated at 125 Volts, 30 Amp hours. Contact with the terminals of the Battery Pack can result in injury or death. The onboard smart battery charger monitors the status/condition of the Battery Pack during normal operation as well as charging.
CHECKING BRAKE FLUID LEVEL Your brake fluid should never go below the MIN mark on the reservoir. Air can enter the reservoir if the fluid level is below MIN. This could cause problems in your scooter’s system. Brake fluid should always be topped off and changed on a routine basis. The brake fluid reservoirs are located on the handlebar assembly. It is recommended that the brake lines be changed every four years.
CHECKING BRAKE PADS FOR WEAR FRONT BRAKE Brake pads have a wear mark. If the grooves in the friction material are visible, the pad is not worn. REAR BRAKE The rear brake pad material should be at least 1mm thick for effectiveness. NOTE! See your service agent for brake replacement.
BULB REPLACEMENT WARNING! Do not change bulbs immediately after running your scooter. Let the lights cool off. Bulbs become hot when the scooter is running, and need proper time to cool off. Hot bulbs can cause severe burns if handled. HEADLIGHT To replace the headlight bulb you will need to work behind the headlight fairing. Remove the connector from the bulb. Pull the tab to remove the protective cap. Release the clip that holds the bulb in place and take the bulb out of the socket.
BEAM SETTING The scooter must be in an upright position to check the beam setting. Make sure that the tires are at the proper inflation and have one person sitting on the scooter. Place the scooter opposite a wall about 10 meters from it. Draw a horizontal line dictated by the headlight center, and a vertical one in line with the scooter axis. It is better to perform this test in dim light. Switch on the low beam.
FUSES WARNING! Any and all fuses need to be serviced by your service agent. Do not attempt to change these fuses, or you will cause injury or death to yourself and others. The fuse protection scheme for your Vectrix scooter limits access to the fuses to an authorized service technician. You should not attempt to change any fuse on your scooter.
TIRES PROPER PRESSURE FOR YOUR FRONT AND REAR TIRE Tire pressure changes with the temperature and by altitude. You should check the pressure on your tires often to ensure a safe ride. The front tire should be at 32 psi (2.2 bar) and the rear wheel should be 40 psi (2.8 bar). If you find that the pressure in your tire is always low and quickly changes from high to low after being filled with air, see your service agent to inspect the tire. TO REPLACE THE FRONT TIRE....
TIRES TO REPLACE THE REAR TIRE.... • Make sure that the scooter is turned “off”. • Raise the scooter up on its center stand on a firm, level surface such that the rear tire is off of the surface. • Remove the rear brake caliper from the brake side swingarm. • Remove nut, flat washer, and lock washer from the brake side of the rear axle. • Remove the four (4) nuts and washers which fasten the brake side swingarm to motorside swingarm near the pivot point. • Move the brakeside swingarm out of the way.
CLEANING As with any vehicle it is important that you wash it on a regular basis to keep the finish in good condition. Never use harsh detergents on your scooter. Try to find cleaners that are safe for your vehicle and that are environment friendly. When cleaning you should avoid using a pressure washer or high pressure water unit. These units could damage your scooter. When drying your scooter always use clean cloths. Dirty cloths can cause scratches on your scooter. Clean cloths will minimize scratching.
STORAGE OF YOUR SCOOTER If you were planning on not riding your scooter for a long time then it would be best to follow these procedures: + Clean the scooter, and allow it to dry before storing. + Place the scooter on a service stand. + Check the scooter for any problems every few weeks. + A cover protects the scooter from the elements, and is a good investment.
TROUBLESHOOTING All of our scooters are carefully inspected before they are delivered to the customer. Even after scooters are inspected some technical problems can occur. The following chart offers a guide for you to identify a problem, and if possible fix it yourself. If you are unable to solve a problem with your scooter you should take it to a service agent at your convenience.
SPECIFICATIONS VECTRIX ELECTRIC MAXI-SCOOTER WARRANTY: Standard is twenty-four months. Plug and Go Pack has a forty-eight month warranty. EMISSIONS: Zero WEIGHT: 495 lbs (225 kg) SEAT HEIGHT: 30.
PERFORMANCE DATA MAX SPEED: 62 mph/100 km/h ACCELERATION: 0-50 mph (80 km/h) in 6.
SAFETY SAFETY RULES AND REGULATIONS Traffic rules and regulations vary from jurisdiction to jurisdiction. Please become aware of those regulations before riding your scooter. your head and brain. It is recommended that you wear above ankle boots, and eye goggles when not wearing a full helmet. Without eye protection wind and debris could get into your eyes and cause an accident. SAFE RIDING These safety tips are useful and may save your life in case of a potential accident.
LABEL LOCATIONS The following pages (47-48) display the locations of safety labels, and the labels themselves.
DANGER WARNING High Voltage Inside / Alkaline Electrolyte To avoid injuries, burns or electric shocks: • Never disassemble this battery unit or remove its covers. - Service by Qualified Personnel• Avoid contact of alkaline electrolyte with eyes, skin, or clothes. in event of accident, flush with water and get medical help immediately. • Keep children away from this unit.
FOR USA VERSIONS ONLY SAFETY DEFECTS Contact the (NHTSA) National Highway Traffic Safety Administration if you believe that this vehicle has a defect that could cause an accident injury or death. Also contact Vectrix Corporation immediately. If the NHTSA receives multiple complaints it could lead to an investigation. The NHTSA may opt to recall vehicles if they see a safety threat. The NHTSA cannot deal with individual problems with dealerships or Vectrix Corporation.
ROUTINE MAINTENANCE RECORD DATE OF SERVICE MILEAGE SERVICE DESCRIPTION COMMENTS Vectrix Electric MAXI-Scooter User’s Guide 51
VECTRIX CORPORATION 11, Touro Street, Suite 201 Newport, RI 02840 USA Phone: +1 401 848 9993 Fax: +1 401 848 9994 www.vectrix.