
User Manual


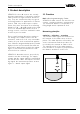


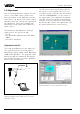
Table Of Contents
- Contents
- Safety information
- Note Ex area
- Quick start
- Quick start with the PC
- Quick start with adjustment module MINICOM
- 1 Product description
- 1.1 Function
- 1.2 Application features
- 1.3 Adjustment
- 1.4 Antennas
- 2 Types and versions
- 2.1 Survey
- 2.2 Configuration of measuring systems
- 3 Technical data
- 3.1 Technical data
- 3.2 Approvals
- 3.3 Dimensions
- 4 Mounting and installation
- 4.1 General installation instructions
- 4.2 Measurement of liquids
- 4.3 Measurement in standpipe (surge or bypass tube)
- 4.4 False echoes
- 4.5 Common installation mistakes
- 5 Electrical connection
- 5.1 Connection and connection cable
- 5.2 Connection of the sensor
- 5.3 Connection of the external indicating instrument VEGADIS 50
- 6 Setup
- 6.1 Adjustment methods
- 6.2 Adjustment with PC
- 6.3 Adjustment with adjustment module MINICOM
- 6.4 Adjustment with HART® handheld
- 7.2 Error codes
- 7 Diagnostics
- 7.1 Simulation

4 VEGAPULS 42 and 44 – 4 … 20 mA
Quick start
Quick start
In the majority of applications, the radar sen-
sor displays the distance to the product
surface immediately after the power supply is
switched on. You only have to carry out the
empty and full adjustment so that at your
required empty and full distances, 4 mA and
20 mA, respectively, are outputted.
However, it is always useful, especially under
difficult measurement conditions (process
tanks, stirrers, filling stream, vessel installa-
tions), to carry out a sensor optimisation, see
chapter "6 Setup“.
Quick start with the PC
Configuration
Start the adjustment software VVO ³2.60 with
the user level "
Planning
“.
• Click to …
… and enter a name for the measurement
loop.
• Choose under "
Application
“ e.g. "
Level
“.
• Confirm with "
OK
“.
Adjustment
• Click to "
Instrument data/Parameter adjust-
ment
“.
• Click in the window "
Adjustment
“ to "
Min/
Max adjustment
and choose "
no (adjust-
ment without medium
)
“ in the following
window „
Min/Max adjustment
“.
• Click to „
OK
“.
• Enter the distance of the sensor to the
product surface at 0 % (empty) and at
100 % (full) in meters.
• Activate the two boxes "
Carry out adjust-
ment
and click to „
OK
“.
You are again in the window "
Adjustment
“.
• Click in the window "
Adjustment
“ to "
Quit
“.
The sensor will now output at the adjusted
empty distance 4 mA and at the full distance
20 mA. In the example, the sensor calibrates
the span of 5.85 m to 1.27 m
to the signal range of 4 … 20 mA.
• Then click to "
Adjustment
“.