International Language Index ENGLISH ____________________________________________________ 3 ITALIANO ____________________________________________________ 14 DEUTSCH ____________________________________________________ 25 FRANCAIS ____________________________________________________ 36 ESPANOL 47 ____________________________________________________
English Introduction Thankyou for purchasing the Veho MUVI micro DV camcorder. At Veho we like to do things differently. We supply products that make a statement and stand out from the crowd. Boring is bad and run of the mill is not in our dictionary. All our products are manufactured to the highest standard and conform to worldwide safety standards. The MUVI unique micro design enables digital video recording in situations where it may not be possible to use standard camcorders.
English MUVI micro DV Product Contents 1 1 1 1 1 1 1 1 x x x x x x x x veho MUVI micro DV camcorder micro SD card USB Cable MUVI webcam software MUVI spring mounting clip MUVI neck chain MUVI carrying pouch MUVI users manual MUVI micro DV Extreme sports Product Contents 1 1 1 1 1 1 1 2 3 x x x x x x x x x MUVI additional spring mounting clip mounting bracket for bike/helmet magnetic mounting bracket for wall MUVI silicon protective sleeve MUVI arm strap MUVI head/helmet strap mounting bracket velcro m
English Veho MUVI Overview hanging ring power switch sound activation switch micro SD card slot record mini USB jack LED indicator 5
English Veho MUVI Operation 1. Charge your Veho MUVI by connecting the USB cable to your PC/Mac/Notebook or using an (optional) Veho USB Adapter and the mini USB jack on the base of the MUVI. While charging the MUVI LED indicator will display red. Once fully charged the red LED indicator will turn off. 2. Insert the micro SD card into the slot on the right side of the MUVI. 3. Power the MUVI on by the switch on the left hand side of the MUVI.
English Veho MUVI Operation (cont) 7. To use sound activation mode move sound activation switch on right hand side MUVI to on and power switch on left hand side to on. When MUVI recognizes sound of more than 65 decibels it starts recording. If MUVI recognizes no further sound greater than 65 decibel for 2 minutes it will save MUVI files and enter standby mode. When in standby if sound of greater than 65 decibels is recognized again the MUVI will enter recording mode again. 8.
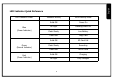
English LED Indicator Quick Reference LED Indicator Colour Blue (Power Indicator) Green (Record Indicator) Red (Power Indicator) Indicator Activity MUVI Activity Mode Solid ON Power On No Light Standby/Power Off Flash Slowly Low Battery Flash Fast Copy Data Solid ON SD Card Full Flash Slowly Recording Flash Fast No SD Card Solid ON Charging No Light Fully Charged 8
English Setting MUVI Pro Date and Time Software Installation 1. Insert disc and select 'Driver installation' 2. Select 'Create Desktop Shortcut' or 'Add to Start Menu' - must select one or both otherwise you can't access MD Playback and Set Time 3. Select 'English', then next for all options until final window and then select 'Install' and then 'Finish' Setting Date and Time 1. With Muvi Pro connected Double click 'Set Time' short cut on desktop or select from Start Menu 2. 'Update Time' box appears. 3.
English Using the MUVI as a Webcam/PC Camera As well as micro recording device it is possible to use the MUVI micro DV camcorder as a webcam/PC camera. Please use the following instructions. 1. Install the MUVI camera drivers from the software CD supplied. 2. Connect the MUVI to the PC using the USB cable provided. 3. Switch MUVI power switch to on and sound activation switch to on. 4. The PC will recognize the MUVI as a PC camera now.
English MUVI Specifications Pixels 2 Mega Pixels Color CMOS Viewing Angle 72 degrees Minimum Illumination 1 lux (min) Battery Capacity 260mAH Usage Time (full charge) 3 hours Standby Time (sound trigger) 250 hours Operating Temp Limit -10º to 60º C Store Temp Limit -10º to 70º C Operating Humidity 15-85%RH Memory Medium Micro SD Card SD Capability USB Support Max 8Gb Micro SD Video decode using motion JPEG, Recording to AVI format VGA (640x480 @ up to 30fps) USB 1.1/2.
English Safety Approval Information Your Veho MUVI meets the requirements of FCC and CE, and is granted the FCC and CE certification. It is authorized to bear the FCC and CE mark. This product has been tested and found to comply with the limits for a Class B digital device, pursuant to Part 15 of the FCC rules. These limits are designed to provide reasonable protection against harmful interference in a residential installation.
English Customer Support To contact Veho for technical support and software downloads please visit our support page here : http://www.veho-uk.com/support.aspx For non technical questions about the MUVI please email Veho on : MUVI@veho-uk.com For general information about other Veho products visit : www.veho-uk.com For general questions about other Veho products email Veho on : info@veho-uk.
Introduzione Alla Veho amiamo fare le cose in maniera diversa. Forniamo prodotti che non si confondono tra la folla. La noia non la concepiamo e le cose ordinarie non sono nel nostro stile. Tutti i nostri prodotti sono fabbricati secondo gli standard più elevati e sono conformi agli standard di sicurezza mondiali. L'esclusivo design della micro MUVI consente la registrazione video digitale in situazioni in cui non potrebbe essere possibile utilizzare le camcorder standard.
Contenuto del prodotto MUVI micro DV x x x x x x x x x veho MUVI micro DV camcorder scheda micro SD caricatore MUVI cavo USB software per webcam MUVI gancio di montaggio a molle MUVI tracolla MUVI tasca da trasporto MUVI manuale dell'utente MUVI Italiano 1 1 1 1 1 1 1 1 1 MUVI micro DV Extreme sports Product Contents 1 1 1 1 1 1 1 2 3 x x x x x x x x x gancio da montaggio a molle aggiuntivo MUVI staffa da montaggio per bici /casco staffa da montaggio magnetica per parete fodero protettivo in silicone
anello di aggancio interruttore di accensione interruttore di attivazione slot scheda SD pulsante di registrazione jack mini USB indicatore LED 16 Italiano Panoramica su Veho MUVI
1. Caricate Veho MUVI collegando il caricatore di alimentazione mini USB o il cavo USB al PC e il jack mini USB sulla base di MUVI. Mentre è in carica l'indicatore LED su MUVI si illumina di rosso. Una volta caricata completamente il LED si spegne. 2. Inserite la scheda micro SD nello slot sul lato destro di MUVI. 3. Accendete MUVI premendo l'interruttore sul lato sinistro di MUVI. Se non è stata inserita alcuna scheda micro SD l'indicatore LED verde lampeggerà rapidamente.
7. Per utilizzare la modalità di attivazione dell'audio, spostate il relativo interruttore collocato sul lato destro di MUVI, su ON e fate lo stesso con l'interruttore di alimentazione presente sul lato sinistro. Quando MUVI riconosce un audio superiore a 65 decibel avvia la registrazione. Se MUVI per 2 minuti non rileva un audio superiore ai 65 decibel salverà i file MUVI ed entrerà in modalità standby.
Colore dell'indicatore LED Blu (indicatore di alimentazione) Verde (indicatore di registrazione) Rossa (indicatore di alimentazione) Attività dell'indicatore Modalità di attività MUVI ACCESO fisso Accesa Nessuna luce Standby/Spenta Lampeggiante lentamente Batteria scarica Lampeggiante velocemente Copia dati ACCESO fisso Scheda SD piena Lampeggiante lentamente Registrazione Lampeggiante velocemente Nessuna scheda SD ACCESO fisso In carica Nessuna luce Completamente carica 19 Italiano
MUVI Pro impostazione data e ora Installazione del software 2. Seleziona 'Crea collegamento sul desktop' o 'Aggiungi al menu Start' - deve selezionare uno o entrambi altrimenti non è possibile accedere MD Riproduzione e Set Time 3. Scegli la lingua, poi accanto a tutte le opzioni fino alla finestra finale e quindi selezionare 'Installa Fine' e poi Impostazione data e ora 1. Con Muvi Pro collegato doppio taglio clic su 'breve Set Time' sul desktop oppure selezionare dal menu di avvio 2.
In qualità di dispositivo di registrazione micro potrete utilizzare MUVI micro DV camcorder come webcam/PC camera. Consultate le seguenti istruzioni. 1. Installate i driver di MUVI camera dal CD del software in dotazione. 2. Connettete MUVI al PC mediante il cavo USB fornito. 3. Spostate l'interruttore di alimentazione MUVI e quello di attivazione dell'audio su ON. 4. Il PC ora rileverà MUVI come PC camera.
Specifiche MUVI Colore 2 Mega Pixel- CMOS Angolo di visualizzazione 72 gradi Illuminazione minima 1 lux (min) Capacità della batteria 260 mAH Tempo di utilizzo (carica completa) 3 ore Tempo di standby (attivatore audio) 250 ore Limite temp operativo Da –10 º a 60 ºC Limite temp archiviazione Da –10 º a 70 ºC Umidità di funzionamento 15-85% RH Supporto memoria Scheda Micro SD Capacità SD Supporto USB Micro SD da max 8 Gb Codifica video mediante motion JPEG, registrazione in formato AVI V
Informazioni sull'approvazione della sicurezza È autorizzata a mostrare il marchio FCC e CE. Questo prodotto è stato testato e riscontrato conforme ai limiti di un dispositivo digitale di classe B, conforme alla Parte 15 della regolamentazione FCC. Tali limiti sono ideati per fornire una protezione adeguata contro interferenza dannosa in un'installazione residenziale.
Per contattare Veho per assistenza tecnica e i download del software, visitate la nostra pagina di supporto al seguente indirizzo: http://www.veho-uk.com/support.aspx Per domande non tecniche su MUVI, inviate un'e-mail a Veho all'indirizzo: MUVI@veho-uk.com Per informazioni generali sugli altri prodotti Veho, visitate: www.veho-uk.com Per domande generiche sugli altri prodotti Veho, inviateci un'e-mail a Veho all'indirizzo: info@veho-uk.
Einleitung Danke für den Kauf der Videokamera Veho MUVI micro DV. Das einzigartige Design von MUVI ermöglicht digitale Videoaufzeichnung in Situationen, in denen es gegebenenfalls nicht möglich ist, herkömmliche Videokameras zu benutzen. Gemeinsam mit dem Extremssport-Installationsset, ermöglicht MUVI dem Benutzer, hochqualitative digitale Video- und Tonaufzeichnungen durchzuführen. Deutsch Wir bei Veho gehen die Dinge gerne etwas anders an.
1 1 1 1 1 1 1 1 1 x x x x x x x x x Videokamera Veho MUVI micro DV Mikro-SD-Karte MUVI Aufladeeinheit-Spannungssversorgungsteil USB-Kabel MUVI Webcam-Software Befestigungsclip MUVI Umhängeband Trage-Beutel Benutzerhandbuch MUVI micro DV Extremsport-Produktinhalt 1 1 1 1 1 1 1 2 3 x x x x x x x x x zusätzlicher MUVI Befestigungsclip Befestigungsbügel für Fahrrad/Helm magnetischer Befestigungsbügel für die Wand MUVI Schutzhülle aus Silikon MUVI Armriemen MUVI Kopf-/Helmriemen Befestigungsklettverschluss
Veho MUVI Übersicht Aufhängering Netzschalter Deutsch Tonaktivierungsschlater Micro SDKartenslot RecordKnopf Mini USBStecker LED-Anzeige 27
Bedienung des Veho MUVI 1. Laden Sie Ihr Veho MUVI auf, indem Sie die Mini-USB-Aufladeeinheit oder das USB-Kabel an Ihren PC und den Mini-USB-Stecker auf der Unterseite des MUVI anschließen. Während des Ladeprozesses leuchtet die MUVI LED-Anzeige. Wenn das Gerät vollständig geladen ist, erlischt die rote LED-Anzeige. 3. Schalten Sie das MUVI mit dem Schalter auf der linken Seite ein. Wenn keine Mikro-SD-Karte eingeführt wurde, blinkt die LED-Anzeige grün und schnell.
Bedienung des Veho MUVI (cont) 7. Um den Ton-Aktivierungsmodus zu verwenden, stellen Sie das MUVI auf der rechten Seite auf "on" und den Netzschalter auf der linken Seite ebenfalls auf "on". Wenn das MUVI einen Ton von mehr als 65 Dezibel erkennt, beginnt es aufzuzeichnen. Wenn das MUVI 2 Minuten lang keinen weiteren Ton über 65 Dezibel erkennt, speichert er die MUVI-Dateien und wechselt in den Stand-by-Modus.
Farbe der LED-Anzeige Blau (Stromanzeige) Grün (Aufnahmeanzeige) Rot (Stromanzeige) Aktivität der Anzeige MUVI Aktivität-Modus Leuchtet Eingeschaltet Kein Licht Standby/Ausgeschaltet Langsames Blinken Niedriger Batteriestatus Schnelles Blinken Daten werden kopiert Leuchtet SD-Karte voll Langsames Blinken Aufnahme Schnelles Blinken Keine SD-Karte Leuchtet Aufladen Kein Licht Voll aufgeladen 30 Deutsch LED-Anzeige Schnellanleitung
Einstellen MUVI Pro Datum und Zeit Software-Installation 1. Legen Sie CD und wählen Sie "Installation der Treiber" 3. Sprache wählen, dann weiter für alle Optionen bis zum letzten Fenster und wählen Sie dann "Installieren" und dann "Fertig stellen" Datum und Zeit einstellen 1. Pro Doppelzimmer mit Muvi verbunden klicken Sie auf "kurze" Zeit einstellen "Schnitt auf dem Desktop oder wählen Sie aus dem Startmenü 2. 'Update Time' wird angezeigt. 3.
Verwendung des MUVI als Webcam Deutsch Die micro DV Videokamera kann sowohl als Mikroaufnahmevorrichtung, als auch als Webcam/PCKamera verwendet werden. Beachten Sie bitte folgende Anweisungen. 1. Installieren Sie die MUVI-Kameratreiber von der mitgelieferten Software-CD. 2. Schließen Sie das MUVI mit dem bereitgestellten USB-Kabels an den PC an. 3. Schalten Sie das MUVI und die Ton-Aktivierung ein. 4. Der PC erkennt das MUVI als PC-Kamera.
Pixel Sichtwinkel Minimale Beleuchtung Batteriekapazität Bedienungszeit (voll aufgeladen) Standby-Zeit (Ton-Auslöser) Bedienungstemperatur-Limit Lagerungstemperatur-Limit Betriebsfeuchtigkeit Speicher-Medium SD-Leistungsfähigkeit Video-Funktion und Format USB-Support Speicherverwendung Ladezeit Gewicht Maße 2 Megapixels Color CMOS 72 Grad 1 lux (Min) 260mAH 3 Stunden 250 Stunden Von -10º bis 60º C Von -10º bis 70º C 15-85%RLF Micro SD-Karte Max 8 GB Mikro-SD Videodekodierung über JPEG, Aufzeichnung im AVI-
Sicherheitszulassungsinformationen Ihr Veho MUVI erfüllt die FCC- und CE-Anforderungen und weist die FCC und CE-Zertifizierung auf. Dieses Gerät wurde geprüft und erfüllt die Grenzwerte für ein Digitalgerät der Klasse B gemäß Teil 15 der Richtlinien der amerikanischen Bundesbehörde für das Fernmeldewesen FCC (Federal Communications CommissionDiese Grenzwerte stellen einen angemessenen Schutz gegen schädliche Funkstörungen innerhalb von Wohngebäuden sicher.
Kundenbetreuung Um Veho für technische Unterstützung und Software-Downloads zu kontaktieren, besuchen Sie bitte unsere Support-Seite: http://www.Veho-uk.com/support.aspx MUVI@Veho-uk.com Für generelle Informationen über andere Veho-Produkte besuchen Sie bitte : www.Veho-uk.com Für generelle Informationen über andere Veho-Produkte schicken Sie bitte ein E-Mail an: info@Veho-uk.
Introduction Nous vous remercions d'avoir acheté le caméscope mini-DV MUVI Veho. Chez Veho, nous aimons faire les choses autrement. Nous fournissons des produits qui ont quelque chose à dire et qui se détachent du lot. Les mots ennuyeux et banal ne font pas partie de notre vocabulaire. Tous nos produits sont fabriqués avec les plus hauts standards et sont en conformité avec les normes de sécurité internationales.
Contenu du produit Mini-DV MUVI 1 1 1 1 1 1 1 1 1 x x x x x x x x x caméscope mini-DV MUVI Veho micro carte mémoire flash chargeur d'alimentation MUVI câble USB logiciel de webcam MUVI clip de montage à ressort MUVI cordon de cou MUVI housse MUVI manuel utilisateur MUVI 1 1 1 1 1 1 1 2 3 x x x x x x x x x clip de montage à ressort MUVI supplémentaire support de fixation pour vélo/casque support de fixation magnétique mural manchon de protection en silicone MUVI bande de fixation au bras MUVI bande de f
Vue d'ensemble du MUVI Veho anneau de suspension bouton On/ off bouton d'activation du son Francais emplacement pour bouton d'enregistrement mini-jack USB voyant LED 38
Fonctionnement du MUVI Veho 1. Pour charger votre MUVI Veho, connectez le chargeur secteur mini USB ou le câble USB à votre PC et au mini-jack USB situé sur la base du MUVI. Pendant le chargement, le voyant DEL du MUVI est rouge. Il s'éteint lorsque le chargement est terminé. 2. Insérez la micro carte mémoire flash dans l'emplacement situé sur le côté droit du MUVI. 3. Allumez le MUVI avec le bouton on/off situé sur le côté gauche.
Fonctionnement du MUVI Veho 6. Si le voyant DEL est vert fixe, cela signifie que la micro carte mémoire flash est pleine. Vous devez transférer vos séquences MUVI sur un PC ou connecter le MUVI à un PC pour en supprimer. 8. Pour transférer les séquences MUVI sur votre PC, connectez le mini-jack USB au port USB de l'ordinateur. Assurez-vous que le MUVI est allumé et que l'activation du son est éteinte. Le Mu vi sera détecté en tant que périphérique de stockage de masse USB.
Couleur du voyant DEL Bleu (témoin de mise sous tension) Vert (témoin d'enregistrement) Rouge (témoin de mise sous tension) Activité du voyant Mode d'activité du MUVI Fixe Allumé Voyant éteint Éteint Clignote lentement Batterie faible Clignote rapidement Copie de données Fixe Carte flash pleine Clignote lentement Enregistrement en cours Clignote rapidement Pas de carte flash Fixe En charge Voyant éteint Chargement terminé 41 Francais Indications concernant le voyant DEL
Réglage MUVI Pro Date et heure Installation du logiciel 1. Insérez le disque et l'installation du pilote "élite" 2. Sélectionnez "Créer un raccourci du Bureau" ou "Ajouter au menu Démarrer - doit choisir l'une ou les deux, sinon vous ne pouvez pas accéder MD Lecture et régler l'heure 3. Anglais Sélectionnez ', puis sur Suivant pour toutes les options avant dernière fenêtre puis choisissez' Installer 'et puis 'Finish' 1.
Utilisation du MUVI comme une Webcam 1. Installez les pilotes du caméscope MUVI qui se trouvent sur le CD du logiciel qui vous a été fourni. 2. Connectez le MUVI à votre ordinateur à l'aide du câble USB fourni. 3. Commutez le bouton On/off sur On et le bouton d'activation du son sur On. 4. Le PC détecte désormais le MUVI comme une Webcam. 43 Francais Le caméscope mini-DV MUVI peut être utilisé comme un mini périphérique d'enregistrement, mais également comme une Webcam.
Spécifications relatives au MUVI Pixels CMOS couleur 2 mégapixels Angle de vision 72 degrés Éclairement minimum 1 lux (min) Capacité de la batterie 260 mAh Durée d'utilisation (charge pleine) Durée de veille (déclenchement par le son) Température de fonctionnement limite Température de stockage limite 3 heures Humidité de fonctionnement 15 à 85 % d'humidité relative Support de mémoire Micro carte mémoire flash Capacité de mémoire Support USB Micro mémoire flash 8 Go maximum Décodage vidéo ut
Informations concernant l'agrément aux fins de la sécurité Votre MUVI Veho répond aux exigences FCC et CE, et a reçu la certification FCC et CE. Il est autorisé à porter la marque FCC et CE. Ce produit a été testé et respecte les restrictions concernant les équipements numériques de Classe B, conformément à la partie 15 des règlements de la FCC. Ces restrictions visent à fournir une protection raisonnable contre le brouillage préjudiciable qui peut survenir lors d'installations résidentielles.
Assistance client Pour contacter Veho pour toute assistance technique et téléchargement de logiciel, veuillez visiter notre page d'assistance à l'adresse suivante : http://www.veho-uk.com/support.aspx Pour toute question non technique à propos du MUVI, veuillez contacter Veho par email à l'adresse suivante : MUVI@veho-uk.com www.veho-uk.com Pour toute question générale à propos d'autres produits Veho, veuillez nous contacter par email à l'adresse : info@veho-uk.
Introducción Gracias por adquirir la microcámara de vídeo digital Veho MUVI. En Veho nos gusta hacer las cosas de forma diferente. Ofrecemos productos que no necesitan presentación y destacan del resto. Lo aburrido es malo y las cosas del montón no están en nuestro diccionario. Todos nuestros productos están fabricados al más alto nivel y siguiendo las normas mundiales de seguridad.
Contenido del producto de VD MUVI micro 1 1 1 1 1 1 1 1 1 x x x x x x x x x microcámara de vídeo digital Veho MUVI tarjeta Micro SD cargador para la MUVI cable USB software para cámara web MUVI clip con muelle para sujección de la MUVI cadena para colgar la MUVI al cuello funda para transportar la MUVI manual del usuario de la MUVI 1 1 1 1 1 1 1 2 3 x x x x x x x x x clip adicional con muelle para sujeción de la MUVI soporte para montaje en la bicicleta o el casco soporte magnético para montaje en la p
Vista general de la Veho MUVI anilla para colgar interruptor encendido activación por sonido ranura para minipuerto USB LED indicator 49 Espanol botón de grabación
Manejo de la Veho MUVI 1. Cargue la Veho MUVI conectando el cargador con mini USB a la red o el cable USB a su PC y el conector mini USB a la base de la MUVI. El indicador LED de la MUVI permanecerá rojo durante la carga. Una vez cargada, el indicador LED rojo se apagará. 2. Inserte la tarjeta Micro SD en la ranura situada en el lateral derecho de la MUVI. 3. Encienda la MUVI mediante el interruptor situado en el lateral izquierdo de la MUVI.
Manejo de la Veho MUVI (cont) 7. Para usar el modo de activación por sonido mueva el interruptor de activación por sonido – situado en el lateral derecho de la MUVI– a la posición de encendido y encienda el aparato mediante el interruptor de encendido situado en el lateral izquierdo. La MUVI empezará a gra bar cuando detecte un sonido de más de 65 decibelios. Si la MUVI no detecta otros sonidos superiores a 65 decibelios durante 2 minutos, guardará los archivos MUVI y pasará el modo de espera.
Guía rápida del indicador LED Azul (Indicador de energía) Verde (Indicador de grabación) Rojo (Indicador de energía) Actividad del indicador Modo de actividad de MUVI Encendido fijo Encendida Sin luz En espera / Apagada Parpadeo lento Batería baja Parpadeo rápido Copiado de datos Encendido fijo Tarjeta SD llena Parpadeo lento Grabando Parpadeo rápido Sin tarjeta SD Encendido fijo Cargando Sin luz Carga completa Espanol Color del indicador LED 52
Configuración MUVI Pro Fecha y hora Instalación de software 1. Insertar disco y seleccionar "Instalación de los controladores" 2. Seleccione "Crear acceso directo del escritorio" o "Añadir al menú Inicio" - debe seleccionar uno o ambos de otro modo no puede acceder a MD reproducción y establecer la hora 3. Escoja un idioma, luego la siguiente para todas las opciones hasta la última ventana y seleccione 'Terminar Instalación' y luego ' Configuración de fecha y hora 1.
Uso de la MUVI como cámara web Además de como dispositivo micro de grabación, la microcámara de vídeo digital MUVI se puede usar como cámara web para el PC. Siga las instrucciones siguientes. 1. Instale los controladores de la cámara MUVI contenidos en el CD de software que se incluye. 2. Conecte la MUVI al PC usando el cable USB suministrado. 3. Ponga el interruptor de la MUVI y la activación por sonido en posición de encendido. Espanol 4. El PC reconocerá la MUVI como una cámara del PC.
Especificaciones de la MUVI Píxeles 2 Megapíxeles de color CMOS Ángulo de visión 72 grados Iluminación mínima 1 lux (mín.) Capacidad de la batería 260 mAh Tiempo de uso (carga completa) Tiempo en espera (activación por sonido) Condiciones de temperatura para el funcionamiento Condiciones de temperatura para el almacenamiento Condiciones de humedad 3 horas Medios de memoria Tarjeta Micro SD Capacidad SD Soporte USB Máx.
Información de certificados de aprobación de seguridad Su Veho MUVI cumple los requisitos de la FCC (Comisión Federal de Telecomunicaciones) y de la CE, y ha obtenido las certificaciones FCC y CE. Está autorizada a llevar los marcados FCC y CE. Este producto ha sido sometido a pruebas y se ha comprobado que está dentro de los límites para dispositivos digitales de Clase B, según la Parte 15 de las normas de la FCC.
Servicio de Asistencia al Cliente Para ponerse en contacto con Veho para solicitar asistencia técnica y descargar software, visite nuestra página de Asistencia al Cliente: http://www.veho-uk.com/support.aspx Para preguntas sobre la MUVI de índole no técnica, envíe un correo electrónico a Veho a: MUVI@veho-uk.com Para información general sobre otros productos de Veho, visite: www.veho-uk.com Para preguntas generales sobre otros productos de Veho, envíe un correo electrónico a Veho a: Espanol info@veho-uk.