8X12 Metal Garden Shed Minimum You will receive three separate boxes for this product to be fully assembled. Please make sure all boxes arrived in good condition before assembling. It happens sometimes when boxes arrive separately due to postponed carrier's shipping, and your patience is really appreciated! You can also reach out to us at any time at customer service@ veikous.
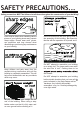
SAFETY PRECAUTIONS... Safety precautions MUST be followed at all times throughout the construction of your building! Care must be taken when handling various pieces of your building since many contain sharp edges. Please wear work gloves, eye protection and long sleeves when assembling or performing any maintenance on your building. Keep children and pets away from the worksite during construction and until the building is completely assembled.
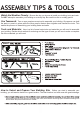
ASSEMBLY TIPS & TOOLS Watch the Weather Closely: Be sure the day you choose to install your building is dry and calm. Do NOT attempt to assemble your building on a windy day. Be careful on wet or muddy ground. Use Teamwork: Two or more people are required to assemble your building. One person can hold the parts or panels in place while the other person fastens them together and handles the tools. This makes the process of assembling your building faster and safer.
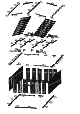
M10 GC GE M13 M9 M11 GC M13A M11 M11A M13B M11A M11B GC M11B GE M9 M10 GC PE6 PE4 PE5 PE3 PE4 PE4 PE3 PE4 PE4 PE3 PE4 PE4 PE3 PE4 PE4 A4 PE7 PE4 PE7 PE5 C4R C5 M2 M2L M2LA M2L M2LA M2 C5 A3 C4L M2L M2LA C4L A3 C5 M2 M2LA M2L PE6 M2 C4R C5 A4 C2 UE2 US3 GS GR C2 UE2R US3 US3 GR GR US3 US3 GR UE1L C2 GS UE1 US3 C2 WS3A W1A WS2A W1A W1A W1A W1A W1A WS2A W1A W1A W1A W1A 20 W1A W1A 20 W1A W1A W1A DLA WS3A UR1 DS1 WS3A
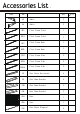
Accessories List... PART Qty. NO. A3 Gable 2 A4 Gable 2 BE1 Floor Frame Front 1 BE1L Floor Frame Front BE2 Floor Frame Back 1 BE2L Floor Frame Back 1 BS3 Floor Frame Side 2 BS3L Floor Frame Side 2 BS3LA Floor Frame Side 2 20 Door Brace Horizontal 4 C5 Roof Beam Bracket 4 C4R Roof Beam Bracket 2 C4L Roof Beam Bracket 2 DLA Door 1 DRA Door 1 DX2 Door Brace Diagonal 4 1 List.
PART Qty. NO.
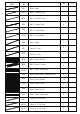
PART Qty. NO. M13 Ridge Cap 1 M13A Ridge Cap 1 M13B Ridge Cap 1 M2 Roof Frame 4 M2L Roof Frame 4 M2LA Roof Frame 4 List. Hardware accessories PART Qty. NO.
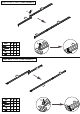
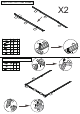
Step1:Front Floor Frame Assembly BE1 V2 F1 BE1L BE1 BE1L F1 List. BE1 BE1 BE1 BE1L F1 V2 BE1L 2 2 Step2:Back Floor Frame Assembly BE2L BE2L BE2 BE2 F1 List.
Step3:Side Floor Frame Assembly X2 BS3 BS3L BS3 BS3L BS3LA BS3LA List. BS3 2 BS3L 2 BS3LA 2 F1 BS3 BS3 BS3L 8 8 Step4-1:Connect Floor Frame BE2 BE2 List.
Step4-2:Connect Floor Frame F1 BE2L BE2L BS3 BS3 BS3 BE2L BS3L BS3LA BE1 F1 BS3LA BS3LA List. F1 4 BE1 4 BE1 Step5-1:Corner Panel Assembly List.
Step5-2:Corner Panel Assembly List. WS2A WS2A 4 F1 4 V2 WS2A BE1 BE1L Step5-3:Corner Panel Assembly List.
Step5-4:Corner Panel Assembly List. WS2A 4 WS2A 4 F1 V2 BE1 BE1L Step6-1:Wall Frame Front Assembly List.
Step6-2:Front Wall Frame Assembly C2 List. UE1L 1 C2 1 GS 1 F1 3 3 UE1L GS F1 BE1L BE1 Step6-3:Back Wall Frame Assembly List.
Step6-4:Back Wall Frame Assembly List. UE2R 1 C2 1 GS 1 F1 3 GS UE2R C2 3 F1 BE1L BE1 Step7-1:Side Wall Frame Assembly List.
Step7-2:Side Wall Frame Assembly List. US3 3 GR 2 F1 2 US3 2 US3 GR US3 GR US3 US3 F1 BE1 BE1L F1 US3 Step8:Left Wall Panel Assembly List.
Step9:Right Wall Assembly List. 8 WS3A 1 W1A F1 68 68 W1A W1A W1A W1A W1A W1A W1A W1A WS3A BE1 BE1L BE1 BE1L Step10:Back Wall Assembly List.
Step11:Front Wall Panel Assembly List. WS3A 2 F1 4 4 WS3A WS3A BE1 F1 WS3A WS3A BE1 Step12:Door Jamp Assembly Make sure the wall panels on BOTH sides are fully covered and tightly fixed with door jamps (i.e. ULA & UR1)with no gap before installing the door panels. Otherwise the door may not work as normal. V2 List.
Step13-1:Gable Connection List. A3 2 A4 2 C4L 2 C4R C5 2 4 F2 12 A3 F2 A4 C4L C4R F2 C5 Step13-2:Gable Assembly List.
Step14-1:Middle Roof Frame Connection List. M2 2 M2L 2 M2LA 2 F2 8 M2 M2L M2LA M2L M2LA M2 List.
List. M2 2 M2L 2 M2LA 2 Step15-1:Side Roof Frame Connection F2 16 M2 F2 M2LA x2 M2L Step15-2:Side Roof Frame Assembly List.
Step16:Left Roof Panel Assembly List. PE3 2 PE4 5 PE5 1 PE6 PE7 1 1 F1 108 PE6 PE4 PE3 PE4 PE4 PE3 PE4 108 PE4 PE7 PE5 F1 PE6 PE4 PE3 PE4 PE4 PE3 PE4 PE4 PE7 PE5 Step17:Right Roof Panel Assembly List.
Step18:Fascia Trim Assembly List. M9 2 M10 2 F1 8 F1 M9 8 M10 M10 M9 Step19:Ridge Cap Assembly List.
Step20:Ridge Plastic Cap Assembly List. GE 2 F1 6 GE 6 GE F1 x2 GE List.
Step22:Corner Plastic Cap Assembly List.
Step23-2:Left Door Assembly List. 20 2 DLA 1 20 Note: make clear the front and back of the door panel DLA 20 Step23-3:Left Door Assembly List.
List.
List.
Step24:Right Door Assembly 20 DX2 DRA DS1 DX2 20
List. 20 2 DRA 1 Step24-1:Right Door Assembly 20 Note: make clear the front and back of the door panel DRA 20 Step24-2:Right Door Assembly List.
List.
List.
List. V1 144 V1 V2 F1 S crews ma y ca u s e h u rt w it h s ha rp he ad s . M ake su re to C O V E R al l of th em w i th p l a s tic e nd cap s to p r e v e n t p ot en t ia l in j ur y.