Test Procedure How-to Manual
CONTENTS General information 1. WHAT’S ON THE BOARD? ............................................................................................................................3 2. TESTING THE BOARD ...................................................................................................................................4 3. TESTING THE COMMUNICATION WITH THE PC ........................................................................................6 Test & examples software 1.
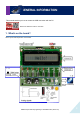
GENERAL INFORMATION This manual teaches you how to master the USB connection with the PC. Search for reference code on YouTube. 1. What’s on the board? All the inputs and outputs are on the board. EDU05 Test procedure & programming in Visual Basic 2010 ( Version 1.
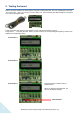
2. Testing the board Make a connection between the board and PC using the included USB cable. The LCD will display the message “Press button SW3 ... SW7 to show analog input values SW8 to exit”. In the meantime the LEDs will light up in sequence. LD1 and LD2 are digital inputs. Press each button and check the LCD readout to check if the board functions correctly. Press button 1 ... 7 one after the other.
Press button 4 Press this button to read the value of potentiometer 2. When you adjust the potentiometer, the value on the display changes. Potentiometer 2 Press button 5 Press button 6 Press this button to read the temperature in the room from the temperature sensor. This shows you the value of the temperature dependent resistor (NTC). The resistance of this type of resistor varies with the temperature. When the temperature goes up, the value of the resistor goes down.
3. Testing the communication with the PC Press button “8” to start the communication with the PC. The LCD shows the message “CONNECTING”. When the connection has succeeded, the display indicates “USB CONNECTED”. YOU MUST PRESS BUTTON 8 TO BE ABLE TO COMMUNICATE WITH THE PC! 6 EDU05 Test procedure & programming in Visual Basic 2010 ( Version 1.
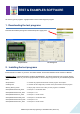
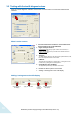
TEST & EXAMPLES SOFTWARE We have 2 types of programs: a graphical demo and a Test & Diagnosis program. 1. Downloading the test programs Download the software package from the EDU05 product page (www…..) Graphical demo Test & Diagnosis 2. Installing the test programs Extract the files in a folder on your drive. The folder “EDU05” and several subfolders will be created: C:\EDU05\ subfolder: \DLL\ contains the dynamic link library file EDU05.DLL.
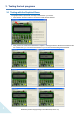
3. Testing the test programs 3.1 Testing with the Graphical Demo The graphical demo reproduces an image of the board on your screen. • First click the “Connect” button to connect the board with the software. • Next, perform the same test as described in chapter 2 “Testing the board”. Because the board and the PC communicate, you can see the exact same on your screen as while testing the board itself.
Button 5 pressed Button 6 pressed Button 7 pressed Button 8 pressed • You can click the buttons on the screen and see the result on the board. Remark: You need to press and hold the buttons on the board to see the result. The buttons on the screen have a toggle function: click once to switch on, click again to switch off.
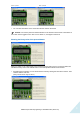
3.2 Testing with the test & diagnosis demo Start the “Test & diagnosis” software and click the “Connect” button to connect the board with the software.
Disabling / Enabling the Start-up demo Disable the demo: • • • Switch on “Disable Startup Demo” Disconnect the software Disconnect the USB cable of the board. When you re-connect the USB cable you’ll see that demo has been disabled.
HOW TO: PROGRAMMING IN VISUAL BASIC 2010 EXPRESS EDITION STEP 1 Download and install Visual Basic 2010 Express edition. You can download the software from here: http://www.microsoft.com/visualstudio/en-us/products/2010editions/visual-basic-express STEP2 If you are not experienced in Visual Basic programming, please check these links: Visual Basic Language Reference: http://msdn.microsoft.com/en-us/library/sh9ywfdk.aspx Getting Started Tutorials: http://msdn.microsoft.com/en-us/library/dd492171.
STEP7 Locate and select "Read_Button.sln" and click Open. STEP8 In the Solution Explorer double-click Form1.vb to show the form editor (if not visible). EDU05 Test procedure & programming in Visual Basic 2010 ( Version 1.
STEP9 In the Solution Explorer click the “View Code” button to show the code editor. STEP10 Click the “Debug” button to run the code. 14 EDU05 Test procedure & programming in Visual Basic 2010 ( Version 1.
To read the status of the buttons you can use the function ReadAllDigital(). This function returns a 32 bit integer. The eight lowest bits of this return value represent the status of the eight buttons. If you press a button, the corresponding bit is set to "1". You can use Visual Basic's And operator to mask the other bits and check the value of an individual bit. Example: If buttons SW1, SW2 and SW8 are pressed, the eight last bits of the value are 10000011.