DMX LIGHTPLAYER Introduction .........................................................................................................2 DMX library ..........................................................................................................3 Programming the channels................................................................................7 Creating a show ................................................................................................
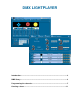
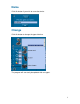
Introduction The DMX LightPlayer is very easy to use. • • • • Import an existing device or create a new one. Manage the DMX library with no trouble at all. Create a light show with just a few mouse clicks.
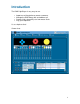
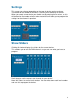
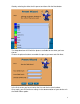
DMX library Click this button to display the screen where you can adjust the values for existing devices or add new devices.
New Click this button to clear your sequence and start a new one. If you have made changes to the previous sequence, the program will prompt you to save the changes. Open Click this button if you wish to open an existing sequence. If you have made changes to the previous sequence, the program will prompt you to save the changes. Save Click this button if you wish to save the sequence you are working on. Insert Click this button if you want to import an existing device from your library.
Name Click this button if you wish to name the device. Change Click this button to change the type of device. The program will constantly be updated with new types.
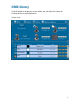
Settings This screen can change depending on the type of device you have chosen. The button for the number of channels is the only one shared by all devices. When you create a new device you should start by entering these values, as this will determine the number of rows to be created that will allow you to program the settings for the channel in question. Show Sliders Clicking this button displays the sliders for the current device.
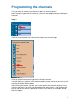
Programming the channels First you have to create a new device or open an existing device. After setting the type and the channels, you can start programming or editing the channels Step 1: Click on the left button of the channel to choose the channel type. Click on the desired channel type for the chosen channel. You will find these settings in the documentation of your device or you can try this out with the Show Sliders option.
Step 2: Now you can add, edit or remove levels for your channel. We will now add new levels. Step 3: Click the Add button to display the Preset Wizard, who will take you through the various steps.
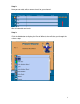
Start by selecting the effect for this preset and then click the Next button. The drop-down box will fill with the pictures available for the effect you have chosen. Choose the picture that best resembles the preset you want and click Next. In the final screen you have to enter the first and the last level number. Once again, you will find these settings in the documentation of your device or in the Show Sliders option.
The Default DMX level is the level the program will use if you load the channel without changing the setting. You can now add all the levels you need. Use the same procedure for the other channels. Step 4: Save your device. This device is now available in your DMX library.
Creating a show A sequence consists of different scenes and a scene consists of different steps. Let's create a sequence step by step. Step1: Insert all the devices you need for this sequence. Step2: Click the Add New Scene button to open the Wizard. Step 3: First of all you are required to name the scene. This name will also appear on the buttons of the various scenes, so keep the name short. Click Next.
Step 4: In the second screen you are required to fill in the number of loops for this scene. Step 5: This is the most important screen, where the user creates the various steps that make up the scene. Let's assume you want to scroll through all the colours of your device. Place the slider for the colours on the first colour and click the Record button.
Step6: Now enter the fade and wait times for this step and the program will proceed to the next step. Set a very short wait time because this step is the first of the scene. Click the OK button to go back to the Record screen. Set the colours slider to the last colour and click the Record button again. Set a Fade Time of 2 seconds for our example and click OK. Once again, you will return to the Record screen so you can add a new step. We don't want any more steps in our example. Click End.
Click on the row selector and click the delete key to delete the entire scene. Double-click on the row selector if you want to change the name of the scene. If you want to change the fade or wait time, just open the 'Steps' drop-down menu (see fig. above). You can play the sequence when all your scenes have been added. All the buttons are self-explanatory. Every computer has a different speed, which is why we have added a small slider with which to adjust the speed (faster or slower).