DVM8681 pH METER pH-METER pH-MÈTRE pH-METRO pH-MESSGERÄT pH-METRO pH-METR USER MANUAL GEBRUIKERSHANDLEIDING NOTICE D’EMPLOI MANUAL DEL USUARIO BEDIENUNGSANLEITUNG MANUALE UTENTE INSTRUKCJA OBSŁUGI
DVM8681 – pH METER 1. Introduction To all residents of the European Union Important environmental information about this product This symbol on the device or the package indicates that disposal of the device after its lifecycle could harm the environment. Do not dispose of the unit (or batteries) as unsorted municipal waste; it should be taken to a specialized company for recycling. This device should be returned to your distributor or to a local recycling service. Respect the local environmental rules.
b. Auto Power-Off • This meter will switch off after approximately 20 minutes of inactivity. • Disable this function by holding HLD and PWR simultaneously pressed before power-on. An “n” will briefly appear onto the display. The function has been disabled. The function will be reactivated after every power-off. c. Automatic Temperature Compensation (ATC) • Since pH values are temperature dependent, pH applications require some form of temperature compensation to ensure standardized pH values.
• Display indicates “- - -” The pH value is out of the pH range (pH 0 ~ pH 14). The solution is either too acid or too alkaline. • The displayed pH value is unstable The probe is exposed. Dip it in the solution to be measured. 7. Technical Specifications pH Range Accuracy Resolution Temperature Accuracy Temperature Resolution Operating Temperature Operating Humidity ATC Self-Calibration Dimensions Calibration Test Solution pH 0 ~ pH 14 pH 0.2 pH 0.1 ± 1°C 0.
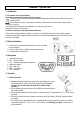
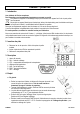
3. Omschrijving 1. 2. 3. 4. 5. 6. 7. gemeten pH-waarde CAL – ijkingmodus ATC – automatische temperatuurcompensatie temperatuuraflezing HLD – data hold-functie PWR – voedingsschakelaar CAL – ijking 4. Gebruik a. Algemeen • Verwijder de 2 doppen zodat de elektrode zichtbaar wordt. Mogelijks vindt u witte kristallen rond de sonde. Houd het sponsje altijd vochtig. • Dompel de elektrode in de testoplossing. Druk op PWR en beweeg de pHmeter tot u een stabiele aflezing krijgt.
• De meter geeft “En” weer wanneer de ijking verkeerd werd uitgevoerd of wanneer de sonde de testoplossing niet kon waarnemen in het spanningsbereik hieronder. In dit geval herijkt u de meter zolas hierboven beschreven. pH 4.00 pH 7.00 pH 10.00 97mV….250mV -60mV….60mV -250mV….-97mV • De pH-waarde van de testoplossing (4, 7 of 10) verschijnt op het scherm wanneer de meter de testoplossing herkent. Druk op HLD en wijzig de waarde wanneer deze lichtjes afwijkt van de veronderstelde waarde, bv. 4.
DVM8681 – pH-MÈTRE 1. Introduction Aux résidents de l'Union européenne Des informations environnementales importantes concernant ce produit Ce symbole sur l'appareil ou l'emballage indique que l’élimination d’un appareil en fin de vie peut polluer l'environnement. Ne pas jeter un appareil électrique ou électronique (et des piles éventuelles) parmi les déchets municipaux non sujets au tri sélectif ; une déchèterie traitera l’appareil en question.
b. Extinction automatique • Ce mètre s’auto-éteint après environ 20 minutes d’inactivité. • Désactiver la fonction en maintenant simultanément enfoncé les touches HLD et PWR lorsque le mètre est éteint. Un « n » s’affiche brièvement pour indiquer que la fonction a été désactivée. La fonction sera réactivée lorsque l’on rallume le mètre. c. Compensation automatique de la température (ATC) • Une valeur pH est tributaire de la température.
• Affichage de « - - - » La valeur pH se trouve en dehors de la plage de mesure (pH 0 ~ pH 14). La solution est trop acide ou trop alcaline. • La valeur pH affichée est instable La sonde est exposée à l’air libre. La tremper dans la solution à mesurer. 7. Spécifications techniques Plage de mesure Précision Résolution Précision de la température Résolution de la température Température de service Taux d’humidité ATC Calibrage automatique Dimensions Solution tampon pH 0 ~ pH 14 pH 0.2 pH 0.1 ± 1°C 0.
3. Descripción 1. 2. 3. 4. 5. 6. 7. valor pH medido CAL – modo de calibración ATC – compensación automática de la temperatura visualización de la temperatura HLD – función data hold (retención de lectura) PWR – tecla de alimentación CAL – calibración 4. Uso a. En general • Saque los capuchones inferior e interior para exponer la sonda. Es normal que encuentra cristales blancos. Asegúrese de que la esponja esté siempre húmida. • Sumerja el electrodo en el líquido.
pH 4.00 pH 7.00 pH 10.00 97mV….250mV -60mV….60mV -250mV….-97mV • El valor pH del líquido de prueba (4, 7 ó 10) aparece en la pantalla si el metro reconoce el líquido de prueba. Si el valor visualizado se aparta ligeramente del valor pH supuesto, p.ej. 4.01 en lugar de 4.00, pulse HLD para modificar el valor. El rango de calibración se encuentra entre 3.50 y 4.50 para un pH 4, entre 6.50 y 7.50 para un pH 7 y entre 9.50 y 10.50 para un pH 10. • El valor estable se guardará automáticamente. 5.
DVM8681 – pH-MESSGERÄT 1. Einführung An alle Einwohner der Europäischen Union Wichtige Umweltinformationen über dieses Produkt Dieses Symbol auf dem Produkt oder der Verpackung zeigt an, dass die Entsorgung dieses Produktes nach seinem Lebenszyklus der Umwelt Schaden zufügen kann. Entsorgen Sie die Einheit (oder verwendeten Batterien) nicht als unsortiertes Hausmüll; die Einheit oder verwendeten Batterien müssen von einer spezialisierten Firma zwecks Recycling entsorgt werden.
b. Automatische Ausschaltung • Dieses Messgerät wird nach etwa 20 Minuten automatisch ausgeschaltet • Deaktivieren Sie diese Funktion indem Sie gleichzeitig HLD und PWR gedrückt halten ehe Sie das Gerät einschalten. “n” erscheint kurz auf dem Schirm, um anzuzeigen, dass diese Funktion ausgeschaltet ist. Die Funktion wird wieder eingeschaltet wenn Sie das Messgerät ausschalten. c. Automatischer Temperaturausgleich (ATC) • Ein pH-Wert hängt von der Temperatur ab.
• Langsame Anzeige Reinigen Sie die Sonde gründlich mit Leitungswasser und spülen Sie sie mit entionisiertem Wasser ab. • Das LCD-Display zeigt “- - -” an Der pH-Wert ist außer Bereich des Messgerätes (pH 0 ~ pH 14). Die Flüssigkeit ist zu säure oder zu alkalisch. • Der angezeigte pH-Wert ist instabil Die Sonde wird ausgesetzt. Tauchen Sie sie in die zu messenden Flüssigkeit ein. 7.
2. Installazione delle batterie • Svitare le due viti di chiusura del vano batterie. Fare attenzione a non perdere le due piccole rondelle. • Inserire 4 batterie a bottone LR44 rispettando la polarità. • Richiudere il vano batterie. 3. Descrizione 1. 2. 3. 4. 5. 6. 7. indicazione pH misurato CAL – modalità calibrazione ATC – compensazione automatica della temperatura indicazione temperatura HLD – memorizzazione dato PWR – tasto accensione/spegnimento CAL – calibrazione 4. Utilizzo a.
• Sul display appare brevemente la scritta “SA” ad indicare l’avvenuto salvataggio dell’impostazione. L’impostazione verrà mantenuta anche dopo lo spegnimento d. Calibrazione dello strumento • La calibrazione è necessaria e deve essere effettuata regolarmente, anche su base giornaliera quando lo strumento viene utilizzato spesso. • Accendere il pH-metro.
7. Specifiche tecniche Gamma pH Accuratezza Risoluzione Accuratezza temperatura Risoluzione temperatura Temperatura operativa Umidità operativa ATC Calibrazione automatica Dimensioni Soluzione di calibrazione pH 0 ~ pH 14 pH 0,2 pH 0,1 ± 1°C 0,5°C 0°C ~ 50°C (32°F ~ 122°F) 0 ~ 80% RH si si 150 x 36 x 25mm tamponi standard USA, tamponi standard NIST, tamponi standard DIN Utilizzare questo dispositivo solamente con accessori originali.
3. Opis 1. odczyt pH 2. CAL – tryb kalibracji 3. ATC – automatyczna kompensacja temperatury 4. odczyt temperatury 5. HLD - pamięć 6. PWR – włącznik 7. CAL – kalibracja 4. Eksploatacja a. Zasady ogólne • Zdjąć górną i wewnętrzną zaślepkę, aby odsłonić elektrodę. Na • • • • wewnętrznej stronie zaślepki i na elektrodzie mogą znajdować się białawe kryształki. Aby przechowywać elektrodę we właściwych warunkach, gąbka znajdująca się w zaślepce musi cały czas pozostać wilgotna.
d. Kalibrowanie pH-metru • Kalibracja jest niezbędna i należy ją wykonywać regularnie, jeśli pH-metr jest używany często – nawet codziennie. • Włączyć pH-metr. • Umieścić elektrodę w roztworze o pH równym 7, następnie 4 lub 10 (roztwory testowe dostępne są w lokalnych aptekach) • Przycisnąć CAL, aby wejść w tryb kalibracji. Przez chwilę na wyświetlaczu pojawią się litery „CA". Po paru sekundach na wyświetlaczu pojawi się napis „CAL” oraz wartość pH, co będzie oznaczać, że urządzenie zostało skalibrowane.
Wilgotność robocza Automatyczna kompensacja temperatury Autokalibracja Wymiary Testowy roztwór kalibracyjny 0 ~ 80% RH tak tak 150 x 36 x 25mm standardowe bufory wg. USA, NIST, DIN Używać tylko z oryginalnymi akcesoriami. Velleman nv nie ponosi odpowiedzialności w przypadku uszkodzenia ciała lub mienia wynikającego z (niewłaściwego) użytkowania sprzętu.
• Por consiguiente, están excluidos entre otras cosas: - todos los daños causados directamente o indirectamente al aparato y su contenido después de la entrega (p.ej. por oxidación, choques, caída,...) y causados por el aparato, al igual que el contenido (p.ej. pérdida de datos) y una indemnización eventual para falta de ganancias; - partes o accesorios que deban ser reemplazados regularmente, como por ejemplo baterías, lámparas, partes de goma...
Ogólne Warunki dotyczące gwarancji: Wszystkie produkty konsumenckie podlegają 24-miesięcznej gwarancji na wady produkcyjne i materiałowe od daty zakupu. W przypadku, gdy usterka jest niemożliwa do usunięcia lub koszt usunięcia jest nadmiernie wysoki Velleman® może zdecydować o wymianie artykułu na nowy, wolny od wad lub zwrócić zapłaconą kwotę.