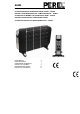
EHD D2 DESIG GN CONVECT TOR HEATE ER WITH TU URBO FAN - 2000W CONVE ECTEUR DESIGN AVEC C VENTILAT TEUR TURBO O - 2000W DESIG GN CONVECT TORKACHE EL MET TUR RBOVENTILA ATOR - 200 00W CONVE ECTOR DE DISEÑO D CO ON TURBOVENTILADOR R - 2000W DESIG GN KONVEK KTOR MET TURBOLÜFT T TER 2000W CONVE ECTOR DES SIGN COM TURBOVENT T TILADOR - 2000W USER MANUAL M NOTICE E D’EMPLOI GEBRUIKERSHAND DLEIDING MANUA AL DEL USUA ARIO BEDIEN NUNGSANLEITUNG MANUA AL DO UTILIZ ZADOR 3 5 7 9 11 13
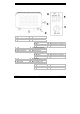
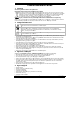
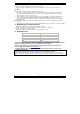
EHD2 1 foot 2 power plug 3 thermostat 4 5 6 power switches fan switch pilot light 1 pied 2 fiche 3 thermostat 1 voet 2 stekker 3 thermostaatknop 4 5 6 4 5 6 4 5 6 selectores ON/OFF interruptor del ventilador piloto LED 4 5 6 selectores ON/OFF interruptor del ventilador piloto LED Netzschalter Ventilatorschalter LED-Kontrollleuchte 1 pie 2 conector 3 termostato 08.04.
D2 EHD USER MA ANUAL 1. Inttroduction To all re esidents of the e European Union Importa ant environmental information about this product This symbol on the device or the package indiicates that dispo osal of the devic ce after its lifecycle could harm the environment. Do D not dispose of o the unit (or batteries) b as unsorted municipa al d be taken to a specialized com mpany for recyclling. This device e should be retu urned waste; it should to your distribu utor or to a local recycling serviice.
EHD2 5. Assembly Refer to the illustration on page 2 of this manual. • Place a foot [1] on either side of the bottom of the heater and fix using the included screws. 6. Use Refer to the illustration on page 2 of this manual. • • Choose a suitable location taking into account the safety instructions above. Turn the thermostat [3] fully counter clockwise and insert the plug [2] into a suitable, grounded mains socket. • Turn on the heater elements by means of the rocker switches [4] as desired.
EHD D2 NO OTICE D’EMPLOI I 1. Inttroduction Aux résiidents de l'Uniion européenn ne Des info ormations enviironnementale es importantes s concernant ce c produit Ce symbole sur l'appareil ou l''emballage indiq que que l’élimin nation d’un appa areil en fin de viie environnement. Ne pas jeter un n appareil électrrique ou électronique (et des piles peut polluer l'e éventuelles) pa armi les déchets s municipaux no on sujets au tri sélectif ; une déchèterie traitera l’appareil en qu uestion.
EHD2 4. Caractéristiques • • • • • • • design élégant boîtier métallique avec revêtement FBE interrupteurs avec indication lumineux thermostat réglable dispositif de sécurité pour désactivation automatique en cas de surchauffe fusible thermique ventilateur turbo puissant 5. Assemblage Se référer à l’illustration en page 2 de cette notice. • Placer un pied [1] de chaque côté au bas du convecteur et les fixer avec les vis incluses. 6. Emploi Se référer à l’illustration en page 2 de cette notice.
EHD D2 GEBRU UIKERSHA ANDLEID DING 1. Inleiding Aan alle e ingezetenen van v de Europe ese Unie Belangrijke milieu-infformatie betre effende dit pro oduct Dit symbool op p het toestel of de d verpakking geeft g aan dat, als het na zijn levenscyclus wordt weggeworpen, dit toestel scha ade kan toebren ngen aan het miilieu. Gooi dit to oestel (en eventtuele e huishoudelijke e afval; het moe et bij een gespecialiseerd bedrijjf batterijen) niett bij het gewone terechtkomen voor v recyclage.
EHD2 5. Assemblage Raadpleeg de figuur op pagina 2 van deze handleiding. • Plaats een voet [1] aan elk uiteinde onderaan de kachel en bevestig met de meegeleverde schroeven. 6. Gebruik Raadpleeg de figuur op pagina 2 van deze handleiding. • • Kies een geschikte plaats volgens de veiligheidsinstructies hierboven. Draai de thermostaatknop [3] volledig tegen de richting van de wijzers in en steek de stekker [2] in een geaard stopcontact. • Schakel de kachel in met de schakelaars [4].
EHD D2 MAN NUAL DEL L USUAR RIO 1. Inttroducción A los ciu udadanos de la a Unión Europe ea Importa antes informac ciones sobre el e medio ambie ente concernie ente a este pro oducto Este símbolo en este aparato o el embalaje in ndica que, si tira a las muestras inservibles, i podrían o ambiente. No tire t este aparato (ni las pilas, si s las hubiera) en e la basura dañar el medio doméstica; deb be ir a una emp presa especializa ada en reciclaje.
EHD2 5. Montaje Véase las figuras en la página 2 de este manual del usuario. • Ponga un pie [1] en cada lado de la parte inferior del aparato y fije con los tornillos incluidos. 6. Uso Véase las figuras en la página 2 de este manual del usuario. • • Seleccione un lugar de montaje al tener en cuenta las instrucciones de seguridad (véase arriba). Gire el termostato [3] completamente en sentido contrario a las agujas del reloj e introduzca el conector [2] en un enchufe puesto a tierra.
EHD D2 BEDIE ENUNGSANLEITU UNG 1. Ein nführung An alle Einwohner E derr Europäischen n Union Wichtige e Umweltinforrmationen übe er dieses Produ ukt Dieses Symbol auf dem Produkt oder der Verrpackung zeigt an, a dass die Enttsorgung dieses h seinem Lebenszyklus der Umwelt Schaden zufügen kann.
EHD2 4. Eigenschaften • • • • • • • elegantes Design Metallgehäuse mit Epoxid-Pulverbeschichtung beleuchtete Schalter einstellbarer Thermostat automatische Abschaltung bei Überhitzung Thermosicherung leistungsstarker Turbolüfter 5. Montage Siehe Abbildung, Seite 2 dieser Bedienungsanleitung. • Befestigen Sie einen Fuß [1] an jedem Ende auf der Unterseite des Gerätes und befestigen Sie mit den mitgelieferten Schrauben. 6. Anwendung Siehe Abbildung, Seite 2 dieser Bedienungsanleitung.
D2 EHD MANU UAL DO UTILIZAD U DOR 1. Inttrodução Aos cida adãos da União o Europeia Importa antes informaç ções acerca do o meio ambien nte no que resp peita a este pr roduto. Este símbolo no aparelho ou na n embalagem indica que, enqu uanto desperdíc cios, poderão causar ho (nem as pilha as se as houverr) no lixo domés stico; danos no meio ambiente. Não deite o aparelh a empresa espec cializada em rec ciclagem.
EHD2 4. Características • • • • • • • design elegante caixa metálica com revestimento FBE (epoxy ligado por fusão) interruptores com indicador luminoso termostato ajustável desactivação automática em caso de sobreaquecimento fusível térmico potente turboventilador 5. Montagem Ver as figuras da página 2 deste manual do utilizador. • Coloque um pé [1] em cada um dos lados da parte inferior do aparelho e fixe-os com os parafusos incluídos. 6.
Velleman® Service and Quality Warranty Velleman® has over 35 years of experience in the electronics world and distributes its products in more than 85 countries. All our products fulfil strict quality requirements and legal stipulations in the EU. In order to ensure the quality, our products regularly go through an extra quality check, both by an internal quality department and by specialized external organisations.
surgieran problemas a pesar de todas las precauciones, es posible recurrir a nuestra garantía (véase las condiciones de garantía).