
Instruction Manual

IVSPROM1
09.11.2010 ©Velleman nv
7
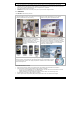
5.3 DVR power on
• This device should be operated only with the type of power source indicated on the manufacturer’s label.
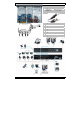
Connect the indicated AC power cord to the power adapter, and plug into an electrical outlet.
Note: Before the DVR is powered on, make sure that (1) the cameras are connected and power-supplied
for the detection of the camera video system to be correct, and (2) a monitor (either LCD or CRT monitor,
not incl.) is connected to the DVR for correct video output detection.
• Switch on the DVR with the power switch on the back of the device. It will take about 30s for the DVR to
initialize.
Note: To ensure that your DVR works constantly and properly, it's recommended to use an UPS,
Uninterruptible Power Supply (not incl.), for continuous operation.
5.4 Date and time setting
Before operating your DVR, please set the date and time on your DVR FIRST.
Note: DO NOT change the date or time of your DVR after the recording function is activated. Otherwise,
the recorded data will be disordered and you will not be able to find the recorded file from backup by time
search. If users change the date or time accidentally when the recording function is activated, it’s
recommended to clear all HDD data, and start recording again.
Note: when using the DVR for the first time, leave it powered on for at least 48 hours continuously after
the date & time is set correctly. To replace the internal battery, refer to APPENDIX 6 in the full user
manual.
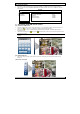
• Right-click to enter the DVR password with the password keypad. The default administrator password is
0000.
• The status will be changed from (key lock) to (administrator).
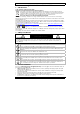
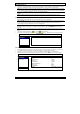
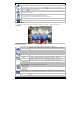
• Right-click to show the main menu, and select “QUICK START” Æ “TIME SETUP” to set the date & time.
QUICK START
GENERAL DATE 2009 / NOV / 17
TIME SETUP TIME 15 : 35 : 53
EXIT
5.5 Clear hard disk
• It’s recommended to clear all data in the hard disk when using this DVR for the first time to ensure the
recorded data are not mixed with other data previously saved in the same hard disk.
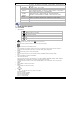
• Right-click to show the main menu, and select “SYSTEM” Æ “SYSTEM INFO” Æ “CLEAR HDD”.
• The DVR will reboot when HDD data are cleared. For details, refer to §5.3.2 in the full user manual.
SYSTEM
TOOLS BAUD RATE 2400
SYSTEM INFO HOST ID 000
USB BACKUP R.E.T.R 5
DVD BACKUP AUTO KEY LOCK NEVER
CLEAR HDD HDD-0
RESET DEFAULT SUBMIT
REMOTE CONTROL ID 000
SERIAL TYPE RS485
VIDEO FORMAT NTSC
VERSION 1019-1008-1010-1010
EXIT