
Instructions


6
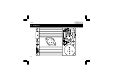
Construction
IC1 : UA723D
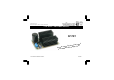
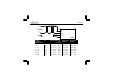
9. Power transistor
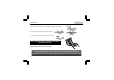
M3 NUT
M3 BOLT
LOCK WASHER
TRANSISTOR
HEATSINK
PCB
Fig 1.0
T1 : MJ3001 or 2N6284G
Apply some thermo-conducting
pasta to the bottom side of the
transistor and mount it on the
PCB simultaneously with the
cooling profile following the
instructions in the figure 1.0.
10. IC. Watch the position of
the notch!