MICW42-2 WIRELESS TRUE DIVERSITY UHF MICROPHONE SYSTEM DRAADLOOS TRUE DIVERISTY UHF MICROFOONSYSTEEM MICROPHONE TRUE DIVERSITY UHF SANS FIL MICRÓFONO TRUE DIVERSITY UHF INALÁMBRICO DRAHTLOSES TRUE DIVERISTY UHF-MIKROFONSYSTEM USER MANUAL GEBRUIKERSHANDLEIDING NOTICE D’EMPLOI MANUAL DEL USUARIO BEDIENUNGSANLEITUNG
MICW42-2 – WIRELESS TRUE DIVERSITY UHF MICROPHONE SYSTEM 1. Introduction & Features To all residents of the European Union Important environmental information about this product This symbol on the device or the package indicates that disposal of the device after its lifecycle could harm the environment. Do not dispose of the unit (or batteries) as unsorted municipal waste; it should be taken to a specialized company for recycling.
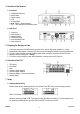
4. Overview of the Receiver a. Front Panel 1. 2. 3. 4. 5. 6. 7. headphones input jack power switch volume control LCD locking feature ▲▼ buttons – selection buttons SET – menu setting and confirmation button b. Back Panel 1. 2. 3. 4. 5. 6. power jack input antenna A balanced output unbalanced output audio attenuation level input antenna B 5. Preparing the Receiver for Use 1. 2. 3. 4. 5. Connect the antennas to the BNC sockets at the rear of the receiver. Align them upwards in a V-shape.
b. Frequency / Channel Selection Press SET until you see the display as below. Wait 2 to 3 seconds. Each channel has its own frequency. Choose the channel / frequency using ▲ or ▼ and press SET to confirm. c. Setting the Setup Lock Press SET until you see the display as below. Choose whether you want to lock the present status or not by using ▲ or ▼. Press SET to confirm. 8. Monitoring Your System Insert stereo headphones (not incl.) to monitor the vocals via headphones. 9.
Wait 2 to 3 seconds. Next, you will be given the choice to lock (loc on) or to unlock (locoff) the transmitter‟s settings. Choose locoff using ▲ or ▼. Press SET again to enter the menu. Choose your channel using ▲ or ▼ and press SET again to confirm. d. Frequency Selection Press SET and select the display menu (disp). Wait 2 to 3 seconds and select the frequency menu (fye9u) using ▲ or ▼. Press SET again to enter the menu. You will see next display. Wait 2 to 3 seconds.
13. Technical Specifications system receiver transmitter power supply dimensions weight frequency range: UHF 863.000 - 865.000MHz (tunable) A licence may be required for some frequency bands. Check your local regulations. modulation mode: FM (PLL) nominal / peak deviation: ± 25kHz / max. ± 48kHz frequency stability: max. ± 15ppm frequency response: 60Hz - 18kHz S/N ratio at 1mV RF and peak deviation: max. 110dB(A) THD at nominal deviation and 1kHz: max.
MICW42-2 – DRAADLOOS TRUE DIVERISTY UHF MICROFOONSYSTEEM 1. Inleiding en kenmerken Aan alle ingezetenen van de Europese Unie Belangrijke milieu-informatie betreffende dit product Dit symbool op het toestel of de verpakking geeft aan dat, als het na zijn levenscyclus wordt weggeworpen, dit toestel schade kan toebrengen aan het milieu. Gooi dit toestel (en eventuele batterijen) niet bij het gewone huishoudelijke afval; het moet bij een gespecialiseerd bedrijf terechtkomen voor recyclage.
4. Een overzicht van de ontvanger a. Frontpaneel 1. 2. 3. 4. 5. 6. 7. hoofdtelefoonaansluiting voedingsschakelaar volumeregeling lcd-scherm vergrendeling ▲▼ – keuzetoetsen SET – menu-instelling en bevestiging b. Back Panel 1. 2. 3. 4. 5. 6. voedingsingang ingang antenne A gebalanceerde uitgang niet-gealanceerde uitgang instelling audiodemping ingang antenne B 5. Voorbereiden van de ontvanger 1. Plaats een antenne in elk van de BNC-aansluitingen achteraan de ontvanger. Plaats de antennes in V-vorm. 2.
Regel de gevoeligheid met ▲ of ▼. Hoe hoger de waarde, hoe lager de gevoeligheid. We raden aan de gevoeligheid op minimaal 20dB in te stellen. Druk op SET om uw keuze te bevestigen. b. Frequentie- / kanaalinstelling Druk op SET tot het volgende scherm verschijnt. Wacht 2 à 3 seconden. Elk kanaal heeft zijn eigen frequentie. Selecteer het kanaal / de frequentie met ▲ of ▼ en druk op SET om te bevestigen. c. Vergrendeling van de instelling Druk op SET tot het volgende scherm verschijnt.
c. Selecteren van het kanaal Schakel de zender in door de voedingsschakelaar op ON te plaatsen. Druk op SET en selecteer het displaymenu (disp). Wacht 2 à 3 seconden en selecteer het kanaalmenu (channl) met ▲ of ▼. Druk opnieuw op SET om het menu weer te geven. U ziet volgende weergave. Wacht 2 à 3 seconden. U kunt nu de instellingen al dan niet vergrendelen (loc on of locoff). Selecteer locoff met ▲ of ▼. Druk op SET om het menu weer te geven.
6. Maak het toestel geregeld schoon met een vochtige, niet pluizende doek. Gebruik geen alcohol of solvent. 7. De gebruiker mag geen onderdelen vervangen. 8. Bestel eventuele reserveonderdelen bij uw dealer. 13. Technische specificaties systeem frequentiebereik: UHF 863.000 - 865.000MHz (afstembaar) Voor het gebruik van sommige frequentiebanden is een licentie vereist. Raadpleeg uw lokale wetgeving. modulatie: FM (PLL) nominale zwaai / piekzwaai: ± 25kHz / max. ± 48kHz frequentiestabiliteit: max.
MICW42-2 – MICROPHONE TRUE DIVERSITY UHF SANS FIL 1. Introduction et caractéristiques Aux résidents de l'Union européenne Des informations environnementales importantes concernant ce produit Ce symbole sur l'appareil ou l'emballage indique que l‟élimination d‟un appareil en fin de vie peut polluer l'environnement. Ne pas jeter un appareil électrique ou électronique (et des piles éventuelles) parmi les déchets municipaux non sujets au tri sélectif ; une déchèterie traitera l‟appareil en question.
4. Description du récepteur a. Panneau frontal 1. 2. 3. 4. 5. 6. 7. prise d‟entrée du casque d‟écoute interrupteur d‟alimentation réglage du volume afficheur LCD verrouillage ▲▼ – touches de sélection SET – paramétrage et confirmation b. Panneau arrière 1. 2. 3. 4. 5. 6. prise d‟alimentation entrée antenne A sortie symétrique sortie asymétrique atténuation audio entrée antenne B 5. Préparer le récepteur à l’emploi 1. Connecter les antennes aux entrées BNC à l‟arrière du récepteur en les aligner en V. 2.
b. Sélection du canal / de la fréquence Enfoncer SET jusqu‟à ce que l‟afficheur LCD montre l‟option suivante. Patienter 2 à 3 secondes. Chaque canal a sa propre fréquence. Choisir la fréquence / le canal avec ▲ ou ▼ et enfoncer SET pour confirmer. c. Verrouillage des paramétrages Enfoncer SET jusqu‟à ce que l‟afficheur LCD montre l‟option suivante. (Dé)verrouiller les paramétrages avec ▲ ou ▼. Enfoncer SET pour confirmer. 8. La balance du système Raccorder un casque d‟écoute (non incl.
d. Sélection de la fréquence Enfoncer SET et sélectionner le menu d‟affichage (disp). Patienter 2 à 3 secondes et sélectionner le menu des fréquences (fye9u) avec ▲ ou ▼. Renfoncer SET pour accéder au menu. L‟affichage suivant s‟affiche. Patienter 2 à 3 secondes. Vous pourrez ensuite verrouiller (loc on) ou déverrouiller (locoff) les paramétrages de l‟émetteur. Choisir locoff avec ▲ ou ▼. Renfoncer SET pour accéder au menu. Sélectionner la fréquence avec ▲ ou ▼ et enfoncer SET pour confirmer.
THD à excursion nominale et 1kHz: max. 1% plage de température: -10°C ~ +55°C récepteur principe: true diversity sensibilité (excursion de crête): 3uV (52dB S/N) tension de sortie AF à excursion de crête et sortie AF 1kHz: symétrique: +10dB (XLR), asymétrique: +4dB (1/4" jack) rapport F/N : max. 80dB rapport P/N : max. 80dB émetteur puissance de sortie RF: 1mW RF squelch: max. 50dB alimentation récepteur: 14VCA/500mA (adaptateur incl.) transmitter: 2 piles 1.5V type R6 (incl.
MICW42-2 – MICRÓFONO TRUE DIVERSITY UHF INALÁMBRICO 1. Introducción & Características A los ciudadanos de la Unión Europea Importantes informaciones sobre el medio ambiente concerniente a este producto Este símbolo en este aparato o el embalaje indica que, si tira las muestras inservibles, podrían dañar el medio ambiente. No tire este aparato (ni las pilas, si las hubiera) en la basura doméstica; debe ir a una empresa especializada en reciclaje.
Utilice este aparato sólo con temperaturas entre +5°C ~ +35°C. 4. Descripción del receptor a. Panel frontal 1. 2. 3. 4. 5. 6. 7. conexión de entrada para auriculares interruptor de alimentación ajuste del volumen pantalla LCD bloqueo ▲▼ – teclas de selección SET – ajuste y confirmación b. Panel trasero 1. 2. 3. 4. 5. 6. entrada de alimentación entrada antena A salida balanceada salida no balanceada atenuación audio entrada antena B 5. Preparar el receptor 1.
Ajuste la sensibilidad con ▲ o ▼. Cuanto más alto sea el valor, menos sensible será el receptor. No ajuste la sensibilidad por debajo de 15dB. Pulse SET para confirmar. b. Seleccionar el canal / la frecuencia Pulse SET hasta que la pantalla LCD visualice la siguiente opción. Espere de 2 a 3 segundos. Cada canal tiene su propia frecuencia. Seleccione la frecuencia / el canal con ▲ o ▼ y pulse SET para confirmar. c. Bloquear los ajustes Pulse SET hasta que la pantalla LCD visualice la siguiente opción.
Espere de 2 a 3 segundos. Luego, puede bloquear (loc on) o desbloquear (locoff) los ajustes del emisor. Seleccione locoff con ▲ o ▼. Vuelva a pulsar SET para entrar en el menú. Seleccione el canal con ▲o ▼ y pulse SET para confirmar. d. Seleccionar la frecuencia Pulse SET y seleccione el menú de visualización (disp). Espere de 2 a 3 segundos y seleccione el menú de las frecuencias (fye9u) con ▲o ▼. Vuelva a pulsar SET para entrar en el menú. Seleccione el canal con ▲o ▼ y pulse SET para confirmar.
13. Especificaciones sistema rango de frecuencia: UHF 863.000 - 865.000MHz (sintonizable) Se requiere una licencia para algunas bandas de frecuencia. Consulte las normativas locales. modulación: FM (PLL) desviación nominal / de pico: ± 25kHz / máx. ± 48kHz estabilidad de la frecuencia: máx. ± 15ppm respuesta en frecuencia: 60Hz - 18kHz relación señal/ruido con 1mV RF y desviación de pico: máx. 110dB(A) THD con desviación nominal y 1kHz: máx.
MICW42-2 – DRAHTLOSES TRUE DIVERISTY UHF-MIKROFONSYSTEM 1. Einführung & Eigenschaften An alle Einwohner der Europäischen Union Wichtige Umweltinformationen über dieses Produkt Dieses Symbol auf dem Produkt oder der Verpackung zeigt an, dass die Entsorgung dieses Produktes nach seinem Lebenszyklus der Umwelt Schaden zufügen kann.
4. Überblick des Empfängers a. Frontplatte 1. 2. 3. 4. 5. 6. 7. Kopfhöreranschluss Stromversorgungsschalter Lautstärkeregelung LCD-Display Verriegelung ▲▼ – Wahltasten SET – Menü-Einstellung und Bestätigungstaste b. Rückseite 1. 2. 3. 4. 5. 6. Stromversorgungseingang Eingang Antenne A symmetrischer Ausgang nicht symmetrischer Ausgang Einstellung Audiodämpfung Eingang Antenne B 5. Vorbereiten des Empfängers 1. Verbinden Sie die Antennen mit den BNC-Anschlüssen auf der Rückseite des Empfängers.
Regeln Sie die Empfindlichkeit mit ▲oder ▼. Je höher der Wert ist, desto niedriger ist die Empfindlichkeit. Stellen Sie die Empfindlichkeit mindestens auf 20dB ein. Drücken Sie SET zur Bestätigung. b. Frequenz- / Kanaleinstellung Drücken Sie SET bis nachfolgendes Display erscheint. Warten Sie 2 bis 3 Sekunden. Jeder Kanal hat seine eigene Frequenz. Wählen Sie mit ▲oder ▼aus und stellen Sie die Frequenz / den Kanal ein. Drücken Sie SET zur Bestätigung. c.
c. Kanal auswählen Schalten Sie den Sender ein indem Sie den Stromversorgungsschalter auf ON stellen. Drücken Sie SET und wählen Sie das Displaymenü (disp) aus. Warten Sie 2 bis 3 Sekunden und wählen Sie das Kanalmenü (channl) mit ▲oder ▼. Drücken Sie SET wieder, um das Menü anzuzeigen. Nachfolgende Anzeige erscheint. Warten Sie 2 bis 3 Sekunden. Sie können nun die Einstellungen verriegeln oder nicht (loc on oder locoff). Wählen Sie locoff mit ▲oder ▼. Drücken Sie SET, um das Menü anzuzeigen.
4. Sorgen Sie dafür, dass die Netzkabel nicht beschädigt werden. Lassen Sie das Gerät von einer Fachkraft installieren. 5. Trennen Sie das Gerät vom Netz ehe Sie mit den Servicearbeiten anfangen. 6. Verwenden Sie zur Reinigung ein feuchtes fusselfreies Tuch. Verwenden Sie auf keinen Fall Alkohol oder irgendwelche Lösungsmittel. 7. Es gibt keine zu wartenden Teile. 8. Bestellen Sie eventuelle Ersatzunterteile bei Ihrem Fachhändler. 13. Technische Daten System Frequenzbereich: UHF 863.000 - 865.
R&TTE Declaration of Conformity R&TTE-verklaring van overeenstemming Déclaration de conformité R&TTE R&TTE Konformitätserklärung Declaración de conformidad R&TTE We / wij / nous / Wir / Nostros Velleman Components NV Legen Heirweg, 33 9890 Gavere (België) Declare on our own responsibility that the finished product(s) : Verklaren op eigen verantwoordelijkheid dat het afgewerkte product : Déclarons sous notre propre responsabilité que le produit fini : Erklären voll verantwortlich dass nachfolgendes Produkt
EMC : - LVD: EN 60065 R&TTE: EN 301 357-2 v1.3.1 : 2005 EN 301 489-1 v1.4.1 : 2002 EN 301 489-9 v1.3.
Velleman® Service and Quality Warranty Since its foundation in 1972, Velleman® acquired extensive experience in the electronics world and currently distributes its products in over 85 countries. All our products fulfil strict quality requirements and legal stipulations in the EU. In order to ensure the quality, our products regularly go through an extra quality check, both by an internal quality department and by specialized external organisations.
Garantía de servicio y calidad Velleman® Desde su fundación en 1972 Velleman® ha adquirido una amplia experiencia como distribuidor en el sector de la electrónica en más de 85 países. Todos nuestros productos responden a normas de calidad rigurosas y disposiciones legales vigentes en la UE. Para garantizar la calidad, sometemos nuestros productos regularmente a controles de calidad adicionales, tanto a través de nuestro propio servicio de calidad como de un servicio de calidad externo.