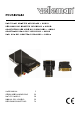
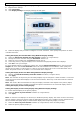
P PCUSB BVGA A2 US SB TO DVI D ADA APTER 1920X10 1 080 + A UDIO US SB NAA R DVI ADAPTE A R 1920X X1080 + AUDIO O A DAPTAT TEUR US SB VERS S DVI 19 920X108 80 + AU UDIO A DAPTAD DOR USB B A DVI 1920X 1080 + AUDIO US SB- AUF F DVI-A DAPTER R 1920X X1080 + AUDIO O US SER MANUAL GE EBRUIKER RSHANDL LEIDING NO OTICE D’E EMPLOI MA ANUAL DEL USUAR RIO BE EDIENUNGSANLEIT TUNG 3 20 38 56 74 4
PCUSBVGA2 © COPYRIGHT NOTICE The copyright to this manual is owned by Velleman nv. All worldwide rights reserved. No part of this manual or may be copied, reproduced, translated or reduced to any electronic medium or otherwise without the prior written consent of the copyright holder. © AUTEURSRECHT Velleman nv heeft het auteursrecht voor deze handleiding. Alle wereldwijde rechten voorbehouden.
PCUSBVGA2 P Use er man nual 1.. Introdu uction To o all residen nts of the European E Un nion Im mportant en nvironmenttal informattion about this t produc ct This symbol on th he device orr the package indicates that t disposal of the device after its lifecycle coulld harm m the environ nment. Do not dispose of o the unit (o or batteries) as unsorted d municipal waste; w it should be taken to t a specialized company for recycling.
PCUSBVGA2 • display modes: o o o o • can easily mirror the main display extend left, right, above, or below can be rotated left, right, or upside-down DVI, VGA and HDMI support audio modes: o o o 2.1 Channel Audio Output microphone support mixed output RCAx2 (left and right track) interface • USB 2.
PCUSBVGA2 • computer screen, if it is not integrated • network access for software downloads, or access to a CD-ROM drive. Graphics Card Support (Windows Vista/Windows 7) In Windows Vista and Windows 7, DisplayLink software interacts closely with the primary graphics card. DisplayLink supports and tests a single graphics card (GPU) installed in a PC from all major GPU brands (Intel, ATI, NVidia and Via).
PCUSBVGA2 7. Installing the Software Note: If you already have V3.x, R4.1 or R4.2 DisplayLink software installed, you must uninstall it using Windows’ Add/Remove Programs before installing this release. 7.1. Installing the Software Using Windows 7 Update The preferred method of installation is using Windows 7’s update facility. 1. Connect your display via the adapter and the USB cable to your PC. Windows detects the new hardware and automatically downloads the driver. 2.
PCUSBVGA2 8. Using the DisplayLink Software 8.1. Windows 7 – Configuring the Display In Windows 7 you can configure a display using Windows Display Properties (WDP). WDP provides a simple method to attach, rotate, duplicate or extend displays as well as modify the display resolution. Opening WDP There are several ways to open WDP. Either: • Right-click on the desktop and select Screen Resolution from the menu. • Choose Start > Devices and Printers and double-click the DisplayLink Device icon.
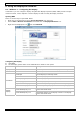
PCUSBVGA2 Selecting the Display Mode To control the behaviour of an attached display, you can use the key combination Windows Logo+P to display a menu (and cycle through it) to switch display modes. 1. Press Windows Logo+P. The following menu appears: 2. Click one of the options. The displays update to reflect your choice. The DisplayLink Application Icon You can configure the behaviour of the adapter through the DisplayLink icon in the taskbar, if present. To show the DisplayLink Manager menu: 1. 2.
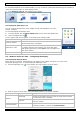
PCUSBVGA2 Menu option Colour Quality Screen Rotation Extend To Submenu option Description Medium (16-bit) Changes the colour depth of the extending display to 16 bits. Highest (32-bit) Changes the colour depth of the extending display to 32 bits. Normal No rotation is applied to the display connected to the adapter Rotated Left Rotates the extended or mirrored display by 270°. Rotated Right Rotates the extended or mirrored display by 90°.
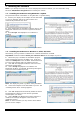
PCUSBVGA2 Configuring the Display Using the Display Settings Window 1. 2. 3. Right-click the desktop. Click Personalize. Click Display Settings. The Display Settings window opens. 4. Select the display that you want to configure. Its mode, resolution, colour quality and position can all be controlled from here. Setting the Display in Extended Mode Using Windows Display Settings 1. 2. 3. 4. 5. Select the Extend the desktop onto this monitor checkbox (1 in figure above).
PCUSBVGA2 3. 4. Uncheck the Extend the desktop onto this monitor checkbox (1 in figure above). Click Apply. The connected display stays the primary display when the PC enters hibernate or suspend mode or is rebooted. If the connected display is detached, the other display becomes the primary display again. Setting the Display as the Primary Display Using the DisplayLink Menu 1. 2. From the taskbar, click on the DisplayLink icon Select Set as Main Monitor. .
PCUSBVGA2 Manual Updates To update the software manually: 1. 2. Click on the DisplayLink icon . The DisplayLink menu opens. Select Updates > Check Now. If you have the most recent software, a dialog box appears. Otherwise the Choose updates to install dialog opens. 8.4. Audio Configuration Before using a speaker or microphone connected to the adapter, you have to correctly configure your application to use USB (Multimedia) Audio Device, i.e., the audio components of the adapter.
PCUSBVGA2 Configuring Application Audio Device To play a movie via media player software using headphones or speakers connected to the adapter, make sure the media player software (such as Windows Media Player, Real Player, WinDVD, PowerDVD…) is configured to use the USB Audio Devices as the audio in and out devices.
PCUSBVGA2 3. Double-click DisplayLink Core software. A Windows confirmation dialog opens (if enabled). 4. Click Yes. A message may appear to state which software packages will also be uninstalled. 5. Click Yes to uninstall the packages that use DisplayLink Core Software. The uninstaller automatically uninstalls the software. Once uninstalled, you will be prompted to reboot. 6. Click Yes to complete the uninstallation. 8.6.
PCUSBVGA2 You will see a red border on the DisplayLink screen. The red border shows the size of the new Windows desktop. 2. Use the “+” and “–” buttons in the Fit to TV window to change the size of the red border until it fits on the TV screen. Note: You can finetune by holding down the CTRL key and clicking the “+” and “–” buttons. 3. Once the red border is at the edges of the TV screen, click Apply to resize the Windows desktop. 8.7.
PCUSBVGA2 Supported Screen Modes There are three components that make up the screen mode: • Resolution: the number of pixels displayed on screen horizontally and vertically. • Colour quality: the number of different colours that can be shown on the screen at the same time. • Refresh rate: the speed at which the entire screen is rescanned. Higher refresh rates reduce flicker. Some screens advertise the supported modes through the VGA or DVI connector.
PCUSBVGA2 10. Mac OS User Guide This guide applies to Mac software version 1.0 and higher. What Is the Mac driver? The Mac driver is designed for MAC OS 10.4 (Tiger), 10.5 (Leopard) and 10.6 (Snow Leopard) to enable you to add an additional display to your Mac using DisplayLink technology. This software enables you to run your adapters on any Intel-based desktop or laptop Mac, allowing you to connect up to 4 additional displays via USB.
PCUSBVGA2 Managing Multiple Displays • When attaching a display with unknown software, the display will by default be extended to the right of the primary display. • To configure the settings for each of your attached displays, select Displays from the System Preferences window on each of your attached displays. • It is possible to use the Gather Windows button to bring all the display preferences windows onto the primary display.
PCUSBVGA2 11. Technical Specifications resolution up to 1600x1200 or 1920x1080 Digital (@60Hz 32-bit) available USB 2.0 port system requirements package contents operating system: Windows 2000 SP4, XP SP2, Vista 32/64bit with Aero support, Windows 7 32/64bit 1x USB to DVI adapter 1x quick start guide 1x CR-ROM with user guide and installation software 1x 4ft (±1m20) USB 2.0 cable 1x DVI to VGA adapter 1x DVI to HDMI adapter 1x 3.
PCUSBVGA2 P Ge ebruike ershan ndleiding 1.. Inleidin ng Aa an alle inge ezetenen va an de Europ pese Unie Be elangrijke milieu-infor m rmatie betrreffende ditt product Dit sy ymbool op het toestel off de verpakking geeft aan dat, als he et na zijn lev venscyclus wordt w weggeworpen, dit toestel sch hade kan toe ebrengen aan n het milieu..
PCUSBVGA2 4. Eigenschappen Met de PCUSBVGA2 USB schermadapter sluit u een extra display, lcd-scherm of projector via een vrije USB 2.0-poort aan op uw computer zonder videokaart. De standaard uitgangspoort is DVI, maar het apparaat wordt geleverd met twee adapters voor een VGA- of HDMI-scherm. Inhoud: USB naar DVI adapter, beknopte handleiding, CD-ROM met uitgebreide handleiding en software, USBkabel 2.0 (±1m20), DVI naar VGA adapter, DVI naar HDMI adapter, 3.5mm stereo naar RCA adapter.
PCUSBVGA2 Windows XP • voor 1-2 schermen, commercieel gebruik, verhoogde productiviteit. Mogelijks is er hierdoor geen volledige framesnelheid bij het afspelen van DVD op volledig scherm: 1.2GHz Single Core CPU, 512MB geheugen • voor 3 schermen waarbij 1 scherm DVD video kan afspelen en tevens zorgen voor verhoogde productiviteit en commerciële toepassingen. Ondersteunt slechts 1 videobeeld met DVD-resolutie op volledig scherm: 1.
PCUSBVGA2 audio-verbinding 7. De software installeren Opmerking: Indien u de DisplayLink-software V3.x, R4.1 of R4.2 reeds installeerde, dan moet u deze verwijderen met de Windows Add/Remove Programs functie, alvorens deze versie te installeren. 7.1. De software installeren met Windows 7 Update De aangewezen installatiewijze is de update-functie van Windows 7. 1. Sluit de display via de adapter en de USB-kabel aan op de PC. Windows herkent de nieuwe hardware en download de driver automatisch. 2.
PCUSBVGA2 7.2. De software installeren op Windows 7/Vista/XP/2000 Desgewenst kunt u de software installeren via een download van een website of via CD-ROM. Belangrijk! Installeer de software vooraleer u een apparaat op uw PC aansluit via de adapter. 1. Als autoplay geactiveerd is in het OS, start de installatie automatisch vanop de CD-ROM. Indien niet, zoek het bestand Setup.exe op de CD-ROM en dubbelklik erop. Het venster Windows User Account Control wordt geopend (indien geactiveerd in de OS). 2.
PCUSBVGA2 Het scherm instellen 1. 2. Open WDP. Stel de schermopties in. Zie onderstaande tabel voor meer details over elke optie. Menu Submenu Beschrijving Display Selecteer het in te stellen scherm in het uitrolmenu. Resolution Kies de resolutie met behulp van het uitrolmenu en de schuifindex. Orientation Multiple displays Landscape Zet het scherm in landschapsmodus. Portrait Zet het scherm in portretmodus. Landscape (flipped) Zet het scherm in omgekeerde landschapsmodus.
PCUSBVGA2 De DisplayLink-icoon Het is mogelijk om de werking van de adapter in te stellen via de DisplayLink-icoon op de taakbalk. Om het DisplayLink Manager-menu weer te geven: • In de taakbalk, klik op de pijl Show hidden icons om alle beschikbare iconen te tonen. • Klik op de DisplayLink-icoon . Er verschijnt een menu met meerdere opties. Zie de tabel hieronder.
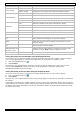
PCUSBVGA2 Menu Extend To Submenu Beschrijving Right Breidt het bureaublad uit rechts van het hoofdscherm. Left Breidt het bureaublad uit links van het hoofdscherm. Above Breidt het bureaublad uit bovenaan het hoofdscherm. Below Breidt het bureaublad uit onderaan het hoofdscherm. Extend Breidt het bureaublad uit naar uit tweede scherm. Set as Main Monitor Stelt het tweede scherm in als hoofdscherm.
PCUSBVGA2 3. Klik op Display Settings (scherminstellingen). Het venster Display Settings wordt geopend. 4. Selecteer het scherm dat u wilt instellen. De modus, resolutie, kleurkwaliteit en positie kunnen van hieruit worden ingesteld. Het scherm in uitgebreide modus zetten met behulp van het Display Settings venster (schermeigenschappen) 1. Vink Extend the desktop onto this monitor aan (zie 1 in figuur hierboven). 2. Regel de schermresolutie met de schuifbalk Resolution (2). 3.
PCUSBVGA2 Opmerking: Voor bepaalde PC’s en laptops is het nodig om het hoofdscherm uit te schakelen. De reden hiervoor is dat vele primaire grafische-kaartdrivers geneigd zijn om het scherm van de laptop automatisch als hoofdscherm in te stellen indien het ingeschakeld is. Om dit te verhelpen schakelt u het scherm van de laptop uit zodat een ander scherm als hoofdscherm kan ingesteld worden. Om dit te doen: 1.
PCUSBVGA2 Handmatige updates Om de software handmatig te updaten: 1. 2. Klik op de DisplayLink-icoon . Het DisplayLink menu wordt geopend. Selecteer Updates > Check Now. Indien u de laatste softwareversie heeft, verschijnt een dialoogvenster. Zoniet wordt het venster Choose updates to install geopend. 8.4. Geluidsinstellingen Alvorens luidsprekers of een microfoon te gebruiken via de adapter, moet u uw applicaties correct instellen voor het gebruik van het USB-geluidsapparaten, d.w.z.
PCUSBVGA2 Het geluidssysteem voor applicaties instellen Om een film af te spelen via media player software met een hoofdtelefoon of speakers aangesloten via de adapter, moet u controleren of de media player software (zoals Windows Media Player, Real Player, WinDVD, PowerDVD, enz.) ingesteld is om het USB-geluidsapparaat (USB Audio Device) te gebruiken.
PCUSBVGA2 3. Dubbelklik op DisplayLink Core software. Een confirmatiescherm wordt geopend (indien geactiveerd). 4. Klik op Yes. Het is mogelijk dat er een bericht verschijnt met softwarepakketten die ook zullen worden verwijderd. 5. Klik op Yes om de pakketten te verwijderen die DisplayLink Core-software gebruiken. Het programma verwijdert de software automatisch. Daarna vraagt het systeem u om de PC opnieuw op te starten. 6. Klik op Yes om het verwijderen te voltooien. 8.6.
PCUSBVGA2 Instellen 1. Om 'Fit to TV' in te stellen, selecteer de optie in het DisplayLink menu. Het volgende scherm verschijnt: U zal een rode rand zien op het DisplayLink-scherm. De rode rand toont het formaat van het nieuwe Windows bureaublad. 2. Gebruik de “+” en “–” knoppen in het 'Fit to TV' venster om het formaat van de rode rand te veranderen totdat het bureaublad past op het tv-scherm.
PCUSBVGA2 Stand-by en sluimermodus, afsluiten en herstarten Het scherm verbonden via de adapter wordt zwart als u de PC in stand-by of sluimermodus zet. Wanneer u de PC opnieuw opstart (en ontgrendelt indien nodig), keert het aangesloten scherm terug in dezelfde modus als voor stand-by of sluimermodus. Als de PC uitgezet en herstart wordt en de gebruiker ingelogd heeft, ook dan keert het aangesloten scherm terug in dezelfde modus als voor het uitzetten.
PCUSBVGA2 Voor meer ondersteuning http://www.displaylink.com/support 9. Problemen en oplossingen Kleine problemen kunnen meestal opgelost worden door: • het scherm los te koppelen en opnieuw aan te sluiten • de schermmodus aan te passen via de DisplayLink-software • of de schermmodus te veranderen via Windows Display Properties (schermeigenschappen).
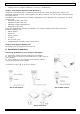
PCUSBVGA2 Schermen aansluiten op uw Mac Na de installatie van de Mac driver, sluit uw adapter(s) aan via USB en verbind elk scherm met een adapter. U kunt nu tot 4 extra schermen aansluiten. Enkele voorbeelden hieronder: Voorbeeld 1: twee schermen verbinden met een MacBook Pro. Verbindt de MacBook Pro met de twee schermen met USB-kabels en twee adapters. Koppel de schermen aan de adapters via standaard VGA/DVIkabels. Voorbeeld 2: drie schermen verbinden met een MacBook Air.
PCUSBVGA2 Schermen instellen via de menubalk Als de optie Show displays in menu bar aangevinkt is in het Display Preferences paneel, kunt u schermen instellen via de schermicoon in de menubalk. Via dit menu kunt u: • alle schermen verbonden met de Mac detecteren • spiegelen in- en uitschakelen • de resolutie instellen van hoofdscherm en extra scherm(en) • het Display Preferences paneel openen. 11. Technische specificaties resolutie tot 1600x1200 of 1920x1080 Digital (@60Hz 32-bits) vrije USB 2.
P PCUSBVGA 2 Notic ce d’em mploi 1.. Introdu uction Au ux résidents s de l'Union n européen nne De es informattions enviro onnementales importa antes conce ernant ce produit p Ce sy ymbole sur l'appareil ou l'emballage indique que e l’éliminatio on d’un appareil en fin de e vie peut polluer l'environn nement.
PCUSBVGA2 • modes d'affichage : o o o o • permet d'inverser l'image principale facilement étendre vers la gauche, la droite, le haut ou le bas peut être tourné à gauche, à droite et à l'envers supporte DVI, VGA et HDMI modes audio : o o o sortie audio 2.1 canaux entrée de microphone interface avec sortie mixte RCAx2 (piste de gauche et de droite) • alimentation par USB 2.
PCUSBVGA2 • Pour 6 écrans dont 1 peut lire DVD en format vidéo en plein écran : Core Duo 1.8GHz, mémoire de 1Go. • Au moins 1 port USB 2.0, 30 Mo d'espace disque disponible. • Afficheur d'ordinateur, si l'afficheur n'est pas intégré. • Accès au réseau pour télécharger du logiciel, ou accès au lecteur de CD-ROM. Cartes graphiques (Windows Vista/Windows 7) Le logiciel DisplayLink ne fonctionne qu'avec des cartes graphiques primaires.
PCUSBVGA2 connexion audio 7. Installer le logiciel Remarque : Si le logiciel DisplayLink v3.x, R4.1 ou R4.2 a été installé, désinstallez-le avec la fonction Windows Add/Remove Programs avant d'installer ce logiciel. 7.1. Installer le logiciel sous Windows 7 Update La méthode préférée pour l'installation est la facilité 'Windows Update'. 1. Connectez votre appareil USB avec le câble USB à l'ordinateur. Windows reconnaît le nouveau hardware et télécharge le pilote automatiquement. 2.
PCUSBVGA2 Remarque : Il est possible que l'écran clignote ou devient noir durant l'installation. 4. Connectez l'adaptateur à votre ordinateur avec le câble USB. La fenêtre pour installer le pilote de l'appareil s'affiche: 5. Cliquez sur Yes. DisplayLink installe l'appareil automatiquement. La fenêtre du logiciel DisplayLink avec le contrat de licence utilisateur s'affiche (voir ci-dessus). 6. Cliquez sur I Accept. Le logiciel DisplayLink s'installe sans notification que l'installation est complète.
PCUSBVGA2 Menu Orientation Multiple displays Sous-menu Description Landscape Réglage de l'afficheur en mode paysage. Portrait Réglage de l'afficheur en mode portrait. Landscape (flipped) Réglage de l'afficheur en mode paysage inversé. Portrait (flipped) Réglage de l'afficheur en mode portrait inversé. Duplicates these displays Reproduit l'afficheur principal sur l'afficheur secondaire. Extend these displays Etend l'afficheur principal vers l'afficheur secondaire.
PCUSBVGA2 8.2. Windows Vista/XP/2000 – Paramétrer l'afficheur Le menu DisplayLink Manager L'icône DisplayLink apparaît dans la barre des tâches après avoir ajouté un appareil. Cela vous donne accès au menu DisplayLink manager. Pour utiliser le menu DisplayLink Manager: 1. Cliquez sur l'icône DisplayLink dans la barre des tâches. Le menu suivant s'affiche. 2. Sélectionnez une des options disponibles. Veuillez voir la table suivante.
PCUSBVGA2 Mettre l'afficheur en Mode Extension en utilisant le menu DisplayLink En mode extension, le bureau Windows s'étend vers un afficheur ajouté à l'adaptateur. Ce mode permet de visualiser plusieurs applications ou documents simultanément. 1. 2. Cliquez sur l'icône DisplayLink Sélectionnez Extend. . A présent, l'appareil est étendu dans la même direction que la dernière fois.
PCUSBVGA2 Mettre l'afficheur en Mode Miroir en utilisant la fenêtre Display Properties (propriétés d'affichage) 1. 2. Désélectionnez Extend the desktop onto this monitor (1 sur l'image ci-dessus). Cliquez sur Apply. Remarque : Il est possible de diminuer la résolution de l'afficheur principal et l'afficheur DisplayLink. En mode miroir, assurez-vous que les deux afficheurs ont la même résolution. Il se pourrait que cette résolution diffère de la résolution maximale de l'afficheur.
PCUSBVGA2 Il est possible de désactiver cette option durant l'installation en désélectionnant Automatically check for updates (en bas à gauche). Utiliser l’assistant pour l'actualisation Par défaut, l'actualisation automatique est activée. Chaque semaine, le logiciel ou les actualisations les plus récentes sont recherchés après la connexion d'un adaptateur ou ordinateur. L’assistant pour l’actualisation sera activé si une nouvelle version du logiciel est disponible.
PCUSBVGA2 Configurer le système audio de Windows Pour configurer un appareil audio pour la lecture de musique dans Windows, ouvrez Control Panel et doublecliquez sur l'icône audio. Ensuite, sélectionnez l'appareil souhaité en Playback. Si vous souhaitez utiliser la carte sonore originelle pour la lecture de musique, assurez-vous de la sélectionner cela au lieu de l'appareil audio USB (USB Audio Device).
PCUSBVGA2 Pour chatter avec le logiciel 'Instant Messenger' utilisant un casque d'coute et un microphone connectés à l'adaptateur, assurez-vous que le logiciel de chat (comme p.ex. MSN Messenger, Yahoo Messenger ou Skype) de configurer pour utiliser l'appareil audio USB. 8.5. Désinstaller le logiciel DisplayLink La méthode de désinstallation peut différer un peu. Cela dépend de votre système d'exploitation. Pour désinstaller l'adaptateur sous Windows : 1. 2. 3.
PCUSBVGA2 5. Cliquez sur Yes pour désinstaller les progiciels du logiciel DisplayLink Core. Le logiciel se désinstalle automatiquement. Après la désinstallation, il est obligatoire de réinitaliser. 6. Cliquez sur Yes pour terminer la désinstallation. 8.6. Fit to TV Pourquoi ai-je besoin de « Fit to TV »? Si vous utilisez l'adaptateur pour connecter un téléviseur, il est possible que seulement une partie du bureau s'affiche parce que les téléviseurs utilisent la fonction « overscan ».
PCUSBVGA2 Calibrer l'afficheur Il est possible de calibrer l'afficheur avec des applications utilisant l'interface « Display Data Channel Command » (DDC/CI). L'afficheur comme l'application doivent supporter DDC/CI pour fonctionner. Un exemple pour une application supportée est ScreenWhite. DDC/CI n'est pas supporté sur des afficheurs avec la technologie DisplayLink. Par exemple des afficheurs mini.
PCUSBVGA2 Messages d'erreur Parfois le logiciel DisplayLink Graphics affiche des messages d'utilisation dans la zone de notification. Veuillez consulter la liste suivante pour voir tous les messages possibles et la description. Message Description Insuffisamment de ressources de système pour effectuer le service demandé Ce message apparaît en entrant en mode extension avec des ressources de système basses. L'ordinateur n'a pas assez de mémoire pour activer un afficheur étendu.
PCUSBVGA2 Guide d'installation - installer/désinstaller le pilote de Mac 1. Pour initier l'installateur de Mac, double-cliquez sur l'image Mac Driver Installer. 2. Sélectionnez Software Installer pour initialiser l'installation du pilote de Mac en utilisant un installateur de MAC. Réinitialisez le PC après l'installation. 3. Sélectionnez User Guide pour afficher le guide d'utilisation. 4. Sélectionnez Software Uninstaller pour désinstaller le pilote de votre Mac.
PCUSBVGA2 Gérer plusieurs afficheurs • L'afficheur s'étend automatiquement à droit de l'afficheur principal en connectant un afficheur que le logiciel ne reconnaît pas. • D'abord, sélectionnez System Preferences et ensuite Displays pour configurer les afficheurs. • Utilisez la touche Gather Windows pour afficher toutes les fenêtres System Preferences à l'afficheur principal.
PCUSBVGA2 11. Spécifications techniques résolution jusqu'à 1600x1200 ou 1920x1080 Digital (@60Hz 32 bits) port USB 2.0 libre système requis contenu Système d'exploitation : Windows 2000 SP4, XP SP2, Vista 32/64 bits avec support Aero, Windows 7 32/64 bits 1x USB vers adaptateur DVI 1x Notice d'emploi 1x CR-ROM avec notice d'emploi et installation de logiciel 1x câble USB 2.0 (1m20) 1x DVI vers adaptateur VGA 1x DVI vers adaptateur HDMI 1x jack stéréo 3.
PCUSBVGA2 P M Manua al del usuario u o 1.. Introdu ucción A los l ciudada anos de la Unión U Europ pea Im mportantes informacio ones sobre el medio am mbiente co oncerniente e a este pro oducto Este símbolo en este aparato o o el embalaje indica qu ue, si tira las s muestras inservibles, podrían p daña ar el me edio ambiente. No tire este e aparato (ni las pilas, si las hubie era) en la ba asura domés stica; debe irr a una empresa e esp pecializada en e reciclaje.
PCUSBVGA2 4. Características El PCUSBVGA2 le permite conectar un monitor, una pantalla LCD o un proyector adicional a un ordenador por un puerto USB 2.0 libre, sin necesidad de tarjetas gráficas adicionales. El puerto de salida es DVI, pero el aparato se entrega con 2 adaptadores para conectar un monitor VGA o HDMI. Incluye: adaptador USB a DVI, guía rápida, CR-ROM con manual del usuario y software de instalación, cable USB 2.
PCUSBVGA2 Windows XP • Para 1-2 monitores, uso comercial, objetivos de productividad. En pantalla completa, no se puede garantizar la velocidad de fotogramas máx. durante la reproducción del DVD: 1.2GHz CPU de un sólo núcleo (Single Core), memoria 512MB. • Para 3 pantallas, de las cuales 1 puede reproducir un DVD en formato de vídeo enfocando al mismo tiempo la productividad y aplicaciones comerciales. Soporta sólo 1 vídeo con una resolución de DVD en pantalla completa: 1.
PCUSBVGA2 conexión Audio 7. Instalar el software Observación: Si ha instalado el software « DisplayLink » v3.x, R4.1 o R4.2, desinstálelo utilizando la función « Add/Remove Programs » de Windows, antes de instalar este software. 7.1. Instalar el software con « Windows 7 Update » El método preferido es « Windows 7 Update ». 1. Conecte el monitor al ordenador con el adaptador y el cable USB. Windows detecta el nuevo hardware y descarga el driver automáticamente. 2.
PCUSBVGA2 Observación: Es posible que la pantalla parpadee o se vuelva negro durante la instalación. 4. Conecte el adaptador al PC con el cable USB. La ventana para instalar el driver del aparato (Installing device driver) aparece en la pantalla. 5. Haga clic en Yes (sí). « DisplayLink » instala el aparato automáticamente. La ventana con el control de cuentas de usuario (User Account Control) de Windows se visualiza (véase arriba). 6. Haga clic en I Accept (aceptar).
PCUSBVGA2 Ajustar la pantalla 1. 2. Abra WDP. Ajuste las opciones de la pantalla. Véase la siguiente lista para ver los detalles. Menú Pantalla Resolución Orientación Pantallas múltiples Submenú Descripción - Utilice la lista desplegable para seleccionar la pantalla que quiere configurar - Utilice la lista desplegable y seleccione una resolución con la barra deslizante. Vertical Pone la pantalla en modo vertical Horizontal Pone la pantalla en modo horizontal.
PCUSBVGA2 8.2. Windows Vista/XP/2000 – Ajustar la pantalla El menú « DisplayLink manager » Un icono aparece en la barra de tareas al añadir un aparato. Esto le permite acceder al menú « DisplayLink manager ». Para utilizar el menú: 1. Haga clic en el icono « DisplayLink » de la barra de tareas. El siguiente menú se visualiza: 2. Seleccione una de las opciones disponibles. Véase la lista siguiente.
PCUSBVGA2 Menú Submenú Avanzado (configuración avanzada) Descripción Para abrir la ventana « Windows Display Properties » (WDP) Poner la pantalla en el Modo Extendido con el menú « DisplayLink » En el modo extendido, la visualización se extiende por una o más pantallas adicionales. Este modo le permite realizar tareas múltiples más eficazmente sin traslapar ventanas. 1. 2. Haga clic en el icono « DisplayLink » Seleccione « Extend ». . La pantalla se extiende en la misma dirección que la última vez.
PCUSBVGA2 Poner la pantalla en el Modo Extendido con « Windows Display Settings » (Ajustes de pantalla de Windows) 1. 2. 3. 4. 5. Marque la casilla « Extend the desktop onto this monitor » (véase n° 1 en la figura de arriba). Ajuste la resolución con la barra deslizante. (2) Seleccione la calidad de color en el menú desplegable « Colors ». (3). Ajuste la posición con respecto a los otros monitores en el escritorio extendido (4). Haga clic en OK para guardar los ajustes.
PCUSBVGA2 Actualización automática La actualización automática de « DisplayLink » es una característica típica de mantenimiento y está soportada por Windows 2000/XP y Vista. El mecanismo de actualización automática asegura que siempre están disponibles los drivers y el software más recientes. Es posible desactivar esta opción durante la instalación al desmarcar la casilla « Automatically check for updates » (en la parte inferior izquierda).
PCUSBVGA2 software « Media Player » (p.ej. Windows Media Player, Real Player, WinDVD, PowerDVD, etc.). En este caso, configure el aparato de audio manualmente para cada aplicación. Configurar el sistema de audio de Windows Para especificar un aparato de audio para la reproducción de música en Windows, abra el panel de control y haga clic dos veces en el icono « sound » o « audio ». Luego, seleccione el aparato deseado en « playback ».
PCUSBVGA2 Para chatear con el software « instant messaging » utilizando los auriculares y el micrófono conectados al adaptador, asegúrese de que el software « instant messaging », (p.ej. MSN messenger, Yahoo messenger o Skype) esté configurado para utilizar el USB Audio Device como aparato de audio. 8.5. Desinstalar el software « DisplayLink » El método de desinstalación puede diferir un poco. Eso depende de su sistema operativo. Desinstalar el adaptador en Windows: 1.
PCUSBVGA2 5. Haga clic en Yes (sí) para desinstalar los paquetes del software « DisplayLink Core ». El software se desinstala automáticamente. Después de que se haya terminado la desinstalación, es obligatorio reiniciar el PC. 6. Haga clic en Yes (sí) para terminar la desinstalación. 8.6. Fit to TV ¿Por qué necesito « Fit to TV »? Si conecta su adatador a un televisor, es posible que no estén disponibles todas las pantallas de Windows porque los televisores utilizan la función « overscan ».
PCUSBVGA2 Calibrar la pantalla Es posible calibrar la pantalla con aplicaciones que utilizan la interfaz « Display Data Channel Command » (DDC/CI). Tanto la pantalla como la aplicación deben soportar DDC/CI para funcionar. Un ejemplo para una aplicación soportada es ScreenWhite. No se soporta DDC/CI en pantallas que incluyan la tecnología « DisplayLink ». Por ejemplo, mini pantallas.
PCUSBVGA2 Modos derivados Algunos modos de la interfaz gráfica de usuario (GUI) « DisplayLink » se visualizan con [ ]. Esto ocurre si la conexión de una pantalla con un modo preferido tiene una resolución más elevada que la resolución máxima soportada del adaptador. En este caso, no se soporta la resolución preferido de la pantalla. No obstante, se añaden resoluciones más bajas y con la misma relación de aspecto para testarlas. Modos entre corchetes [ ] indican que la pantalla no ha mencionado estos modos.
PCUSBVGA2 10. Manual del usuario Mac OS Este manual se aplica al software de Mac, versión 1.0 y superior. ¿Qué es el driver de Mac? El driver de Mac ha sido diseñado para MAC OS 10.4 (Tiger), 10.5 (Leopard) y 10.6 (Snow Leopard) y para poder añadir una pantalla adicional mediante la tecnología « DisplayLink ». Este software le permite iniciar sus adaptadores en cualquier escritorio basado en Intel o en cualquier ordenador portátil de Mac.
PCUSBVGA2 Manejar varias pantallas • La pantalla se extiende automáticamente a la derecha de la pantalla principal al conectar una pantalla que el software no reconoce. • Primero, seleccione « System Preferences » y luego « Displays » para configurar cada pantalla conectada por USB. • Es posible utilizar la tecla « Gather Windows » para visualizar todas las ventanas con las preferencias en la pantalla principal.
PCUSBVGA2 11. Especificaciones resolución hasta 1600x1200 ó 1920x1080 Digital (@60Hz 32-bit) puerto USB 2.0 libre exigencias del sistema Incluye sistema operativo: Windows® 2000 SP4, XP SP2, Vista 32/64-bit con soporte Aero, 7 32/64Bit 1x adaptador USB a DVI 1x guía rápida 1x CR-ROM con manual del usuario y software 1x cable USB 2.0 (±1m20) 1x adaptador DVI a VGA 1x adaptador DVI a HDMI 1x conector estéreo de 3.
PCUSBVGA2 P Bedienu ungsan nleitun ng 1.. Einführrung An n alle Einwo ohner der Europäische E en Union Wiichtige Umw weltinform mationen üb ber dieses Produkt P Diese es Symbol au uf dem Produkt oder derr Verpackung g zeigt an, dass d die Ents sorgung dies ses Produkte es nach seinem Lebe enszyklus de er Umwelt Schaden zufü ügen kann.
PCUSBVGA2 4. Eigenschaften Der PCUSBVGA2 ermöglicht es, einen zusätzlichen Bildschirm, LCD oder Projektor, ohne zusätzliche Grafikkarte, über USB 2.0 an einen Computer anzuschließen. Ausgangsport ist DVI, aber das Gerät wird mit 2 Adaptern geliefert, damit Sie einen VGA- oder einen HDMI-Bildschirm anschließen können. Lieferumfang: USB- auf DVI-Adapter, Schnelleinstieg, CR-ROM mit Bedienungsanleitung und InstallationsSoftware, 4ft USB 2.0-Kabel (±1m20), DVI- auf VGA-Adapter, DVI- auf VHDMI-Adapter, 3.
PCUSBVGA2 Windows XP • Für 1-2 Monitore, geschäftliche Nutzung, Produktivitätsziel. Dies kann nicht die volle Bildrate der DVDWiedergabe im Vollbildmodus gewährleisten: 1.2GHz Single Core CPU, 512MB-Speicher. • Für 3 Monitore, wovon 1 DVD Video abspielen kann während gezielt die Produktivität und BusinessAnwendungen laufen. Unterstützt nur 1 Video mit DVD-Auflösung in Vollbild: 1.6GHz CPU, 1GB-Speicher • Für 6 Bildschirme, wovon einen 1 DVD Video in Vollbild abspielen kann: 1.
PCUSBVGA2 Audio-Anschluss 7. Die Software installieren Bemerkung: Wenn Sie v3.x, R4.1 oder R4.2 DisplayLink-Software schon installiert haben, müssen Sie diese deinstallieren, indem Sie die Windows-Funktion « Add/Remove Programs » (Programme hinzufügen/entfernen) nutzen, bevor Sie diese Version installieren 7.1. Die Software mit « Windows 7 Update » installieren Die bevorzugte Methode für die Installation ist « Windows 7 Update ». 1.
PCUSBVGA2 7.2. Die Software auf Windows 7/Vista/XP/2000 installieren Alternativ können Sie die Software über einen Website-Download oder über CD-Rom installieren. Wichtig! Schließen Sie kein Gerät über den Adapter an Ihren PC an, bevor Sie die Software installiert haben. 1. Ist die Funktion « auto-play » eingeschaltet, dann startet das Installationsprogramm automatisch from the CD-ROM. Ist dies nicht der Fall, so doppelklicken Sie auf Setup.exe (CD-ROM).
PCUSBVGA2 Den Bildschirm einstellen 1. 2. Öffnen Sie WDP. Stellen Sie die Bildschirm-Optionen ein. Siehe folgende Tabelle. Menü Bildschirm Auflösung Ausrichtung Mehrfachanzeige Untermenü Beschreibung - Verwenden Sie das Aufklappmenü, und wählen Sie den Bildschirm, den Sie konfigurieren möchten, aus. - Verwenden Sie das Aufklappmenü und den Schieber und wählen Sie eine Auflösung aus. Querformat Setzt die Anzeige auf die Landschaft-Ansicht. Hochformat Setzt die Anzeige auf Foto- Ansicht.
PCUSBVGA2 Die DisplayLink-Ikone Sie können das Verhalten des Adapters über die DisplayLink-Ikone, die in der Taskleiste angezeigt wird, konfigurieren. Das DisplayLink Manager-Menü anzeigen: 1. 2. Klicken Sie in der Taskleiste auf den Pfeil, der die versteckten Ikonen anzeigt. Klicken Sie auf die DisplayLink-Ikone . Es erscheint ein Menü mit verschiedenen Optionen, die in der nachfolgenden Tabelle beschrieben werden.
PCUSBVGA2 Menü Erweitern auf Untermenü Beschreibung Rechts Erweitert das Bild nach rechts. Links Erweitert das Bild nach links. Oben Erweitert das Bild nach oben. Unten Erweitert das Bild nach unten. Erweitern Erweitert Ihre Arbeitsoberfläche auf den sekundären Bildschirm. Als Hauptbildschirm einstellen Setzt den sekundären Bildschirm als Hauptbildschirm.
PCUSBVGA2 3. Klicken Sie auf Display Settings (Bildschirmeinstellungen). Das Display Settings-Fenster öffnet sich. 4. Wählen Sie den Bildschirm, den Sie konfigurieren möchten, aus. Sie können hier Den Modus, die Auflösung, die Farbqualität und die Position kontrollieren. Den Bildschirm über die Windows-Bildschirmeinstellungen in Erweiterten Modus setzen 1. Markieren Sie das Kästchen Extend the desktop onto this monitor (die Arbeitsoberfläche auf diesen Monitor erweitern) (1, in Abb.). 2.
PCUSBVGA2 Tun Sie dazu dies: 1. Markieren Sie This is my main monitor (Dies ist mein Hauptbildschirm) (1, in Abb.) auf dem zweiten Bildschirm. 2. Wählen Sie den primären Bildschirm aus (Bildschirm 1). 3. Entmarkieren Sie das Kästchen Extend the desktop onto this monitor (1, in Abb.). 4. Klicken Sie auf Apply. Der angeschlossene Bildschirm bleibt primär wenn der PC in den Ruhezustand gewechselt und neu gestartet wird.
PCUSBVGA2 Manuelle Updates Die Software manuell aktualisieren: 1. 2. Klicken Sie auf die DisplayLink-Ikone . Das DisplayLink-Menü öffnet sich. Wählen Sie Updates > Check Now aus. Wenn Sie die neueste Software haben, öffnet sich ein Dialogfenster. Andernfalls öffnet sich das Fenster Choose updates to install (Wählen Sie Updates zum Installieren). 8.4. Audio-Konfiguration Konfigurieren Sie die Anwendung, um ein USB (Multimedia) Audio-Gerät, d.
PCUSBVGA2 Das Audio-System für Anwendungen konfigurieren Um einen Film über die Mediaplayer-Software und den mit dem Adapter verbundenen Kopfhörer oder Lautsprecher zu verwenden, beachten Sie, dass die Mediaplayer-Software (z.B. Windows Media Player, Real Player, WinDVD, PowerDVD, usw. ) konfiguriert ist, um das USB Audio Device als Audiogerät zu verwenden.
PCUSBVGA2 3. Doppelklicken Sie auf DisplayLink Core software. Ein Bestätigungsfenster öffnet sich (wenn aktiv). 4. Klicken Sie auf Yes. Es kann eine Meldung erscheinen, um anzuzeigen, welche Software-Pakete ebenfalls deinstalliert werden. 5. Klicken Sie auf Yes, um die Pakete der DisplayLink Core-Software zu deinstallieren. Die Software wird automatisch deinstalliert. Einmal deinstalliert, werden sie aufgefordert den PC neu zu starten. 6. Klicken Sie auf Yes, um die Deinstallation abzuschließen. 8.6.
PCUSBVGA2 Konfiguration 1. Um Fit to TV zu konfigurieren, wählen Sie die Option aus der DisplayLink-GUI. Das folgende Fenster öffnet sich: Ein roter Rahmen erscheint im DisplayLink-Bildschirm. Der rote Rahmen zeigt Ihnen die Größe des neuen Windows-Desktops. 2. Benutzen Sie « + » und « - » auf der Fit to TV GUI, um die Größe des roten Rahmens zu ändern, bis es auf den Fernsehbildschirm passt.
PCUSBVGA2 Mehrere Adapter verwenden Die Software unterstützt bis zu sechs gleichzeitig über USB angeschlossene Bildschirme. Es ist auch möglich, dass verschiedene Arten von Bildschirmen zu unterschiedlichen Zeiten genutzt werden, zum Beispiel, zwei im Büro und zwei zu Hause. Die Software speichert jedes Display-Profil getrennt. Dies ermöglicht verschiedene physikalische Positionierungen oder verschiedenen Auflösungen von angeschlossenen Monitoren im Büro und zu Hause.
PCUSBVGA2 Inkompatibler Display-Treiber Diese Meldung erscheint, wenn der primäre Grafikkarten-Treiber nicht WDDM kompatibel ist. Windows 7 ist nicht darauf ausgelegt, ohne WDDMTreiber zu arbeiten. Laden Sie den neuesten Windows 7 (WDDM)-Treiber für Ihre primäre Grafikkarte herunter und installieren Sie ihn. Das System kann nicht auf das angegebene Gerät zugreifen Diese Warnung kann in Windows XP nach dem Ändern des Display-Modus mehrmals (z.B.
PCUSBVGA2 Bildschirme an den Mac-Computer anschließen Nach Installation des Mac-Treibers, verbinden Sie den (die) Adapter über USB und verbinden Sie jedes Display mit einem Adapter. Es können bis zu 4 zusätzliche Bildschirme angeschlossen werden. Beispiele: Beispiel 1: Zwei Bildschirme mit dem MacBook Pro verbinden. Der MacBook Pro wird über USB-Kabel und Adapter mit zwei Bildschirmen verbunden. Bildschirme werden über Standard VGA/DVI-Kabel mit den Adaptern verbunden.
PCUSBVGA2 Configuring Displays from the Menu Bar If you have checked Show displays in menu bar in the Display Preferences panel, you can configure displays by clicking the display icon in the menu bar. This menu allows you to perform the following actions: • Detect all displays connected to the Mac. • Turn display mirroring on/off. • Set the resolution of primary and secondary display(s). • Open the Display Preferences panel. 11.
Velleman® Service and Quality Warranty Since its foundation in 1972, Velleman® acquired extensive experience in the electronics world and currently distributes its products in over 85 countries. All our products fulfil strict quality requirements and legal stipulations in the EU. In order to ensure the quality, our products regularly go through an extra quality check, both by an internal quality department and by specialized external organisations.
Garantía de servicio y calidad Velleman® Desde su fundación en 1972 Velleman® ha adquirido una amplia experiencia como distribuidor en el sector de la electrónica en más de 85 países. Todos nuestros productos responden a normas de calidad rigurosas y disposiciones legales vigentes en la UE. Para garantizar la calidad, sometemos nuestros productos regularmente a controles de calidad adicionales, tanto a través de nuestro propio servicio de calidad como de un servicio de calidad externo.