
Owner manual


PROMIX220 HQPOWER
4
• Use the original packaging if the device is to be transported.
• All modifications of the device are forbidden for safety reasons.
• Only use the device for its intended purpose. All other uses may lead to short circuits, burns, electroshocks,
crash, etc. Using the device in an unauthorised way will void the warranty.
4. Installation
Connect all stereo input sources first and then connect microphones and headphones. Make sure to place all faders
in their minimum position (“0”). Connect the stereo outputs to the power amplifier and/or tape decks. Power the
device through the included PSU connected to the mains. Use high quality shielded low-capacitance stereo cables
only.
5. Description
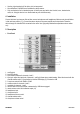
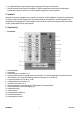
• Front Panel
1. on/off switch
2. level LED display
3. input selector switches for channels 1 and 2
4. input gain: adjust the input level of channels 1 and 2 with these rotary potentiometers. Select the channel with the
channel selector switch (13) and adjust so that the LED display (2) is centred on 0dB
5. 2-way tone controls from -26dB to +12dB
6. volume controls for channels 1 and 2
7. crossfader for channels 1 and 2
8. talk-over switch: the sound output is attenuated by 12dB when engaged
9. master volume control for the master output (18)
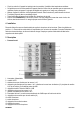
10. headphones input
11. microphone input
12. headphones volume control
13. channel selector switch
14. microphone volume control