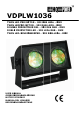
VD DP PLW W1 103 36 6 TWIN LED PROJEC P CTOR - 302 RGB R LE EDs - D DMX TWIN LEDPR ROJECT TOR - 302 RGB-LEDS - D DMX DOUBL LE PRO OJECTE EUR DEL - 30 02 DEL L RGB - DMX DOBLE E PROY YECTO OR LED - 302 LEDs RGB - DMX TWIN LED-S SCHEIN NWERF FER - 302 3 RG GB-LED Ds - DM MX USER MA ANUAL KERSHA ANDLEI IDING GEBRUIK LOI NOTICE D’EMPL M MANUAL L DEL USUARIO O BEDIENU UNGSAN NLEITU UNG
VDPLW1036_v3 2 HQPOWER™
EN NGLIS SH 1. Intrroductio on o all reside ents of the e European Union To Im mportant environme e ental inforrmation ab bout this product p This symbol on the device e or the pac ckage indica ates that disposal of tthe device after a its lifecy ycle could harm h the en nvironmentt. Do not dispose of th he unit (or batteries) as a unsorted d municipal waste e; it should d be taken to t a specialized compa any for recycling.
• Familiarise yourself with the functions of the device before actually using it. Do not allow operation by unqualified people. Any damage that may occur will most probably be due to unprofessional use of the device. • Use the original packaging if the device is to be transported. • All modifications of the device are forbidden for safety reasons. • Only use the device for its intended purpose. All other uses may lead to short circuits, burns, electroshocks, crash, etc.
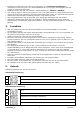
Synchronized Mode 1 Master 2 Slave 6. Choose mode (manual, auto, sound-control) DMX Control Enter the DMX address with or . Confirm with ENTER.
DMX512 Chain with Termination A DMX terminator is recommended for installations where the DMX cable has to run a long distance or is in an electrically noisy environment (e.g. discos). The terminator prevents corruption of the digital control signal by electrical noise. The DMX terminator is simply an XLR plug with a 120Ω resistor between pins 2 and 3, which is then plugged into the XLR output socket of the last device in the chain. Please see illustrations.
NED DERLA ANDS 1. Inle eiding an alle ing gezetenen van de Eu uropese Un nie Aa Be elangrijke milieu-infformatie betreffend b de dit prod duct s op p het toeste el of de verpakking ge eeft aan datt, als het na a zijn leven nscyclus Dit symbool word dt weggewo orpen, dit toestel t scha ade kan toe ebrengen aan het milieu. Gooi diit toestel (e en even ntuele batte erijen) niett bij het gew wone huish houdelijke afval; a het m moet bij een n gesp pecialiseerd d bedrijf terrechtkomen n voor recy yclage.
• Installeer het toestel weg van extreme temperaturen (zie ‘Technische specificaties’), vochtigheid en stof. Zorg voor een minimumafstand van 0,5 m tussen de lichtuitgang van het toestel en het belichte oppervlak. • Maak het toestel vast met een geschikte veiligheidskabel (bv. VDLSC7 of VDLSC8). • Leer eerst de functies van het toestel kennen voor u het gaat gebruiken. Ongeschoolde personen mogen dit toestel niet gebruiken. Meestal is beschadiging het gevolg van onprofessioneel gebruik.
Muzieksturing 1 Chase 2 7-kleurige flits 3 Se00-Se15 Gesynchroniseerd gebruik 1 Master 2 Slave 6. Kies aanstuurmodus (handmatig, automatisch, muziek) DMX-aansturing Geef het DMX-adres in met of . Bevestig met ENTER.
DM MX512-aansluiting uit een XLR R-kabel aan n de vrouwe elijke 3-pin XLR-uitgang van de controller c e en de andere kant van n Slu de e mannelijke 3-pin XLR R-ingang va an de VDPLW1036. U kunt vers scheidene V VDPLW1036’s aan elk kaar koppelen met behulp van ee en seriële koppeling. k Gebruik G daarvoor een n 2-aderige afg geschermde kabel me et XLR ingang- en uitg gangsaanslu uitingen.
8. Technische specificaties Voeding Verbruik Zekering Leds DMX Afmetingen Gewicht Max. omgevingstemperatuur Max. temperatuur behuizing 230 VAC/50 Hz 40 W T1A, 250 VAC (5 x 20 mm) (ordercode FF1N) 302 3-pin XLR 176 x 294 x 136 mm 2,5 kg 45°C 60°C Gebruik dit toestel enkel met originele accessoires. Velleman Components nv is niet aansprakelijk voor schade of kwetsuren bij (verkeerd) gebruik van dit toestel. Voor meer informatie over dit product, zie www.hqpower.com.
FR RANÇA AIS 1. Intrroductio on ux résiden nts de l'Un nion europ péenne Au De es informa ations env vironneme entales imp portantes concernant ce prod duit Ce symbole s sur l'appareil ou l'emballage indiqu ue que l’élim mination d’un appareil en fin de vie v peutt polluer l'e environnem ment. Ne pas jeter un appareil a éle ectrique ou électroniqu ue (et des piles s éventuelle es) parmi le es déchets municipaux non sujetts au tri sélectif ; une déchèterie e traittera l’apparreil en ques stion.
• Choisir un endroit où l’appareil est protégé contre la poussière, l’humidité et des températures extrêmes (voir « Spécifications techniques »). Respecter une distance minimum de 0,5 m entre la sortie lumière de l’appareil et la surface illuminée. • Fixer l’appareil à l’aide d’un câble de sécurité adéquat (p.ex. VDLSC7 ou VDLSC8). • Se familiariser avec le fonctionnement de l’appareil avant de l’utiliser. Ne pas permettre pas aux personnes non qualifiées d’opérer cet appareil.
Pilotage par le son 1 Poursuite 2 Éclats 7 couleurs 3 Se00-Se15 Pilotage synchronisé 1 Maître 2 Esclave 6. Sélectionner le mode de pilotage (manuel, auto, son) pilotage PMX Saisir l’adresse avec les boutons et . Confirmer avec ENTER.
Connexion DMX512 Connecter un câble à fiche XLR à la sortie XLR femelle à 3 broches de votre contrôleur et l’autre fiche XLR mâle à 3 broches à l’entrée du VDPLW1036. Il est possible de relier plusieurs VDPLW1036 à partir d’une connexion sérielle. Utiliser un câble de connexion blindé à 2 conducteurs avec des connecteurs d’entrée et de sortie XLR.
8. Spécifications techniques Alimentation Consommation Fusible DEL DMX Dimensions Poids Température ambiante max. Température max. du boîtier 230 VCA/50 Hz 40 W T1A, 250 VCA (5 x 20 mm) (réf. FF1N) 302 3-pin XLR 176 x 294 x 136 mm 2,5 kg 45°C 60°C N’employer cet appareil qu’avec des accessoires d’origine. SA Velleman Components ne sera aucunement responsable de dommages ou lésions survenus à un usage (incorrect) de cet appareil. Pour plus d’information concernant cet article, visitez notre site web www.
ES SPAÑO OL 1. Intrroducció ón danos de la Unión Eu uropea A los ciudad mportantes s informac ciones sob bre el med dio ambien nte concerrniente a e este produ ucto Im Este símbolo s en este apara ato o el embalaje indic ca que, si tira t las mue estras inserrvibles, podrían dañar el medio am mbiente. No o tire este aparato a (ni las pilas, si las hubierra) en la ca; debe ir a una emp presa espec cializada en n reciclaje.
• Familiaríce ese con el funcionamie f ento del ap parato. Sólo o personas cualificadas pueden manejar m estte aparato. La L mayoría de los daño os son caus sados por un u uso inad decuado. • Transporte e el aparato o en su embalaje original. • Por razone es de segurridad, las modificacion m nes no auto orizadas del aparato están prohib bidas. o el VDPLW W1036 parra las aplica aciones des scritas en este e manual a fin de evitar p.ej.
Mo odo contro olado por la música 1 Chase 2 D Destellos 7 colores c 3 Se00-Se15 odo sincro onizado Mo 1 Maes stro 2 Escla avo 6. Selección de el modo (au utónomo, automático, control po or la música a) Control DM MX a dirección DMX con lo os botones Inttroduzca la y . Co onfirme con n ENTER.
• Conexión DMX512 Conecte un cable con conector XLR (incl.) a la salida XLR hembra de 3 polos del controlador y el otro conector XLR macho de 3 polos a la entrada del VDPLW1036. Es posible conectar varios VDPLW1036 en serie. Use un cable blindado de doble hilo conductor con conectores XLR de entrada y de salida • Conexión DMX-512 con una terminación DMX Se recomienda una terminación si el cable DMX debe cubrir una gran distancia o si se usa en un medio ambiente con mucho ruido eléctrico (ej. una discoteca).
8. Especificaciones Alimentación Consumo Fusible LEDs DMX Dimensiones Peso Temperatura ambiente máx. Temperatura máx. de la caja 230 VCA/50 Hz 40 W T1A, 250 VCA (5 x 20 mm) (ref. FF1N) 302 3-pin XLR 176 x 294 x 136 mm 2,5 kg 45°C 60°C Utilice este aparato sólo con los accesorios originales. Velleman NV no será responsable de daños ni lesiones causados por un uso (indebido) de este aparato. Para más información sobre este producto, visite nuestra página web www.hqpower.com.
DE EUTSC CH 1. Einfführung g n alle Einw wohner der Europäis schen Unio on An Wichtige Um mweltinforrmationen n über dies ses Produkt Dieses s Symbol auf dem Pro odukt oder der Verpac ckung zeigt an, dass d die Entsorgu ung dieses Produktes nach seinem s Leb benszyklus der Umwelt Schaden zufügen ka ann.
• Achten Sie e bei der Wahl W des Ins stallationso ortes darauff, dass das Gerät kein nem Staub, keiner Feuchtigke eit und extrremen Tem mperaturen (siehe « Te echnische e Daten ») ausgesetztt wird. Beachten Sie S eine minimale Entffernung von n 0.5m zwis schen der Lichtausbeu L ute und irge endeiner beleuchtetten Fläche. ät mit einem m geeignete en Sicherhe eitskabel fe est (z.B.
Au utomatisch her Modus s 1 Blitz 2 Automatisch her « fade in » y « fad de out » 3 Automatisch her 7-farbig ger Wechsel 4 Chase 5 Chase-Gesch hwindigkeitt usikgesteu uerter Mod dus Mu 1 Chase 2 7-farbiger Blitz 3 Se00-Se15 ynchronisierter Mod dus Sy 1 Mastter 2 Slav ve 6. W Wählen Sie den d Modus aus (Stand d-Alone, au utomatisch,, musikgestteuert) DMX X-Ansch hluss eben Sie die e DMX-Adre esse mit Ge oder e ein. Bestätig gen Sie mitt ENTER.
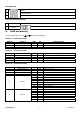
5 Sh hutter 6 Ma akros 0 10 58 60 109 111 160 162 0 10 51 92 133 174 215 9 57 59 108 110 159 161 255 9 50 91 132 173 214 255 Keine Funk ktion Stroboskop p von langs sam bis sch hnell Keine Funk ktion Geschlosse en Impuls v von langsam m bis schne ell Keine Funk ktion Schnell sch hließender Impuls Keine Funk ktion Beliebiges Stroboskop Kein Makro o Farbenfade e1 Farbenfade e RGB Farbenfade e2 Farbenfade e3 Farbenimp puls beliebig alle Makros s • DMX512--Anschluss erbinden Sie e ein XLR-K Kabel mit dem
5. Trennen Sie das Gerät vom Netz ehe Sie mit den Servicearbeiten anfangen. 6. Verwenden Sie zur Reinigung ein feuchtes Tuch. Verwenden Sie auf keinen Fall Alkohol oder irgendwelche Lösungsmittel. 7. Es gibt keine zu wartenden Teile. 8. Bestellen Sie eventuelle Ersatzunterteile bei Ihrem Fachhändler. 8. Technische Daten Stromversorgung Stromverbrauch Sicherung LEDs DMX Abmessungen Gewicht Max. Umgebungstemperatur Max. Temperatur Gehäuse 230 VAC/50 Hz 40 W T1A, 250 VAC (5 x 20 mm) (Bestell-Nr.
Velleman® Service and Quality Warranty • Tip: alvorens het toestel voor reparatie aan te bieden, kijk nog eens na of er geen voor de hand liggende reden is waarom het toestel niet naar behoren werkt (zie handleiding). Op deze wijze kunt u kosten en tijd besparen. Denk eraan dat er ook voor niet-defecte toestellen een kost voor controle aangerekend kan worden. • Bij reparaties buiten de waarborgperiode zullen transportkosten aangerekend worden. • Elke commerciële garantie laat deze rechten onverminderd.
• Von der Garantie ausgeschlossen sind: - alle direkten oder indirekten Schäden, die nach Lieferung am Gerät und durch das Gerät verursacht werden (z.B. Oxidation, Stöße, Fall, Staub, Schmutz, Feuchtigkeit, ...), sowie auch der Inhalt (z.B. Datenverlust), Entschädigung für eventuellen Gewinnausfall. - Verbrauchsgüter, Teile oder Zubehörteile, die regelmäßig ausgewechselt werden, wie z.B. Batterien, Lampen, Gummiteile, Treibriemen, usw. (unbeschränkte Liste).