
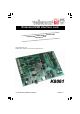
User Manual


10
software installation
After assembly of the circuit, it is now time to install the software drivers and examples and to test
the K8061.
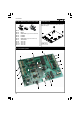
Connect a 12V power supply (non regulated 12V adapter) to the power supply connector of the
K8061 (SK2).
The control LED LD12 (RUN) should light as well as LD13 to LD20 (these are the input control
LEDs and light when the inputs are not active “LOW”).
If OK, connect the USB connector of the K8061 to your PC using the included USB cable.
LD10 (POWER) should light.
LD9 (USB) should light next in case of a data connection between the PC and the K8061.
With the first connection, you should install the USB driver of the microcontroller onto the PC first.
The location of this driver can be found on the included CD in the ‘USB_driver’ subfolder of the
K8061 software.
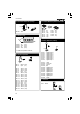
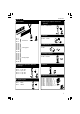
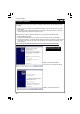
Refer to the figures below illustrating the driver installation (example Windows XP):
24. Software installation
Step 1 : New hardware detected
Local driver, don't run Windows Update
Step 2 : Select "specific location"
Screenshots may vary with
different operating system