
Owner's manual
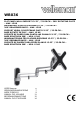
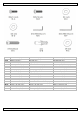
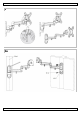
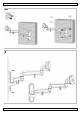

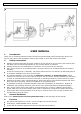
Table Of Contents

WB036
V. 02 – 16/07/2013 7 ©Velleman nv
5. Installation
Refer to the illustrations on page 2, 3, 4, 5, and 6 of this manual.
1. Preparation
Lift the TV bracket from the wall bracket. To do this, release the screws (2) at the back.
2a. Wooden Support
1. Choose an installation spot able to support the weight of the bracket and the screen.
2. It is important that the bracket be mounted on beams and not simply on a panel.
3. Use the bracket as a template to mark the hole locations (see diagram 2a).
4. Check for electric lines or pipes, or metal studs in wood battens.
5. Make sure the holes are level.
6. Pre-drill the holes (± 30 mm deep) using a power drill and a 3 mm wood bit.
7. Fix the bracket to the wall using 3 lag bolts [W-A] and washers [W-C].
2b. Concrete or Brick Support
1. Choose an installation spot able to support the weight of the bracket and the screen.
2. Use the bracket as a template to mark the hole locations (see diagram 2b).
3. Check for electric lines or pipes.
4. Make sure the holes are level.
5. Drill the holes (± 50 mm deep) using a power drill and an 8 mm masonry bit.
6. Insert a nylon plug [W-B] in each hole.
7. Fix the bracket to the wall using 3 lag bolts [W-A] and washers [W-C].
3. Covers
1. Place the plastic finishing covers on the wall plate.
2. Install the cable guide on the bottom or top of the bracket.
4. TV Bracket
Mount the TV bracket on the back of the TV. Depending on the TV screen, use the appropriate M4 or M5
screws and the appropriate washers (see diagram 4).
5. Installing the Display
Hook the TV mounting bracket over the wall mounting bracket and secure it with the mounting screws.
Note: This operation should be done by 2 adult persons.
6. Screen Position
1. Slightly release the 3 hex screws with the hex wrench [M-F] and adjust the angle of the screen (see
diagram 6).
2. Tighten the hex screws to secure the screen in the desired position.
Note: Check all screws and brackets regularly to ensure safe use.
6. Technical Specifications
LCD/plasma size
13-23" (33-58 cm)
max. load
15 kg / 33 lb
rotation
15° up/down tilt, 180° left / right swivel, and 360° rotation
distance to wall
min. 97 mm, max. 417 mm
weight
± 1.35 kg
Use this device with original accessories only. Velleman nv cannot be held responsible in the
event of damage or injury resulting from (incorrect) use of this device. For more info
concerning this product and the latest version of this manual, please visit our website
www.velleman.eu. The information in this manual is subject to change without prior notice.
© COPYRIGHT NOTICE – The copyright to this manual is owned by Velleman nv. All worldwide rights reserved.
No part of this manual may be copied, reproduced, translated or reduced to any electronic medium or otherwise without
the prior written consent of the copyright holder.
GEBRUIKERSHANDLEIDING
1. Inleiding
Dank u voor uw aankoop! Lees deze handleiding grondig voor u het toestel in gebruik neemt. Werd het
toestel beschadigd tijdens het transport, installeer of gebruik het dan niet en raadpleeg uw dealer.