LaCrosse Technology Heavy Weather Pro Software User’s Guide (for 2800 series weather stations with USB connectivity) Revision: 1.
CONTENTS Contents ........................................................................................................................................................................2 Overview........................................................................................................................................................................6 Getting Started ..................................................................................................................................
Help.....................................................................................................................................................................18 Options ....................................................................................................................................................................18 Setting Alarms ......................................................................................................................................................
Gust.....................................................................................................................................................................28 Max .....................................................................................................................................................................28 Alarm...................................................................................................................................................................
The Wind, Outdoor Temp, Dewpoint and Windchill are Blank ...............................................................................39 Heavy weather pro does not reconnect to the weather station.............................................................................40 Why do I see big spikes in the wind or rain data?...................................................................................................40 I have lost connection with my external rain and/or wind sensor(s).................
OVERVIEW W elcome to Heavy Weather Pro, the display and management software application designed for use with your LaCrosse Technology wireless personal weather station. Heavy Weather Pro allows you to use a PC to monitor and record weather data received from your LaCrosse Technology wireless weather station, via a proprietary USB device that was provided with your 2800 series weather station.
GETTING STARTED Let’s go over the things needed to prepare for installing the Heavy Weather Pro software application. LICENSING H eavy Weather Pro software is licensed to you free of charge with the qualifying purchase of a La Crosse Technology hardware model. You may install it on one PC, and if desired, the same owner may install one additional copy on one notebook. Reasonable backups of the software may be made for disaster recovery purposes.
SET UP YOUR WEATHER STATION HARDWARE Before installing the Heavy Weather Pro software on your computer, you should complete the setup of your LaCrosse Technology wireless weather station. If you have not already setup your weather station, please take the time to do so before continuing with the installation of the Heavy Weather Pro software application.
If you have met these requirements, we’re ready to install the software. There are two parts to installing the Heavy Weather Pro software: • Installing the Heavy Weather Pro software application. • Installing or connecting the USB communication device to the PC. INSTALLING THE HEAVY WEATHER PRO SOFTWARE Locate the Heavy Weather Pro application file (this is the file you downloaded earlier). It is typically named setup_hw_wv5.exe. Double click the exe file to start the installation process.
When the ‘Ready to Install’ dialog appears, click the ‘Install’ button to begin the software installation process. During the installation, the ‘Installing’ shows the installation progress. When the ‘Completing…’ dialog appears, Heavy Weather Pro has finished installing. Click “Finish” to complete the installation and start the Heavy Weather Pro application (if the checkbox labeled “Launch Heavy Weather” is selected).
Although the USB communication device can be installed on any USB port connected to your computer, using a non-powered USB hub or extension cable increases the chance for interruptions between the USB communication device and your computer. Where obstructions are an issue, a good quality 6ft USB extension cable can be used if it is directly connected to either a powered hub or a port on the computer itself.
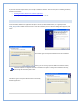
3. The Heavy Weather Pro software is installed. IF YOU HAVE NOT YET INSTALLED THE HEAVY WEATHER PRO SOFTWARE, please refer to the section on installing Heavy Weather before continuing. Ok, if the things listed above are complete, let’s begin the synchronization of our weather station with our computer (USB device)! To do this, we need to: 1. Put the weather station into Synchronize mode. 2. Put the software into Synchronize mode.
When you click the Resynchronize menu option, the Synchronize dialog will appear. Once we have the synchronize dialog displayed on your computer we are ready to put the weather station in synchronize mode. DON’T CLICK THE SYNCHRONIZE BUTTON YET! At this point, we need to leave the software portion of the synchronization process and get the weather station into synchronize mode.
DETAILED INSTRUCTIONS To tell the weather station to start communicating with the software, press and hold the button showing a down arrow until the weather station beeps (approximately 3-4 seconds). When you hear the beep, this indicates that the weather station is now searching for the USB communication device. While the weather station searches for a USB communication device, it will display ‘SCn-PC’ next to the time. The weather station should now be in scan mode.
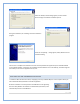
IF SYNCHRONIZATION IS NOT SUCCESSFUL If the synchronization process is not successful; you will see a message similar to the one to the right. At this point, you will need to retry the synchronization. REPEATING THE SYNCHRONIZATION PROCESS To repeat the synchronization process, we need to put both the weather station and the software into synch mode again. To do this press the down arrow on the display, then click the Synchronize button on the ‘Synchronize message box (on the software).
Menus Temp and Humidity Graphical Forecast Wind Speed and Direction Dewpoint Relative Pressure Wind Chill Rain Totals File Management Window Current Weather, Chart, or Data Window MENU There are several menu options available from the Heavy Weather Pro main window. This section briefly describes the functions accessible through these menu options.
FILE New Template: create a new template file. Open: Open an existing saved template or graph file. Save as Graph: Save the current data plot as a Graph file. Export as text: Export the history records as a comma-delimited text file. (for import into a spreadsheet application – you must be on the Data tab page to export history information) Print: To print a current plot or Graph (Note: history data must first be exported to be printed). Exit: Close the Heavy Weather Pro application.
VIEW Show Current Weather: Show or hide the Current Weather window. History Files: show or hide the History tab in the file management window. Template Files: Show or hide the Template tab in the file management window. Graph Files: Show or hide Graph tab/windows in the file management window.
GENERAL SETTINGS Language: This option sets the language for all windows and dialogs within Heavy Weather Pro. If a new language is selected, the application must be restarted. Show Help as ToolTips: Check this box to enable tooltip help wherever it is available. Recording History File: This is the path to the history data storage file. You can change the location and name of the history data file here.
button is pressed, the Heavy Weather Pro application will transfer those settings to the weather station (if the weather station and computer are synchronized and currently connected via the USB communications device). Time: Select either a 12 or 24 hour format for the time displayed on the weather station. Recording Interval: This option allows you to control how often Heavy Weather Pro will sample and store the data reported by the weather station.
DIRECTORIES History Files Directory: This is the path where the history data file will be written. The path for the history data file can also be modified through the Recording History File setting. (~\My Documents\HeavyWeather\History by default) Template Files Directory: Represents the path where template files are stored. The default is ~\My Documents\HeavyWeather\Templates. Graph Files Directory: This is the path where the graph files are stored.
MIN MAX VALUES The weather station can also store data regarding the minimum and maximum values for several properties. The actual min and max values are displayed in the main Heavy Weather Pro window, in the Current Weather tab. You can also view the date and time that these values were recorded, by viewing the details of a particular min or max value.
TEMPERATURE AND HUMIDITY The temperature and humidity section of the main dialog shows you: • The current indoor and outdoor temperature. • The current indoor and outdoor humidity levels. • Min and Max values for both indoor and outdoor temperature. • Min and Max values for both indoor and outdoor humidity. To view or reset the min or max values for any of the temperature properties, please refer to the Min Max Values section.
air can cause skin to crack and become irritated more easily. Typically however, a lower dewpoint is considered more comfortable because of the correlation with lower temperatures. People more used to continental climates often begin to feel uncomfortable when the dew point reaches between 59 to 68 °F (15 and 20 °C). Most people living in these areas will consider dew points above 70 °F (21 °C) oppressive.
RELATIVE (AIR) PRESSURE WHAT IS RELATIVE PRESSURE? Relative (also referred to as atmospheric) pressure is defined as the force per unit area exerted against a surface by the weight of air above that surface at any given point in the Earth’s atmosphere. Basically, even the atmosphere has weight. For most purposes, we can get air pressure by measuring the hydrostatic pressure caused by the weight of air above a certain point.
RAIN The entire lower portion of the main Heavy Weather Pro screen is devoted to rainfall. This section will talk about each of these values and what they represent. LAST HOUR The last hour rain gauge represents the amount of rainfall reported by the weather station’s external rain sensor in the last or previous 60 minutes. You can reset this value, or view details about the last hour of rain, by placing the mouse cursor over the Last Hour section and double clicking.
LAST WEEK The Last Week rainfall total represents the amount of rain that has been collected from Monday 12:00 AM to Sunday 11:59 PM OF THE PREVIOUS WEEK. The Last Week value will update each Monday at 12:00 AM to reflect the last full week’s total. Monday is used as this is the start date for international and business planning calendars. Example: If today is Wednesday, rainfall that occurs today will not be included in the Last Week value until Monday at 12:00 AM. Note: This value will be 0.
WIND SPEED AND DIRECTION Wind speed and direction is displayed in the upper right section of the main window. CURRENT WIND SPEED The current wind speed is displayed at the top of this section, above the Beaufort scale, with the wind direction represented by a compass in the middle. The current wind direction is represented by the arrow with a red tip. Note: the Beaufort scale (bft) is the effect of wind upon water and has a high reading of 12.
CHARTS, GRAPHS AND TRENDS Heavy Weather Pro provides the ability to analyze the weather data collected from the weather station and its sensors using graphical charts of the data. The software collects data from the weather station and stores it in a history data file (~\My Documents\HeavyWeather\History\history.dat by default). The stored data file is then used to generate different kinds of graphical reports for analysis.
WHAT IS A GRAPH? A graph is the resulting image created when we plot out and connect the data points in a particular history file. To create a graph, you must first select a history file and create a template. Since the graph may change if you modify the template or change the history file, you should click the “Save as Graph” menu selection, or the Save icon on the toolbar if you want to keep a permanent copy of the current data.
MAIN WINDOW There are two parts of the main window: File Management Current Graph (Chart) or History Data On the left is the file management section, which allows you to select and show the history, template or graph files. On the right is the chart \ data window, which shows you the current graph or history data.
THE FILE MANAGEMENT WINDOW HISTORY TAB When the History tab is selected, it shows all history files located in the history folder (~\My Documents\HeavyWeather\History\ by default). You can select the current history file, or one that was previously saved to the history folder. For more details on using history files, see the Working with History files section. TEMPLATE TAB If the Template tab is selected, you will see a list of the templates that have been saved.
WORKING WITH HISTORY DATA AND FILES By default, the history file is named history.dat and is located in the ~\My Documents\HeavyWeather\History\directory. This directory is where the Heavy Weather Pro application looks for history files to display in the History tab of the File Management window.
WORKING WITH TEMPLATE FILES Template files define the properties needed to construct a graph from a selected history data file and it’s data records (see What is a Template? for details). A sample template is provided for you, and is named Demo Template.hwt. This template gives you an idea of what a typical graph/chart template will contain. To create a new template, click the File menu dropdown and select New Template. The template properties window will appear.
Min and Max: Use the Min and Max checkboxes if you want to limit the data set to records within a specific range. Indoor, Outdoor, Dewpoint and Windchill: For some data types, you can choose to display more or less details. The details available will change depending on the data type selected. DATA PROPERTIES These properties allow us to choose the specific data records that will be displayed for the weather data selected in the graph properties.
STATUS The status section of the Properties window tells us if the data type and intervals we have chosen are valid. If we have selected to display a data type or a time period that is not available in our data records, the status line will turn red to indicate that the data cannot be displayed. If our selections are valid, the status text will be green. SAVING A TEMPLATE AS A GRAPH To display weather data in a chart of graph format, we first need to select the history data and create a template.
WORKING WITH GRAPHS AND TEMPLATES Now that we know how to create templates and graphs, let’s go over some of the things we can do with the data that is displayed in our Chart window. OPENING A GRAPH To open a graph, select the Graph tab in the File Management window and double the filename. You can have several graphs and templates open at one time, and each will have a tab across the top of the Chart window to identify it. IDENTIFYING THE CHART TYPE Notice that template tabs type of chart they represent.
ZOOMING OUT To zoom back out, press and hold the left mouse button anywhere on the chart window and with the mouse button still pressed, move the mouse up and to the left. The size of the box you draw does not matter when zooming out, you will always zoom out the original size of the template or graph.
TROUBLESHOOTING / FAQ HEAVY WEATHER PRO LOSES CONNECTION WITH MY WEATHER STATION OVERNIGHT. Many computers temporarily disable or “put to sleep” some of their hardware if they sit idle for awhile. This includes USB ports, which is what Heavy Weather Pro (the USB communication device) uses to talk to your weather station. If Heavy Weather Pro loses contact with the USB device, it will be necessary to re-synchronize the weather station and USB device.
manually reconnecting the weather station to its sensors (initiate the re-learn process on the weather station (press and hold the up ^ arrow until the weather station beeps). HEAVY WEATHER PRO DOES NOT RECONNECT TO THE WEATHER STATION If for some reason the weather station loses connection with its external sensors, it will try to automatically reconnect to them (usually within a few minutes).