Soundbar with wireless Subwoofer 1000002681 For every thrilling moment Experience cinematic sound from your sofa. This Dolby Atmos soundbar with wireless sub-woofer draws you deeper into the shows and movies you love. You’ll hear the drama flow around you, and even overhead more channels reproduce height as well as depth, creating a virtual three-dimensional surround sound. Whether it's spaceships flying overhead or the crowd in an arena, you'll feel the drama flow above and around you.
Important Safety Instruction Thank you for purchasing the 1000002681 Soundbar. Please read this user manual carefully and keep for future reference. Warning Caution: To reduce the risk of electric shock, do not dismantle the product and do not expose the apparatus to rain or moisture. No user-serviceable parts inside. Refer servicing to qualified personnel only. Plug on the power cord is used as disconnect device, the disconnect device shall be easily accessible.
6. The unit should not be impeded by covering the ventilation opening with items such as newspaper, table-cloths, curtains etc. Make sure that there are at least 20 cm of space above and at least 5 cm of space on each side of the unit. 7. The apparatus must not be exposed to dripping or splashing liquid, no objects filled with liquids such as vases, should be placed on the apparatus. 8. To prevent fire or shock hazard, do not expose this equipment to direct heat, rain, moisture or dust. 9.
Note: The Grantee is not responsible for any changes or modifications not expressly approved by the party responsible for compliance. such modifications could void the user's authority to operate the equipment. The device has been evaluated to meet general RF exposure requirement.
Preparation for Use Unpacking and Set Up •Remove the Sound bar from the carton and remove all packing material from the Sound bar. Save the packing material, if possible, in case the Sound bar ever needs to be serviced or transported. The original carton and packing material is the only safe way to pack your Sound bar to protect it from damage in transit. •Remove any descriptive labels or stickers on the front or top of the cabinet.
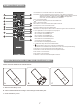
Product Diagram 1 Standby-on: Switch the Soundbar On or to standby. 3 Volume: Decrease the volume. 4 Volume: Increase the volume. 5 6 7 8 9 10 11 12 INPUT: Select an input source for the Soundbar. AC IN: Connect to power supply. 7 HDMI IN 2 : Connect to HDMI OUT of TV/Satellite/ Netework/Set-top box/BD/Blue Ray DVD/DVD player. 8 HDMI IN 1 : Connect to HDMI OUT of TV/Satellite/Netework/ Set-top box/BD/Blue Ray DVD/DVD player. 9 6 DISPLAY PANEL.
Pair up with the subwoofer After the soundbar and the subwoofer are powered on at the same time, make sure that the soundbar switches to BT mode. (Do not connect the soundbar Bluetooth to the device firstly, wait for the soundbar to pair with the subwoofer before connecting to device. Usually the pairing method will be fastest in BT mode.
REMOTE CONTROL 1. Power button: Press to switch the sound bar on/ off or standby mode. 2. Pair button: long-press pair button more than 2 seconds to conect and disconect last device. short-press pair button, the display will be shown “ ”, it is indicated that the surround effectiveness is switched on. Short-press pair button again, the display will be shown “OFF”, the surround effectiveness is switched off. 3. VOL+: to increase the volume. 4. Previous button: Skip to the previous track in USB & BT mode.
CAUTION Risk of explosion if the battery is replaced by an incorrect type Handling the battery • Improper or incorrect use of batteries may cause corrosion or battery leakage, which could cause fire, personal injury or damage to property. • Only use the battery type indicated in this manual. • Do not install new batteries with used ones and do not mix different types of batteries. • Do not dispose of used batteries as domestic waste. Dispose of them in accordance with local regulations.
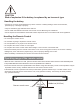
Positioning the Sound Bar Table Placement • Place the sound bar horizontally on a solid surface such as a TV unit or shelves and align it centrally with the TV screen. • For best sound output and good airflow around the soundbar, place your soundbar and subwoofer as shown on the right.
Soundbar Pad Soundbar Pad or 150*55*40MM 5 6 75*35*5MM Mount the unit on a wall When mounting the soundbar on a wall, all installation musted be performed in right way. The customer must never attempt to install it without authorization. Improper or inadequate installation may cause the sound bar to fall so as to result in personal injury.
Using the Soundbar • • • • Before connecting the AC power cord, ensure you have completed all other connections. Risk of product damage! Ensure that the power supply voltage corresponds to the voltage printed on the back or the underside of the unit. Connect the mains cable to the AC IN of the unit and then into a mains socket. Power cord quantity and plug type vary by regions. Basic Operation 1. Press the power button on either the remote control or the sound bar to turn on the sound bar. 2.
Auto Standby 1. The unit will automatically turns to standby mode when no audio input is received for 20 minutes. The sound bar will wake up from standby mode when any button is pressed or source input is received. 2. If the TV or the external unit is disconnected, switched it off • To switch the unit off completely, remove the mains plug from the mains socket. • Please turn the unit off completely to save energy when not in use. 3.
4. Select and play audio files or music on your Bluetooth device. • During play, if a call is coming, music play is paused.
Playing Audio via USB Port The sound bar automatically switches to USB input mode with the LED display when a USB flash drive is inserted (this mode isn't selectable on the sound bar or remote control unless a USB flash drive is connected). 1. Ensure that your USB flash drive contains MP3 audio files (other file types not supported) 2.
• Start playing on the TV • Press the source input button on the sound bar or remote control to activate the corresponding mode (the OPTICAL mode) to open optical digital input of your sound bar. After successfully connected, the LED display will show . Operate your audio device directly for playback features. • Press the VOL +/– buttons to adjust the volume to your desired level.
Option 2: Standard HDMI If your TV is not HDMI ARC-compliant, connect your soundbar to the TV through a standard HDMI connection. • Use an HDMI cable (included) to connect the soundbar’s HDMI OUT socket to the TV’s HDMI IN socket. • Use an HDMI cable (not included) to connect the soundbar’s HDMI IN (1 or 2) socket to your external devices (e.g. games consoles, DVD players and Blue-Ray). • Then short-press button on the sound bar or on the remote controller to switch to HDMI mode.
Troubleshooting Remote control Problem The unit cannot be operated using the remote control. Cause Remedy The unit is out of the operating range. Use the remote control within the operating range. The batteries are weak. Replace with new batteries. The remote control sensor of the unit is exposed to direct sunlight or strong lighting. Adjust the lighting angle, or reposition the unit. The TV cannot be operated Position the unit so that it does not obstruct the TV’s using the TV’s remote control.
Manufactured under license from Dolby Laboratories. Dolby, Dolby Audio, Dolby Vision, Dolby Atmos and the double -D symbol are trademarks of Dolby Laboratories. What is DOLBY ATMOS®? Dolby Atmos® transports you from the ordinary into the extraordinary with breathtaking, moving audio that fills your room and flows above and around you. Dolby Atmos gives you amazing experience you have never heard before by overhead sound, and all the richness, clarity, and power of Dolby sound.
Music mode Movie mode News mode 3D mode Enhances the treble and adds greater depth to the music. Intensifies the bass and enhances the clarity of dialogue. Enhances the clarity of voices. Suitable for watching TV shows and news. Enhances background music and full range to be sports effect Adjust the Volume Volume value: the volume value is 00-32, and the factory set value is "10". It has last volume memory function. Press Vol+/Vol- (Volume) to increase or decrease a volume level.