
Operation Manual


CONTROLS & CONNECTIONS
T
he subwoofer is set up, configured and adjusted by the controls, inputs and connections located on the back and front panels of the
subwoofer and the remote. Figures 1, 2 and 3 show the location of each of these important operational interfaces. Brief descriptions of each
i
nterface are below.
Cabinet Front
I
n order to access the controls and connections on the front of the cabinet, you need to remove the grille. You don’t need to remove the grille
right now. For instructions on how to remove and re-install the grille, see the Remove Subwoofer Grille and Install Subwoofer Grille sections.
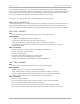
Figure 1: Subwoofer Cabinet Front with Grille Removed
REMOVE SUBWOOFER GRILLE
To remove the grille:
1. Place your thumbs on the top outside corners of the grille.
2. Use your thumbs to gently apply downward pressure to the top outer grille edges and pull the top grille edge towards you.
3. After the top of the grille is free of the top cabinet face, carefully rock the bottom grille cups of the grille off of the steel grille pegs.
INSTALL SUBWOOFER GRILLE
To reinstall the grille:
1. Carefully insert the bottom grille cups of the grille onto the lower steel grille pins.
2. Place your thumbs on the top outside corners of the grille.
3. Use your thumbs to gently push the top grille onto the cabinet face.
4. Push the grille to the cabinet over each grille pin.
[ 6 ]
D
igital Drive
P
LUS
U
ser’s Manual
PART ONE — OPERATE
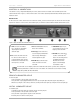
A. USB: Connect this mini USB to a
PC to optionally use the Windows
Setup Program to optimize the
subwoofer output.
B. MIC: Connect the smaller end of the
mic cable to use the microphone in
conjunction with the Sweep Tone CD.
The EQ functions will terminate unless
the microphone is connected.
C. Remote Control Sensor: Receives
remote control commands.
D. LED Display: Shows volume level,
crossover frequency and Auto-EQ
P
LUS
status messages. LED display is
visible through the front grille.
E. VOLUME: Adjust subwoofer output
volume.
The volume level shows
on the LED.
F. CROSSOVER: Adjust low pass
crossover frequency. The crossover
frequency shows on the LED.
G. AUTO EQ: Press and hold for 5
seconds to start the Auto-EQ
PLUS
function. This time delay prevents
accidentally performing the
Auto-EQ
PLUS
function. “AU”
appears on the LED display
once Auto-EQ
PLUS
starts.
The volume and crossover frequency return to their saved values after a power cycle unless these settings were
saved using the Auto-EQ
PLUS
software’s TV screen or PC interface. The volume and crossover knobs don’t change
settings during Self-EQ,
Auto-EQ or Manual-EQ.