1 1 - INTRODUCTION - Introduction 2 - Organisation du manuel 3 - PARTIE 1 – INTERFACE UTILISATEUR WINDOWS POUR L’OPTIMISATION (INTERFACE RECOMMANDÉE) 3 - Pilote port COM virtuel 3 - Programme d’installation Windows Digital DrivePLUS 4 - Configuration matériel requise 4 - Installation du port Com virtuel et du logiciel d’installation Windows pour le Digital DrivePLUS 11 - Interface utilisateur du logiciel d’installation Windows pour le Digital DrivePLUS 11 - Courbe de réponse en fréquence et écran de p
INTRODUCTION INTRODUCTION Parmi les fonctions les plus avancées du caisson de basses Digital DrivePLUS, vous découvrirez les modes d’optimisation : Self-EQ, Auto-EQPLUS et Manual EQ. Vous pouvez utiliser l’ensemble de ces méthodes d’optimisation, à l’exception de Manual EQ, sans passer par les interfaces d’optimisation de Digital DrivePLUS. Si vous souhaitez utiliser le mode d'optimisation Manual EQ, vous devrez utiliser l’une des interfaces utilisateur.
INTRODUCTION ORGANISATION DU MANUEL Pour voir les paramètres ou les courbes de réponse en fréquence, vous ne devez utiliser qu’une seule interface. Nous vous conseillons d’opter pour l’Interface Windows car il est en général plus facile de connecter votre caisson de basses à votre ordinateur qu’à votre téléviseur. L’Interface Windows vous permet également de voir les courbes du filtre paramétrique et enregistrer les paramètres sur votre ordinateur. Ces fonctions ne sont pas disponibles sur l’Interface TV.
PARTIE 1 – Optimisation à partir l’Interface Windows (Interface recommandée) Pour que l’Interface Windows procède à l’installation et à l’optimisation du caisson de basses Digital DrivePLUS, les deux programmes suivants doivent être installés sur votre ordinateur : Port com virtuel USB Programme d’Installation Windows Digital DrivePLUS Velodyne Ces deux programmes peuvent être désinstallés avec les procédures Windows habituelles telles que décrites plus bas, votre ordinateur est alors remis dans l’état dans
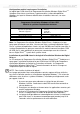
Configuration matériel requise pour l’installation Le logiciel port COM virtuel et le Programme d’Installation Windows Digital DrivePLUS Velodyne nécessitent, au minimum, la présence d’un système d’exploitation Windows ainsi que les éléments détaillés dans le tableau ci-dessous, sur votre ordinateur.
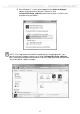
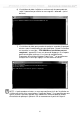
5) Dans Windows 7, si vous voyez apparaître une boîte de dialogue comme celle présentée ci-dessous, cliquez sur Run VelodyneDD+Setup_v###.exe en dessous du texte « Install or run program from your media ». NOTE : Si le Programme d’installation ne démarre pas automatiquement, vous pouvez le lancer en double cliquant sur le fichier VelodyneDD+Setup_v###.exe dans l’explorateur Windows comme décrit ci-dessous. ### représente le numéro de version du logiciel, 100 par exemple.
6) L’installation du pilote s’affiche sur un écran noir de commandes de script. Il commence par afficher un message dit « echo off » (voir cidessous). 7) L’installation du pilote peut prendre de quelques secondes à quelques minutes selon la configuration de votre ordinateur. Quand l’installation est terminée, le message « FTDI CDM Drive Installation process completed » apparaît et il vous est demandé d’appuyer sur n’importe quelle touche pour continuer.
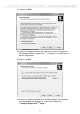
8) La fenêtre de dialogue Select Setup Language (Sélectionnez une langue) s’ouvre. Choisissez la langue de votre choix puis cliquez sur OK. 9) L’assistant de configuration du Programme d’Installation Windows Digital DrivePLUS s’ouvre. Cliquez sur Next (Suivant) pour continuer. 10) Lire l’ALUF (Accord de Licence de l’Utilisateur Final), sélectionnez « J’accepte ». Il est nécessaire d’accepter l’ALUF pour poursuivre l’installation.
11) Cliquez sur Next 12) Choisissez l’emplacement où vous souhaitez installer le Programme d’Installation Windows Digital DrivePLUS. Par défaut il s’installera dans le dossier Programmes. 13) Cliquez sur Next 14) Choisissez l’emplacement du menu de démarrage où vous souhaitez que votre programme apparaisse. Le dossier par défaut est « Velodyne Digital DrivePLUS Setup ».
15) Cliquez sur Next 16) SI vous ne souhaitez pas que le programme d’installation crée une icône pour le Programme d’Installation Windows Digital DrivePLUS, décochez l’option « Create a desktop icon ». Sinon, cette icône est créée par défaut.
18) Cliquez sur « Install » 19) Si vous souhaitez lancer le Programme d’Installation Windows Digital DrivePLUS, sélectionnez l’option « Launch Velodyne Digital DrivePLUS ». 20) Cliquez sur « Finish » (Terminer) 21) Connectez votre caisson de basses DrivePLUS à votre ordinateur à l’aide du câble USB fourni en vous assurant que votre caisson est allumé. Ceci permet à Windows de terminer l’installation du pilote.
NOTE : Après l’installation du port COM virtuel, votre ordinateur considère que la câble reliant le port USB à votre caisson de basses est connecté à un port COM. Vous pouvez voir le numéro attribué au port COM virtuel en allant dans Panneau de Configuration > Matériel > Gestionnaire de périphériques. Le port virtuel s’affiche comme un port COM avec la mention « Port série USB ».
Graphes Courbe de réponse en fréquence : affiche la courbe mesurée. Les échelles en abscisses et en ordonnées sont fixes. Graphe d’égalisation paramétrique : représentation graphique des 8 filtres d’égalisation ajustables à partir des paramètres du filtre paramétrique. chaque losange représente un de ces huit filtres. Le petit chiffre à côté de chaque losange indique le numéro du filtre paramétrique symbolisé par le losange. Les filtres sont numérotés de 1 à 8 de gauche à droite.
Paramètres d’optimisation - Paramètres du filtre paramétrique : affiche et permet d’ajuster les paramètres de chaque filtre. Vous pouvez ajuster les paramètres c’est-à-dire augmenter la valeur par clics de souris en ou entrant directement une valeur. Si vous changez les paramètres d’un filtre en utilisant ces champs, les changements apparaissent sur le Graphe d’égalisation paramétrique.
Menu - Menu dossier (File Menu) : - Open : ouvre un profil de paramétrage du caisson de basses. - Save : enregistre un profil de paramétrage du caisson de basses au format ddp. - Save as : enregistre un profil de paramétrage du caisson de basses sous un nom ou à un emplacement différent. - Exit : ferme le programme sans sauvegarder les paramètres vers un dossier ou sur le caisson de basses. - Menu DD+ - Reconnect : tentative de reconnexion avec le caisson de basses.
Écran des préréglages L’écran des préréglages permet de voir et de modifier le volume, la fréquence et la pente du filtre passe-bas, la fréquence et la pente du filtre subsonique, la phase et la polarité pour tous les préréglages de manière globale. L’écran des préréglages permet aussi de modifier la fréquence, le niveau de "contour" et le gain pour chaque préréglage. Cet écran vous permet également de paramétrer l’intensité du Mode nuit et le mode Marche/Arrêt automatique.
2) Connecter votre ordinateur au port USB situé sur le panneau avant de votre caisson de basses en utilisant le câble USB fourni. Veuillez vous reporter au Manuel Utilisateur Digital DrivePLUS. pour savoir comment retirer la grille frontale de votre caisson de basses afin d’accéder au port USB.
Pour modifier les préréglages en utilisant l’écran courbe de réponse et paramètres: 1) Dans la section Preset Parameter Settings (modification des paramètres de préréglages), utilisez le menu déroulant Preset pour sélectionner le préréglage que vous souhaitez modifier. 2) Utilisez les menus déroulants pour modifier les paramètres des préréglages.
3) Insérez le CD de tonalité à fréquence glissante dans votre lecteur de disques et lancez la lecture. 4) Lorsque le CD est en cours de lecture, réglez le volume de l'amplificateur de votre système pour obtenir un niveau sonore correspondant à celui d’une conversation normale. 5) Sur l’écran courbe de réponse et paramètres, sélectionnez Auto dans la partie EQ Optimization Option Selection and Initiation. 6) Cliquez sur Start.
5) Lorsque le statut de connexion affiche Synced, vous pouvez commencer à ajuster les paramètres du caisson de basses. Ne tentez pas d’ajuster les paramètres avant que le caisson n’affiche Synced. Synced signifie que le caisson a synchronisé sa mesure de fréquence avec celle du CD se trouvant dans votre système audio.
GUIDE DE DÉPANNAGE Cette partie vous fournit des informations pour résoudre les problèmes que vous pouvez rencontrer avec le logiciel et le pilote nécessaires pour mettre en service et optimiser votre caisson de basses Digital DrivePLUS. Si vous ne parvenez pas à trouver la réponse à un problème rencontré avec le logiciel, vous pouvez contacter le Service Clients de Velodyne au (408) 465-2851 ou par e-mail : service@velodyne.com. Problème : pas de connexion avec le caisson de basses.
b. Sélectionner Panneau de configuration. c. Dans Programmes, cliquez sur Désinstaller un programme.
2) Allez jusqu’à la ligne « Velodyne Digital DrivePLUS Velodyne Setup version X.XX » dans le menu déroulant et double cliquez dessus. 3) Dans la fenêtre de dialogue Velodyne Digital DrivePLUS Velodyne Setup, cliquez sur Yes. 4) Quand l’assistant de désinstallation a terminé, le Programme Windows Digital DrivePLUS Velodyne est définitivement désinstallé.
Cependant, si vous avez besoin d’espace sur le disque dur pour d’autres programmes ou dossiers, vous pouvez désinstaller le port COM virtuel. Si vous le désinstallez et souhaitez modifier les paramètres du caisson Digital DrivePLUS, il sera alors nécessaire de réinstaller ce port COM.
7) Pour terminer la désinstallation du pilote du port COM virtuel sous Windows XP, vous devez supprimer manuellement le pilote INF et les fichiers PNF. a. Dans le panneau de configuration, allez dans Options Dossiers > Voir et sélectionnez les options Afficher les fichiers cachés et Afficher le contenu des dossiers système. b. Recherchez le fichier FTDIBUS.INF dans le dossier Windows/INF en sélectionnant l’option de recherche « mot ou phrase dans le fichier ».
PARTIE 2 – Interface utilisateur d’optimisation à partir de l’écran du téléviseur Pour paramétrer ou optimiser votre caisson de basses Digital DrivePLUS avec l’interface de l’écran TV, vous devez raccorder une entrée vidéo de votre téléviseur à la sortie vidéo de votre caisson de basses. Cette partie vous explique comment : raccorder votre téléviseur au caisson de basses. comment utiliser la télécommande pour modifier et enregistrer les paramètres du caisson de basses.
Figure 1 : Écran d’accueil Sur la télécommande, si vous pressez sur MUTE pour mettre le caisson de basses en mode mute ou NIGHT (mode nuit), ces paramètres s’affichent également sur l’Écran d’accueil (voir Figure 2). Figure 2 : Écran d’accueil avec le modes nuit (Night Mode) et mute (Subwoofer Mute) activés.
Écran de Réponse Système À partir de l’écran d’Accueil, vous pouvez accéder à l’écran de Réponse Système, utilisé pour afficher la courbe de réponse en fréquence du caisson. Voir figure 3. Voir le tableau de Commandes Séquentielles des Touches de la Télécommande, en page 25, pour en savoir plus sur le rôle de chaque bouton. L’écran de Réponse Système contient les informations et les fonctions suivantes : - courbe de réponse en fréquence du caisson de basses entre 15 et 200 Hz.
Écran de navigation Vous pouvez aller dans l’écran des Paramètres Système en utilisant NEXT dans le coin supérieur droit de l’écran. Figure 3 : Écran de courbe de réponse du système Écran de Paramètres Système À partir de l’écran Réponse Système, vous pouvez vous rendre sur l’écran Paramètres Système en cliquant sur NEXT.
Écran de navigation Vous pouvez retourner sur l’écran de Réponse Système en utilisant PREV dans le coin supérieur gauche de l’écran. Figure 4 : Écran des Paramètres Système Commandes : Pilotage des fonctions à l’écran Utilisez la télécommande pour régler les paramètres du caisson de basses Digital DrivePLUS. Vous pouvez réaliser toutes les opérations d’installation grâce aux boutons de la télécommande fournie par Velodyne et voir les résultats sur l’écran de votre téléviseur.
BOUTONS DE LA TÉLÉCOMMANDE Vous trouverez ci-dessous les commandes et les séquences qui leur correspondent en utilisant les touches de la télécommande. Sauf indication contraire, ces séquences ne fonctionnent que sur l’écran d’Accueil. Commandes séquentielles à partir des touches de la télécommande pour l’Interface TV Commande Séquence Description Aller dans l’Ecran Réponse Système 1-2-3-4-5 Sur l’Ecran d’accueil Self-EQ 3-2-1 Lance l’optimisation Self-EQ.
Aller sur l’écran Réponse Système Pour aller sur l’écran Réponse Système : 1. Lorsque l’écran d’Accueil apparaît sur l’écran de vote téléviseur, appuyez sur 1-2-3-4-5 sur les touches de la télécommande Digital DrivePLUS. En pressant ces touches, les chiffres s’inscrivent sur l’écran d’Accueil (voir Figure 5). Figure 5 : écran d’Accueil 2.
Aller à l’écran de Paramétrage Système (System Settings) Pour aller sur l’écran Paramétrages Système : 1. Sur l’écran Réponse Système, placez le curseur sur NEXT. 2. Appuyez sur SELECT sur la télécommande. 3. L’écran Paramétrage Système apparaît (voir figure 7). Figure 7 : écran de Paramétrage Système Verrouiller les paramètres de préréglage Avant de modifier un préréglage individuel, enregistrer les paramètres de préréglage d’installation.
Restaurer les paramètres par défaut Pour restaurer les paramètres par défaut de sortie d’usine pour tous les réglages d’égalisation : À partir de l’écran d’Accueil, appuyez sur les touches 8-9-0 de la télécommande. Les chiffres n’apparaîtront pas sur l’écran. Si vous avez réussi, l'écran clignote et la page d’Accueil se réinitialise. Le message RESTAURATION DES PARAMÈTRES (DEFAULTS RESTORED) apparaît en haut de l’écran (voir figure 9).
en sélectionnant YES et en pressant SELECT sur la télécommande, vos paramètres sont enregistrés et votre caisson redémarre et vous ramène à l’écran d’Accueil. en sélectionnant NO et en pressant SELECT sur la télécommande, vous revenez à l’écran d’Accueil sans avoir enregistré ; les paramètres reviendront à ceux correspondant à la dernière sauvegarde. en sélectionnant CANCEL et en pressant SELECT sur la télécommande, vous ne changez pas d’écran. 4.
Figure 11 : Modification de la fréquence du filtre passe-bas à partir de l’écran Paramètres Système. Modifier le préréglage par défaut Le préréglage par défaut est activé lorsque le caisson de basses est mis sous tension. Les réglages usine utilise le préréglage 3 en tant que préréglage par défaut. Pour modifier ce préréglage : , 1.
2. 3. 4. Appuyez sur SELECT pour modifier le préréglage par défaut. Utilisez les touches et pour choisir le préréglage que vous souhaitez définir comme préréglage par défaut. Utilisez les touches , , et ⊳ pour aller jusqu’à SAVE/EXIT et enregistrer selon les instructions décrites plus haut. Régler les paramètres des filtres de l’égaliseur paramétrique Vous pouvez utiliser les réglages de l’égaliseur paramétrique pour réaliser une meilleure égalisation en fonction de l'acoustique de la pièce.
Figure 14 : Modification du filtre d'égalisation à 63 Hz à partir de l’écran Réponse Système 5. Pour désélectionner le filtre d’égalisation, pressez à nouveau sur SELECT. 6. Utilisez et ⊳ pour positionner le curseur sur un autre filtre, si vous le souhaitez, et répétez la procédure à partie de l’étape 3, jusqu’à l’égalisation complète. Lancer le mode d'optimisation Self-EQ – Premier niveau d’optimisation L’optimisation d’égalisation la plus facile à réaliser est Self-EQ.
6) Sur l’écran Réponse Système, l’option SELF apparaît dans la partie EQ MODE. Figure 15 : Écran Réponse Système avec Self-EQ sélectionné 8) Vous pouvez constater, sur l'écran Réponse Système, que votre caisson de basses lisse sa réponse en fréquence en ajustant les filtres d'égalisation paramétriques. Self-EQ ne modifie pas les paramètres de préréglage d'égalisation (volume, fréquence des filtres, etc) et utilise un filtre de coupure calé à 160 Hz.
PLUS NOTE : Auto-EQ se poursuit jusqu’à ce qu’un des évènements suivants se produise : PLUS Auto-EQ termine correctement son processus et enregistre les paramètres. Vous décidez d’interrompre le processus. Pressez RESET sur la télécommande. Vous revenez à l’écran d’Accueil et ne voyez plus la courbe de PLUS réponse en fréquence d’Auto-EQ . Vous placez le curseur du champ AUTO en mode inactif (auquel cas le champ concerné revient sur Manual-EQ).
LANCER L’OPTIMISATION MANUAL-EQ – RÉGLAGE SELON VOS PRÉFÉRENCES Dans des pièces posant des problèmes particuliers au niveau de l’acoustique, il peut être nécessaire d’opérer des réglages encore plus évolués que pour la procédure PLUS Auto-EQ . Manual-EQ offre suffisamment de flexibilité pour obtenir dans ce cas une réponse linéaire de votre caisson de basses. 1) Installez le microphone, le caisson de basses et le CD de balayage de PLUS tonalité comme pour la méthode Auto-EQ .
Pour augmenter le volume du caisson par rapport aux enceintes principales : Montez le niveau du volume du caisson dans les réglages "haut-parleurs" de l'amplificateur ou du préampli-processeur de votre système. OU Montez le volume de votre caisson de basses Digital DrivePLUS après avoir réalisé la procédure d’égalisation de la pièce et des autres paramètres.
Figure 18 : Mode off (éteint) activé sur l’écran d’Accueil Mode mise en attente du déclencheur 12 Volts (Trigger) La figure 19 montre le message affiché quand l’unité est en attente de l’activation par un signal de déclenchement 12 V après que le MODE AUTO ON/OFF a été paramétré et enregistré sur DÉCLENCHEUR 12V (12 V TRIGGER) sur l’écran Paramètres Système.
Désactiver le filtre passe-bas du caisson de basses Dans certains cas, très rares, il est possible que vous souhaitiez désactiver le filtre passe-bas du caisson de basses. Par exemple, si vous n’avez pas procédé à une PLUS optimisation Auto-EQ , le signal reçu par le caisson peut-être limité directement par le filtre passe-bas intégré à l'amplificateur ou le préampli-processeur de votre système. Pour désactiver le filtre passe-bas du caisson : 1. Aller sur l’écran Paramètres Système. 2.
PARTIE 3 MISES À JOUR DU LOGICIEL ET DU PILOTE Les mises à jour du logiciel et les instructions d’installation du pilote port COM virtuel, le Programme d’Installation Windows Digital DrivePLUS Velodyne et le firmware du caisson de basses Digital DrivePLUS Velodyne sont disponibles sur www.velodyne.com. Les mises à jour du firmware du caisson de basses Digital DrivePLUS Velodyne sont applicables quel que soit le type d’interface utilisé.