
User`s manual


RearPanelConnecuons
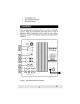
Figure 1 shows the connections on the rear panel of the DLS-R.
Following are brief descriptions of the connections described
in
Figure
1.
More detail on these connections can be found on the next page.
(1)
LOW
..
PASS CROSSOVER
Use this knob to select the high-frequency range at which you
wish to cut off the signal to the subwoofer. When the knob is
turned all the way to the left, the Subwoofer Direct feature is
invoked and the subwoofer plays all frequencies up to 200 Hz.
(2) VOLUME Control
This control allowsyou to balance the outputfrom the subwoofer
to the main speakers in your system. This control should be set
to achieve similar volume level from between both the main
speakers and subwoofer. When pressing volume up ordown, the
speed at which the powerlight blinks indicatessubwoofervolume
- the faster the blinking, the louder the unit plays.
Note: Volume is also controllable by using the supplied remote.
(3)
AUTO
ON/OFF Switch
Use this switch to select between auto-on (active) and constant
on (inactive) operation.
(4)
LINE OUTPUT
Connectthese jacks to the LINE IN preamp inputto use the DLS-
R's internal high pass crossover. See below for a more detailed
explanation of this crossover.
(5)
LINE INPUT/LFE Input
Connect these jacks to the LINE
OUT
preamp output, LFE
output, or subwoofer output jacks ofyour receiver/processor.
If
using the LFE output from your receiver or processor, plug the
single cable into the "L" - LFE input or, for moresignal, use a "yn
connector and feed the signal into both "R
ll
and "L" inputs.
continued.
..
4