SC-IF/IC (In-Floor/In-Ceiling) Subwoofer SubContractorTM Series INSTALLATION MANUAL
Caution IMPORTANT SAFETY INSTRUCTIONS A A® Caution To reduce the risk of electric shock, do not remove cover (or back). No usor-serviceable parts inside. Rofor sorvicing to qualified sorvice personnel. The lightning flash with arrowhead symbol is intended to alert the user to the presonce of uninsulated "dangerous voltage" wnhin the product's enclosure that may be of sufficient magnitude to constitute a risk of electric shock to persons.
Ta b l e o f C o n t e n t s Product Overview.................................................................................................1 Installation — Step-By-Step ....................................................................................2 Other Velodyne Products.....................................................................................10 . www.velodyne.
Product Ov ervie w The SC-IF/IC (In-Floor/In-Ceiling) is the first floor/ceiling sub to deliver true reference quality performance. The SC-IF/IC sports a powerful 12” driver and expanded sealed cabinet enabling maximum performance to reproduce the most demanding home theater and music with authority, accuracy and low distortion. The SC-IF/IC is easy to install whether it's for new construction or retrofit – four adjustable brackets are included that can be attached anywhere on the cabinet surface.
I n s ta l l a t i o n — S t e p - B y - S t e p Step 1 Determine installation location. As stated above, the SC-IF/IC can be mounted virtually anywhere. The only requirements are that the cabinet fit into the location, and that there be proper venting for the audio to be passed into the listening environment. Step 2 Mark installation location.
Step 3 Determine and mark grille location. From the centerline of the subwoofer driver, mark off the dimensions of the grille opening to accommodate the decorative grille chosen for the end user installation. Step 4 Prepare the installation location. Make whatever modifications are required to enable the subwoofer to fit in the installation location. Note that the SC-IF/IC is designed for joists on 16” centers. Install spacer studs as required to accommodate this dimension.
Step 6 Attach the PSA-sided foam strips to the subwoofer cabinet. MAKE SURE STRIPS ARE USED ANYWHERE THE CABINET WILL COME INTO CONTACT WITH THE STRUCTURE IN ANY WAY. The SC-IF/IC is a powerful subwoofer and will likely buzz or rattle if not isolated from the structure using the provided foam strips. Figure 3: Affix foam strips. . www.velodyne.
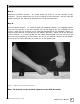
Step 7 Install. Place the SC-IF/IC as determined in step two and attach the brackets loosely. CAUTION: The SC-IF/IC is heavy. Either use a partner to suspend the subwoofer while you are attaching it or use a mechanical device to hold it in place during installation. Figure 4: SC-IF (In-Floor) positioned into floor location. . www.velodyne.
Step 8 Adjust position and tighten. the brackets. Position the subwoofer into its final location and tighten Figure 5: Tighten the brackets. . www.velodyne.
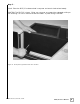
Step 9 Secure wiring. Attach the speaker wire to the speaker terminals. A 16 AWG or heavier wire is recommended. Be sure to secure the speaker wire so it does not rattle or buzz against the cabinet during use. BE SURE NOT TO CROSS THE SPEAKER WIRES AS THIS CAN DAMAGE THE AMPLIFIER. Figure 6a, 6b, and 6c: Speaker wire connection. . www.velodyne.
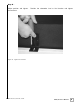
Step 10 Complete installation. Install the decorative grille and perform any other tasks needed to complete the installation based on chosen woofer positioning. It is recommended to use caulking to secure the decorative grille to prevent buzzing and rattling. Figure 7: Finished installation with register Step 11 Check for rattles and buzzes. Use aggressive bass material and check the subwoofer for buzzes and rattles.
FOR YOUR RECORDS. . . Date Puchased_________________________________________________________________ Dealer_________________________________________________________________________ Serial #________________________________________________________________________ *NOTE: Please complete and return your warranty card within ten (10) days or Register. . . ON LINE . . . It’s faster . . . and easier www.velodyne.com LIMITED WARRANTY VELODYNE ACOUSTICS, Inc.
Other Velodyne Products 110V DD ® Series DD-10 DD-12 DD-15 DD-18 Digital Drive 1812 Signature Edition DLS™-R Series DLS-3500R DLS-3750R DLS-4000R DLS-5000R DPS™ Series DPS-10 DPS-12 MiniVee™ SMS™-1 . www.velodyne.
Velodyne Acoustics, Inc. 345 Digital Drive Morgan Hill, CA 95037 408.465.2800 voice 408.779.9227 fax 408.779.9208 service fax www.velodyne.com Service E-mail: service@velodyne.com Product E-mail: help@velodyne.com Technical E-mail: techhelp@velodyne.com . 63-SCIFC Rev A OCT06 www.velodyne.