
User`s manual


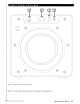


(1)
Power Switch
This button forces your Optimum subwoofer into standby mode. The numeric
LED
shuts off
and the sub puts out
no
power. The sub will remain
in
this mode until the
POWER
button
is
pressed again.
To
fully deactivate (i.e. power button) the sub, use the main power switch
on
the back panel.
(2)
LED Numeric Display
This
LED
supplies information
on
volume, crossover, presets, and
other
information. The
"Light" button
on
the remote deactivates this display.
(3)
Volume Control
These buttons allow
you
to balance the output from the subwoofer
to
the main speakers
in
your system. The volume should
be
set
to
achieve similar volume
level
of both the main
speakers and subwoofer. The default volume
is
30.
The
upper button increases the
subwoofer level and the lower button decreases it.
Note: Volume can also
be
controllable
by
using the supplied remote.
WARNING: Some manufacturers
preset
their receivers with the Sub-Out
fA.
K.A.
LFE)
channel signal
at
a minimum
level.
It is very
important
to verify
that
your receiver Sub-Out
channel is
set
to the same output level
as
your front
right
and left channels. Refer to your
receiver manual for the individual channel level adjustment procedure.
If
your receiver
Sub-Out channel is
set
too
low,
the subwoofer may appear to have a weak output,
it
may
sound noisy
or
distorted, and the Auto
On/Off
feature may
not
operate properly.
(4)
Mic
Input
Connect the supplied microphone for the Auto-EQ feature
to
this mini-jack input.
WWW.VELODYNE.COM
Optimum
User's
Manual
II]