USER’S MANUAL Amplifier/Subwoofers SC-1250 Amplifier SC-8 SC-10 SC-12 SC-15 Subwoofers SC-IW SC-IF SC-IC
www.velodyne.
TABLE OF CONTENTS Congratulations. . . . . . . . . . . . . . . . . . . . . . . . . . . . . . . . . . . . . . . . . . . . . . . . . . . . . . . . . 1 Product Features. . . . . . . . . . . . . . . . . . . . . . . . . . . . . . . . . . . . . . . . . . . . . . . . . . . . . . . . 1 – SC-1250 Subwoofer Amplifier . . . . . . . . . . . . . . . . . . . . . . . . . . . . . . . . . . . . . . . . 1 – SC-8, SC-10, SC-12, SC-15, SC-IW, SC-IF Woofers. . . . . . . . . . . . . . . . . . . . . . . 2 Setup Checklist. . . . .
CONGRATULATIONS Congratulations on your purchase of a Velodyne SubContractor Series subwoofer. This system represents the state-of-the-art in low frequency reproduction. Read and follow the instructions below to insure safe and proper system operation. Warning! To prevent fire or shock hazard, do not expose this equipment to rain or moisture. To avoid electrical shock, do not open speaker enclosure or amp chassis cover. Please observe all warnings on the equipment itself.
SC-8, SC-10, SC-12, SC-15, SC-IW, SC-IF/IC Subwoofers SC-8: - 8” (6.5” piston diameter) subwoofer 2.
Setup Checklist Be sure to do the following to ensure the best performance from your subwoofer(s): If possible, optimize the placement of the subwoofer(s) in the listening area. See page 11 of the User’s Manual. Install and wire the subwoofer per the instructions on pages 3 - 9. Select the proper model per the instructions on page 11. Be sure the low pass crossover is set correctly. See pages 9 - 10. Be sure to equalize the subwoofer using the microphone and Auto-EQ feature.
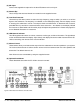
(3) Mic Input Connect the supplied microphone for the Auto-EQ feature to this mini-jack. (4) Remote Eye This is the eye that receives infrared commands from the supplied remote. (5) Low-Pass Crossover Use these up and down buttons to select the high-frequency range at which you wish to cut off the signal to the subwoofer. The frequency is indicated on the LED display briefly, then the display reverts to showing the subwoofer’s volume. The slope is fixed at 24 dB/octave.
(9) Thru Jacks (See Figure 3A) These RCA connectors are for passing along the same signal that goes into your subwoofer to a second “daisy-chained” subwoofer. The signal from these RCA connectors is the same as the input signal. (10) Line Input / LFE Input (See Figure 3A & 3B) Connect these jacks to the LINE OUT preamp output, LFE output, or subwoofer output jacks of your receiver/processor.
Option Figure 3B: Stereo Line-Level Connection. 6 - SC-1250 Amplifier User’s Manual www.velodyne.
(11) Balanced XLR LFE Input (See Figure 4) This XLR input jack receives the balanced LFE signal from your receiver or processor. Figure 4: Balanced Line-Level Connection. (12) Mic Input Connect the supplied microphone for the Auto-EQ feature to this mini-jack. (13) IR Input This is a connection that allows the utilization of a third party infrared remote sensor, such as Elan or Xantech, or an extended cable for placement closer to your other remote controlled equipment.
(16) Auto ON/OFF Switch Use this switch to select between auto-on active and auto-on inactive (constant on) operation. For maximum amplifier life, we recommend the Auto ON/OFF “Active” setting. (17) Speaker Level Output Terminals (See Figure 5) These connections send a crossed-over speaker-level signal to the front speakers. When connected in this fashion, your satellite speakers will be crossed over at 80 Hz.
(18) Speaker Level Input Terminals (See Figure 5) Connect these input terminals to the speaker output terminals of your amplifier or receiver. If you use this method of connection, when you go to the receiver speaker set up menu, make sure you select the “large” speaker option. (19) Subwoofer Connection Terminals Connect these output terminals to the subwoofer(s) being controlled by the SC-1250.
You should set the crossover frequency to obtain a smooth and seamless transition from the subwoofer(s) to the main speakers in your system. If your main speakers are smaller units with limited low frequency output, you may wish to choose a higher frequency (such as 100-120 Hz) than you would with larger speakers which have greater low frequency output. With larger speakers, you might start with this control set lower, such as 80 Hz. The SC-1250 crossover has a default of 80 Hz.
A Word About Subwoofer Placement Subwoofers operate at extremely low frequencies, which are primarily omni-directional. Keep in mind that frequency response and output level can be drastically influenced by placement, depending on the acoustic properties of the listening room. Typically, the optimum location for a subwoofer is in a front corner of your listening room. This location will usually offer the greatest output levels and optimum low frequency extension.
model changes on the LED display. Once the desired model is seen on the LED display, simply release the button. You don’t need to do anything else - the model to be controlled is automatically stored in the SC-1250’s memory. To exit model selection mode, use the power switch on the back panel to power down and power up the unit. You should see the model you selected for 2 seconds on the LED display before the display reverts to the volume.
listening position. Select the switch position at which you hear the most bass. The LED will show the phase selected by showing “PH” followed by the phase number. • LIGHT — If you wish, you can deactivate the numeric LED on your SC-1250. To do this, press the LIGHT button on your remote. To reactivate the LED, press the LIGHT button again. • NIGHT — Night mode limits the maximum dynamic output of the subwoofer for late night listening or to be more considerate of close neighbors.
The following table indicates musical style and which preset is recommended for it.
Each preset has its own characteristics with respect to subsonic filter, volume differential and a single equalizer (EQ) in order to optimize the listening mode for the preset. Restoring Defaults There is a feature that allows you to restore default settings for your SC-1250. By pressing presets in EXACTLY the following order on the remote, the unit’s power light will blink indicating that you have restored defaults. 1. Movies 2. R&B – Rock 3. Jazz – Classical 4. Games 5. Games 6. Jazz – Classical 7.
Troubleshooting and Service Before seeking service for your subwoofer, please re-check all systems. Following is a simple troubleshooting guide to assist you. 1. Verify that the unit is plugged in and power outlet used is active. 2. Is the power switch on? 3. Is the unit receiving an input signal from your source? 4. Have all controls (volume, crossover, phase, etc.) been properly set? 5. If the unit has been running at high levels, one of the protection circuits may be engaged.
Specifications Specification SC-1250 Subwoofer Amplifier Amplifieer (Class D) 3000 watts Dymamic, 1250 watts RMS Power High Pass Crossover 80 Hz (6 dB/octave) Low-Pass Crossover 30 Hz - 160 Hz (24dB octave slope) Input Line and speaker-level Outputs Line-level 80 Hz up, speaker level for up to two subwoofers Phase 0°, 90°, 180°, 270° Dimensiona Warranty Shipping Weight (approx.) www.velodyne.com 3.6” x 17” x 12.5” (9 x 43.2 x 31.
Specifications SC-8 SC-10 8” forward firing (6.5” piston diameter) 10” forward firing (8” piston diameter) 28-120Hz Harmonic Distortion Magnet Structure Woofer Frequency Response: (+/-3 dB) Voice Coil Video Shielded SC-12 SC-15 SC-IW (Inwall) SC-IF (Infloor), SC-IC (Inceiling) 12” forward firing (9,7” piston diameter) 15” forward firing (12.7” piston diameter) 4” x 14” rectagular driver (3” x 13.25” piston dimension) 12” (9.
Appendix A: RS-232 Serial Overview and Commands Introduction This document outlines Velodyne’s SubContractor (SC) RS-232 protocol specification. This protocol indicates how SC products receive run-time commands from devices such as Creston Universal Remote Controls.
RS232 Commands Activity Command Format Acceptable n Values Example(s) Comments Volume Control #VOnn$, #VO+$, #VO-$, #VO?$ 00 – 99 #VO25$, #VO+$, #VO-$, #VO?$ Sets volume to a value, increments volume up or down, or requests current volume setting Preset Control #PSn$, #PS?$ 1, 2, 3, 4, 5, 6 #PS1$, #PS2$, #PS3$, #PS4$, #PS5$, #PS6$, #PS?$ Activates the indicated preset, or requests the current preset Logo Light Control #LTn$, #LT?$ 0: Light Off 1: Light On #LT0$, #LT1$, #LT?$ Turns the Log
Velodyne Products 115-120 DD® Series DD-10 DD-12 DD-15 DD-18 Digital Drive 1812 Signature Edition DEQ-R Series DEQ-8R DEQ-10R DEQ-12R DEQ-15R DLS™-R Series Impact Series Impact - Mini Impact -10 Impact -12 MicroVee® MiniVee® MiniVee® 10 SMS -1 ™ SubContractor™ Series SC-1250 SC-8 SC-10 SC-12 SC-15 SC-IW SC-IF/IC SC-600 Amp SC-600 IW SC-600 IF/IC VX-11 DLS-3500R DLS-3750R DLS-4000R DLS-5000R 220-240V DD® Series DD-10 DD-12 DD-15 DD-18 Digital Drive 1812 Signature Edition CHT-Q Series CHT-8Q CHT-1
FOR YOUR RECORDS DATE/PLACE OF PURCHASE: PRODUCT MODEL: PRODUCT SERIAL NUMBER: NOTE: If you need to file a warranty claim for your product, you will still need to submit to Velodyne the original sales invoice or other proof of ownership and date of purchase. Please validate your product warranty by completing the warranty registration online within 30 days at: velodyne.com/warranty-subwoofers For detailed warranty information, please visit us online at: velodyne.
Amplifier/Subwoofers Velodyne Acoustics, Inc. Subcontractor-Series_AmpsSubs-RevD_MAY2012 345 Digital Drive 408.465.2800 voice Service E-mail: service@velodyne.com Morgan Hill, CA 95037 408.779.9227 fax Product E-mail: help@velodyne.com www.velodyne.com 408.779.9208 service fax Technical E-mail: techhelp@velodyne.