
Operation Manual


www.velodyne.com
4 - SC-1250 Amplier User’s Manual
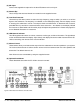
(3) Mic Input
ConnectthesuppliedmicrophonefortheAuto-EQfeaturetothismini-jack.
(4) Remote Eye
This is the eye that receives infrared commands from the supplied remote.
(5) Low-Pass Crossover
Usetheseup anddownbuttons toselectthe high-frequencyrange atwhichyouwishtocutothe
signaltothesubwoofer.ThefrequencyisindicatedontheLEDdisplaybriey,thenthedisplayreverts
toshowingthesubwoofer’svolume.Theslopeisxedat24dB/octave.Todeactivatethecrossover,
pressBOTHtheupanddowncrossoverbuttonsatthesametime–twodashesonthedisplayindicate
the crossover is deactivated and the woofer plays all frequencies presented to it. Please see page 9 for
a more detailed discussion on crossovers.
(6) LED Numeric Indicator
This LED supplies information on volume, crossover, woofer type, and other information. The light button
on the remote deactivates this display. Upon startup, the display shows the model of subwoofer the SC-
1250 is controlling, then reverts to the volume indicator.
(7) Volume Control
These buttons allow you to balance the output from the subwoofer to the main speakers in your system.
The volume should be set to achieve similar volume level from between both the main speakers and
subwoofer. The default volume is 30.
Note: Volume is also controllable by using the supplied remote.
(8) Optional Rack Mount
These detachable ears allow the SC-1250 to be rack mounted.
Figure 2: Rear Panel Connections of the SC-1250.