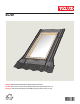
ECW English: ECW Curb Mounted Skylight Flashing Installation Instructions ESPAÑOL: Instrucciones de instalación de tapajuntas ECW para tragaluz montado en brocal FRANÇAIS : Instructions d'installation du solin ECW pour puits de lumière monté sur cadre 14°-60° VAS 452865-2011-04
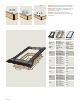
English: Index Pages 2-3 Important installation requirements Page 4 Planning Pages 5-6 Installing underlayment Pages 7-11 Installing flashing Español: Índice Páginas 2-3 Requisitos importantes de instalación Página 4-6 Planificación Páginas 5-6 Instalación de la lámina de soporte Páginas 7-11 Instalación del tapajuntas Français : Index Pages 2-3 Spécifications d'installation importantes Page 4 Planification Pages 5-6 Installation de la membrane de toiture Pages 7-11 Installation du solin English: Imp
English: Important installation requirements for the USA Español: Requisitos importantes de instalación para los Estados Unidos Français : Spécifications d'installation importantes pour les États-Unis VELUX® series A21 skylights are designed and engineered to be installed with VELUX flashing systems. VELUX flashing systems include VELUX adhesive skylight underlayment in a quantity sufficient to install one skylight of the size for which the flashing system was designed.
English: Site-built curb to be provided by installer, with a height of 7¼" (185 mm), 5½" (140 mm) or 3½" (90 mm). 2x8 2x6 2x4 ESPAÑOL: El brocal instalado en el lugar debe ser provisto por el instalador, con una altura de 7¼" (185 mm), 5½" (140 mm) o 3½" (90 mm). FRANÇAIS : Cadre construit sur place fourni par l'installateur, hauteur de 7¼" (185 mm), 5½" (140 mm) ou 3½" (90 mm).
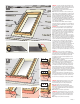
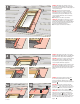
1 7" 180 mm 3" 75 mm English: To ensure waterproofing, skylight curbs shall be completely wrapped in VELUX adhesive skylight underlayment as indicated. Underlayment must be applied before installing the flashing. Remove existing roofing underlayment around the rough opening as shown. Note: If snow accumulation on the roof is likely, waterproofing is achieved by installing a continuous selfadhesive waterproof membrane beneath the roofing material and flashing material.
3 6" 150 mm 6" 150 mm English: Wrap the sides and the corners of the skylight curb with VELUX adhesive skylight underlayment and create water-shedding laps over roofing underlayment. Note: Observe the measurements stated. Español: Envuelva los lados y esquinas del brocal del tragaluz con la lámina de soporte autoadhesiva para tragaluz VELUX para crear solapas impermeabilizantes sobre la lámina de soporte del techo. Nota: Respete las medidas especificadas.
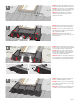
English: To support the sill flashing section, install roofing material up to bottom curb as shown. 6 ESPAÑOL: Para reforzar la sección de tapajuntas del alféizar, instale el material de cubierta hasta la parte inferior del brocal como se muestra. max 4" max 100 mm FRANÇAIS : Pour supporter le solin d'appui, installer le matériel de toiture jusqu'au cadre supérieur, tel qu'illustré. English: Position sill flashing section and dress apron and side pieces over the roofing material.
10 English: Cut side sections to match size of curb. Modify side sections to allow for a smooth transition from sill flashing section to deck level and attach side sections to curb with roofing nails. Note: Ensure that the bent edges of side sections will hold back water. Raise edges of side sections if necessary. ESPAÑOL: Cortar secciones laterales del tamaño del brocal.
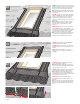
13 English: Cut and bend the bottom and top counter-flashings as shown. Attach all counterflashings to curb with roofing nails. 3 ESPAÑOL: Corte y doble las secciones de refuerzo del tapajuntas inferior y superior como se indica. Sujete todos los refuerzos de tapajuntas con clavos para techo. FRANÇAIS : Découper et replier les sections inférieure et supérieure de contre-solin, tel qu'illustré. Fixer toutes les sections de contre-solin au cadre à l'aide de clous à toiture.
English: Install roof battens as shown. Consider installing a tile support batten (not supplied) attached with wire straps at the top. Note: Do not nail through the flashing. 15 ESPAÑOL: Instale los rastreles como se indica. Quizá sea necesario instalar rastreles de soporte para tejas (no incluidos) sujetos con cables en la parte superior. Nota: No perfore el tapajuntas. FRANÇAIS : Installer les lattes de toit, tel qu'illustré.
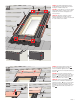
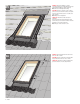
17 English: For installation of skylight, follow the manufacturer's recommendations. ESPAÑOL: Para instalar el tragaluz, siga las recomendaciones del fabricante. FRANÇAIS : Pour l'installation du puits de lumière, suivre les instructions du fabricant.
www.veluxusa.com Instructions d'installation du solin ECW pour puits de lumière monté sur cadre ©2011 VELUX Group ®VELUX et le logo VELUX sont des marques de commerce déposées et employées sous licence de VELUX Group ECW Curb Mounted Skylight Flashing Installation Instructions. ©2011 VELUX Group ®VELUX and the VELUX logo are registered trademarks used under licence by the VELUX Group USA: VELUX America Inc.