EDL + FS, VS, VSE ENGLISH: EDL Deck Mounted Skylight Flashing Installation Instructions ESPAÑOL: Instrucciones de instalación de tapajuntas EDL para tragaluz montado sobre tablero FRANÇAIS : Instructions d'installation du solin EDL pour puits de lumière à cadre intégré monté directement sur la toiture 14°-85° VAS 452200-2020-03
ENGLISH: Index ESPAÑOL: Índice FRANÇAIS : Index Pages 2-3 Pages 3-5 Pages 6-7 Pages 8-11 Páginas 2-3 Requisitos importantes de instalación Páginas 3-5 Planificación Páginas 6-7 Instalación de la lámina de soporte Páginas 8-11 Instalación del tapajuntas Pages 2-3 Specifications d'installation importantes Pages 3-5 Planification Pages 6-7 Installation de la membrane de toiture Pages 8-11 Installation du solin ENGLISH: Important installation requirements ESPAÑOL: Requisitos importantes de instalaci
ENGLISH: Important installation requirements for the USA and Canada ESPAÑOL: Requisitos importantes de instalación para los Estados Unidos y Canadá FRANÇAIS : Spécifications d'installation importantes pour les États-Unis et Canada VELUX® series A21 skylights are designed and engineered to be installed with VELUX flashing systems. VELUX flashing systems include VELUX adhesive skylight underlayment in a quantity sufficient to install one skylight of the size for which the flashing system was designed.
Roofing material max 5 ⁄16" Materiales de cubierta max 1 ⁄2" max 8 mm ENGLISH: EDL is designed for thin roofing materials (max thickness 5/16" (8 mm)). ESPAÑOL: EDL está diseñado para materiales de cubierta delgados (grosor máximo 5/16" (8 mm)). FRANÇAIS : EDL est conçu pour une utilisation avec le matériau de toiture mince (épaisseur maximale de 5/16" (8 mm)). > 9⁄16" max 13 mm ENGLISH: EDL can also be used for cedar shingles and slates (max thickness ½" (13 mm)).
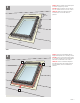
ENGLISH: Remove existing roofing underlayment around the rough opening as shown. 1 ESPAÑOL: Retire la lámina de soporte existente de la zona alrededor del hueco tal como se indica. 5½" FRANÇAIS : Retirez la membrane de toiture existante autour de l'ouverture brute, tel qu'illustré. 140 mm 3" 75 mm 3" 75 mm ENGLISH: To properly install VELUX adhesive skylight underlayment, remove cladding as shown.
3 6" 150 mm 6" 150 mm FS ½" 13 mm VS/VSE ½" 13 mm 6 VELUX ENGLISH: To ensure waterproofing, skylight frames should be completely wrapped in VELUX adhesive skylight underlayment supplied with the flashing. This underlayment must be applied before installing the flashing. Note: If snow accumulation on the roof is likely, waterproofing is achieved by installing a continuous self-adhesive waterproof membrane beneath the roofing material and flashing material.
4 ENGLISH: Wrap the side frames and corners of the skylight with VELUX adhesive skylight underlayment and create water-shedding laps over roofing underlayment. Note: Observe the measurements stated. 6" 150 mm ESPAÑOL: Envuelva las esquinas y lados del marco del tragaluz con la lámina de soporte autoadhesiva VELUX para crear solapas impermeabilizantes sobre la lámina de soporte del techo. Nota: Respete las medidas especificadas.
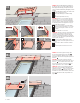
ENGLISH: Position sill flashing section tightly to the bottom frame and attach it with roofing nails as shown. Skylight FS: The sill flashing section must be placed between the rubber gasket and the bottom frame. ESPAÑOL: Coloque la sección de tapajuntas del alféizar firmemente sobre el marco inferior y fíjela con clavos para techo como se indica. Tragaluz FS: La sección de tapajuntas del alféizar debe colocarse entre la empaquetadura de goma y el marco inferior.
ENGLISH: Interweave step flashing pieces with roofing material and fasten them to roof with roofing nails. If necessary, cut the top step flashing pieces as indicated. 9 ESPAÑOL: Intercale las piezas de tapajuntas escalonado con el material de cubierta y sujételas al techo con clavos para techo. Si es necesario, corte las piezas de tapajuntas escalonado superiores como se indica.
ENGLISH: Install saddle flashing. Determine use of extension piece: use it if the saddle flashing is lifted up by the underlying roofing material and remove it if the saddle flashing fits tightly over the skylight. 1 Attach saddle flashing at the sides. Add screws for extra security if necessary. 2 Fasten saddle flashing to roof with roofing nails. 3 Flatten down upstand if necessary. 11 ESPAÑOL: Instale la sección superior del tapajuntas.
ENGLISH: Observe distance to roofing material. Do not nail through the saddle flashing when attaching the roofing material. 13 n mi " 10 i /m 5 n2 0m ESPAÑOL: Mantenga la distancia con respecto al material de cubierta. No perfore la sección superior del tapajuntas cuando coloque el material de cubierta. m FRANÇAIS : Respectez la distance par rapport au matériau de toiture. Ne pas clouez à travers le solin en sabot lors de l'installation du matériau de toiture.
CA: VELUX Canada Inc. 1 800 88-VELUX (888-3589) www.velux.com INSTRUCTIONS D'INSTALLATION DU SOLIN EDL POUR PUITS DE LUMIÈRE À CADRE INTÉGRÉ MONTÉ DIRECTEMENT SUR LA TOITURE. ©2010, 2020 VELUX GROUP ®VELUX ET LE LOGO VELUX SONT DES MARQUES DE COMMERCE DÉPOSÉES ET EMPLOYÉES SOUS LICENCE DE VELUX GROUP EDL DECK MOUNTED SKYLIGHT FLASHING INSTALLATION INSTRUCTIONS.