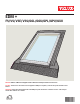
EDM + FS/VS/VSE/VSS/GGL/GGU/GPL/GPU/GXU ENGLISH: EDM Deck Mounted Skylight and Roof Window Flashing Installation Instructions ESPAÑOL: Instrucciones de instalación de tapajuntas EDM para tragaluz y ventana de tejado montados sobre tablero FRANÇAIS : Instructions d'installation du solin EDM pour puits de lumière et fenêtre de toit à cadre intégré montés directement sur la toiture 15°-90° 14°-85° VAS 452232-2021-09
ENGLISH: Index ESPAÑOL: Índice FRANÇAIS : Index P. P. P. Pág. 2-4 Requisitos importantes de instalación Pág. 5-6 Planificación Pág. 7-15 Instalación de tapajuntas P. ENGLISH: Important installation requirements Roof pitch and roofing material EDM is designed for metal roofs (max profile height 1½" - 1¾" (38 mm - 45 mm)) with roof pitch 14° - 85° (3:12 - 137:12). EDM is not for copper roofing materials.
Important installation requirements • Requisitos importantes de instalación • Spécifications d'installation importantes max 11/2" max 13/4" max 38 mm max 45 mm 13" 330 mm 15" 15" 380 mm ENGLISH: EDM is designed for thin roofing materials (max thickness 1½" - 1¾" (38 mm - 45 mm)). Additional roofing material is always required to allow for necessary overlaps. 380 mm ESPAÑOL: EDM está diseñado para materiales de cubierta delgados (grosor máximo 1½" - 1¾" (38 mm - 45 mm)).
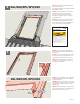
ENGLISH: Roof with battens Check that the skylight is raised and installed on top of battens. ESPAÑOL: Techo con rastreles Verifique que el tragaluz está elevado e instalado por encima de los rastreles. FRANÇAIS : Toiture avec voliges Assurez-vous que le puits de lumière est relevé et installé sur le dessus des lattes. 11/2" 38 mm ENGLISH: Skylight underlayment To ensure waterproofing, skylight frames should be completely wrapped in VELUX adhesive skylight underlayment supplied with the flashing.
1a FS/VS/VSE/VSS ENGLISH: Remove cladding as shown. ESPAÑOL: Retire el recubrimiento como se indica. FRANÇAIS : Retirer le recouvrement, tel qu'illustré. 1b GGL/GGU/GPL/GPU/GXU ENGLISH: Remove cladding as shown. See details in the installation instructions provided with the window. ESPAÑOL: Retire el recubrimiento como se indica. Consulte los detalles en las instrucciones de instalación que se proporcionan con la ventana. FRANÇAIS : Retirer le recouvrement, tel qu'illustré.
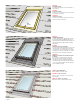
ENGLISH: Maintain illustrated clearances between frame and roofing material. If the skylight/ roof window is located above a seam in the roofing material, the horizontal seam at the top can be avoided by removing all roofing material above the skylight/roof window. Minimum distance to the roofing material at the sides (A/B) depends on the use of the auxiliary side flashing section.
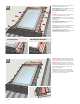
ENGLISH: Position sill flashing section and dress apron over the roofing material. The sill flashing section must be modified when it overlaps the next whole panel of roofing material. Form sill flashing section against the upstanding profile of the roofing material and cut sill flashing section leaving an upstand no higher than the roofing profile. 4 ESPAÑOL: Coloque la sección de tapajuntas del alféizar y disponga el antepecho sobre el material de cubierta.
ENGLISH: Reposition sill flashing section and attach it to bottom frame with flashing nails provided. 6 ESPAÑOL: Vuelva a colocar la sección de tapajuntas del alféizar y sujételo al marco inferior con los clavos para tapajuntas provistos. FRANÇAIS : Repositionner le solin inférieur et fixer-le au cadre inférieur avec les clous à solin fournis. ENGLISH: Skylight FS: The sill flashing section must be placed between the rubber gasket and the bottom frame.
8 GGL/GGU/GPL/GPU/GXU ENGLISH: Position the top frame cladding part/ parts if removed earlier. See details in the installation instructions provided with cladding set ZWC. ESPAÑOL: Coloque la pieza o piezas del recubrimiento del marco superior si las retiró antes. Consulte los detalles en las instrucciones de instalación que se proporcionan con el juego de recubrimiento ZWC. FRANÇAIS : Poser la pièce/les pièces d'en haute du recouvrement si antérieurement retirée(s).
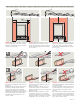
ENGLISH: Install and secure the side flashing sections and saddle flashing as shown. FS/VS/VSE/VSS: Attach side flashing sections to frame with flashing nails provided. GGL/GGU/GPL/GPU/GXU: Bend over frame flaps to secure. 10 ESPAÑOL: Instale y sujete las secciones laterales y superior del tapajuntas come se indica. FS/VS/VSE/VSS: Fije las secciones laterales del tapajuntas al marco con los clavos para tapajuntas suministrados. GGL/GGU/GPL/GPU/GXU: Doble las solapas de sujeción del marco para asegurarlas.
12a FS/VS/VSE/VSS 10 ENGLISH: Replace cladding by engaging with the saddle flashing and secure by bending flaps as shown. ESPAÑOL: Reemplace el recubrimiento enganchándolo con la sección superior del tapajuntas y fíjelo doblando las solapas como se indica. FRANÇAIS : Repositionner le recouvrement en l'engageant avec le solin supérieur et fixer-le en pliant les rabats, tel qu'illustré.
ENGLISH: When the roofing material fits into the retaining channel on the side flashing section, cut roofing material to engage with side flashing section as shown. 13a ESPAÑOL: Cuando el material de cubierta encaja en el canal de retención de la sección lateral del tapajuntas, corte el material de cubierta para empalmarlo con la sección lateral del tapajuntas como se indica.
b ENGLISH: When the roofing material conflicts with the retaining channel on the side flashing section, the auxiliary side flashing section must be used to extend the side flashing section. 1 1 To reduce the amount of visible flashing, the conflicting wave is cut off with distance to bottom of channel as shown. 1-3 " 1/2 25 - 90 mm 2 Cut the auxiliary side flashing section to fit as shown. 3 Engage the auxiliary side flashing section and secure to roof as shown.
a 2 1/2 - 4" 60 - 100 mm 15" 380 mm min 10" min 250 mm min 2" min 50 mm 14 VELUX® ENGLISH: Cut the roofing material maintaining 2½" - 4" (60 mm - 100 mm) clearance at the top. Make necessary overlaps and use closure strips between saddle flashing and roofing material, following roofing manufacturer's instructions. Do not perforate flashing when attaching the roofing material; maintain minimum distance for fasteners, see details.
14b ENGLISH: With an installation including two or more roofing panels, the overlaps at the top can be avoided by cutting the side panels and adding a notch to allow engagement on the sides. ESPAÑOL: En una instalación que incluye dos o más paneles de material de cubierta, pueden evitarse las superposiciones de la parte superior cortando los paneles laterales y agregando una muesca para permitir el empalme en los lados.
AU: VELUX Australia Pty. Ltd. 1300 859 856 www.velux.com.au JP: CA: VELUX Canada Inc. 1 800 88-VELUX (888-3589) www.velux.ca KR: VELUX International (VELUX A/S) +45 7632 9240 www.velux.co.kr VELUX-Japan Ltd. 0570-00-8141 www.velux.co.jp VELUX New Zealand Ltd. 0800 650 445 www.velux.co.nz US: VELUX America LLC 1-800-88-VELUX www.veluxusa.com www.velux.