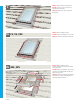
EDW + FS, VS, VSE, GGL, GPL English: EDW Deck Mounted Skylight and Roof Window Flashing Installation Instructions Español: Instrucciones de instalación de tapajuntas EDW para tragaluz y ventana de tejado montados sobre tablero Français : Instructions d'installation du solin EDW pour puits de lumière et fenêtre de toit à cadre intégré montés directement sur la toiture For use in US and CA Para uso en US y CA Pour usage au US et CA 瓦用施工説明書 14°-85° VAS 452257-2011-09
ESPAÑOL: Índice Pág. 2-3 Requisitos importantes de instalación Pág. 4-5 Planificación Pág. 6-13 Instalación del tapajuntas: Tejas Pág. 14-22 Instalación del tapajuntas: Tablillas de cedro Pág. 23 Resortes de GPL FRANÇAIS : Index P. 2-3 Spécifications d'installation importantes P. 4-5 Planification P. 6-13 Installation du solin: Tuiles P. 14-22 Installation du solin: Bardeaux de cèdre P.
English: Important installation requirements for the USA Español: Requisitos importantes de instalación para los Estados Unidos Français : Spécifications d'installation importantes pour les États-Unis VELUX® series A21 skylights are designed and engineered to be installed with VELUX flashing systems. VELUX flashing systems include VELUX adhesive skylight underlayment in a quantity sufficient to install one skylight of the size for which the flashing system was designed.
English: Roof with battens Check that the skylight/roof window is raised and installed on top of battens. Skylight underlayment To ensure waterproofing, skylight frames should be completely wrapped in VELUX adhesive skylight underlayment supplied with the flashing. This underlayment must be applied before installing the flashing. Follow instructions provided with the VELUX adhesive skylight underlayment.
max 4¾" max 120 mm Pages Páginas Pages 6-13 min 1" min 25 mm Pages Páginas Pages 14-22 VELUX 5
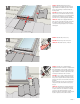
2 1 English: Replace battens if removed earlier. Español: Vuelva a colocar los rastreles si se desmontaron anteriormente. Français : Replacer les voliges si antérieurement retirées. 2a FS, VS, VSE English: Remove cladding as shown. Español: Retire el recubrimiento como se indica. Français : Retirer le revêtement, tel qu'illustré. 2b GGL, GPL English: Remove cladding as shown. Consult your VELUX sales company for optional removal of the sash. Español: Retire el recubrimiento como se indica.
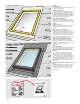
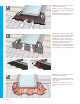
ENGLISH: Maintain illustrated clearances between frame and roofing material and install support batten for sill flashing section. This will ensure correct drainage of water from the sill flashing section. 3 11/4 - 23/8" ESPAÑOL: Respete los espacios libres ilustrados entre el marco y el material de cubierta e instale rastreles de soporte para la sección de tapajuntas del alféizar. Esto asegurará el drenaje de agua adecuado de la sección de tapajuntas del alféizar.
ENGLISH: Position sill flashing section and dress apron over the roofing material. 2 5 ESPAÑOL: Coloque la sección de tapajuntas del alféizar y disponga el antepecho sobre el material de cubierta. FRANÇAIS : Positionner le solin d'appui et installer ensuite la jupe sur le matériel de toiture. ENGLISH: Remove sill flashing section and bend the apron down as shown. This will ensure that the apron lies tightly against the roofing material.
ENGLISH: Reposition sill flashing section and attach it to bottom frame with roofing nails provided. Install support battens at sides, if necessary. Skylight FS: The sill flashing section must be placed between the rubber gasket and the bottom frame. 7 ESPAÑOL: Vuelva a colocar la sección de tapajuntas del alféizar y sujételo al marco inferior con los clavos para techo provistos. Instale los rastreles de soporte a los lados, si fuese necesario.
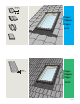
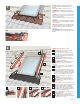
9a 2 FS, VS, VSE ENGLISH: Replace cladding as shown. Español: Vuelva a colocar el recubrimiento como se indica. 2 2 1 1 10 VELUX 2 Français : Repositionner le revêtement, tel qu'illustré.
9b GGL, GPL ENGLISH: Replace cladding as shown. Español: Vuelva a colocar el recubrimiento como se indica. 6 Français : Repositionner le revêtement, tel qu'illustré. 4 5 6.1 5 4 3 6.
10 1 2 3 ENGLISH: Install saddle flashing. support battens at sides, if necessary, 1 Install and under the saddle flashing. 2 Attach saddle flashing by engaging and bending flaps as shown and secure with clips if necessary. 3 Install the optional tile support supplied with the flashing. ESPAÑOL: Instale la sección superior del tapajuntas. rastreles de soporte en los lados, si 1 Instale fuera necesario, y por debajo de la sección superior del tapajuntas.
ENGLISH: Install tiles and maintain distance to frame as shown; cut tiles, if necessary. Trim and cut foam gasket for optimum contact to roofing material. 1 To allow the tiles to lie correctly, it may be necessary to remove a nib from the tile and flatten down the upstand around the battens. 12 ESPAÑOL: Instale las tejas y respete la distancia al marco como se indica. Si fuese necesario, corte las tejas. Recorte la empaquetadura de gomaespuma para lograr un contacto óptimo con el material de cubierta.
1a FS, VS, VSE English: Remove cladding as shown. Español: Retire el recubrimiento como se indica. Français : Retirer le revêtement, tel qu'illustré. 1b GGL, GPL English: Remove cladding as shown. Consult your VELUX sales company for optional removal of the sash. Español: Retire el recubrimiento como se indica. Consulte con su distribuidor VELUX sobre cómo quitar la hoja (opcional). Français : Retirer le revêtement, tel qu'illustré.
English: When installing the first course of interlayment reaching the skylight/roof window, wrap this course around the bottom frame. 2 Español: Al instalar la primera hilera de lámina de soporte interna que llegue al tragaluz u a la ventana de tejado, fije esta hilera alrededor del marco inferior. Français : Lors de l'installation de la première couche de matériaux de protection, arrivée près du puits de lumière ou de la fenêtre de toit, assurezvous de recouvrir le cadre inférieur.
ENGLISH: Position sill flashing section and dress apron over the roofing material. 5 2 ESPAÑOL: Coloque la sección de tapajuntas del alféizar y disponga el antepecho sobre el material de cubierta. FRANÇAIS : Positionner le solin d'appui et installer ensuite la jupe sur le matériel de toiture. 6 ENGLISH: Remove sill flashing section and bend the apron down as shown. This will ensure that the apron lies tightly against the roofing material.
ENGLISH: Reposition sill flashing section and attach it to bottom frame with roofing nails provided. Install support battens at sides, if necessary. Skylight FS: The sill flashing section must be placed between the rubber gasket and the bottom frame. 7 ESPAÑOL: Vuelva a colocar la sección de tapajuntas del alféizar y sujételo al marco inferior con los clavos para techo provistos. Instale los rastreles de soporte a los lados, si fuese necesario.
9a 2 FS, VS, VSE ENGLISH: Replace cladding as shown. Español: Vuelva a colocar el recubrimiento como se indica. 2 2 1 1 18 VELUX 2 Français : Repositionner le revêtement, tel qu'illustré.
9b GGL, GPL ENGLISH: Replace cladding as shown. Español: Vuelva a colocar el recubrimiento como se indica. 6 Français : Repositionner le revêtement, tel qu'illustré. 4 5 5 6.1 4 3 6.
ENGLISH: Install saddle flashing. 10 ttach saddle flashing by engaging and bend1 A ing flaps as shown and secure with clips, if necessary. the optional tile support supplied with 2 Install the flashing. ESPAÑOL: Instale la sección superior del tapajuntas. ujete la sección superior del tapajuntas enca1 S jando y doblando las solapas, como se indica, y fíjela con sujetadores de ser necesario. 2 Coloque el soporte opcional para tejas provisto con el tapajuntas. FRANÇAIS : Installer le solin en sabot.
English: To allow for proper drainage, interweave roofing underlayment as shown. 12 Español: Para lograr un drenaje adecuado, intercale la lámina de soporte para techo como se indica. min 4" min 100 mm Français : Pour assurer un drainage adéquat, entrecroiser avec la membrane de toiture, tel qu'illustré. English: Install the following courses of interlayment. 13 1 C ut foam gasket and flatten down edges of flashing as shown. 2 Install interlayment over flashing as shown.
English: Complete installation of cedar shakes and interlayment. Maintain distance to frame as shown. 14 Español: Complete la instalación de las tablillas de cedro y la lámina de soporte interna. Respete la distancia al marco como se indica. Français : Terminer l'installation des bardeaux de cèdre et des matériaux de protection. Respecter la distance au cadre, tel qu'illustré. 2 3⁄8" 6 0 mm English: Maintain distance to frame as shown.
GPL ENGLISH: Connection of springs Close window using control bar. Then open window using handle on bottom of sash. Push sash outwards, ensuring that fittings and springs on both sides automatically connect. Español: Ensamblaje de resortes Cierre la ventana usando la barra de control. Luego abra la ventana usando la manija que se encuentra en la parte inferior de la hoja. Empuje la hoja hacia afuera, asegurándose de que las piezas de ajuste y los resortes de ambos lados se conecten automáticamente.
CDN: VELUX Canada Inc. 1 800 88-VELUX (888-3589) www.velux.com Instructions d'installation du solin EDW pour puits de lumière et fenêtre de toit à cadre intégré montés directement sur la toiture. ©2009, 2011 VELUX Group ®VELUX et le logo VELUX sont des marques de commerce déposées et employées sous licence de VELUX Group EDW Deck Mounted Skylight and Roof Window Flashing Installation Instructions.