TGR/THR/TMR ENGLISH: Installation instructions for rigid sun tunnel TGR/THR/TMR ESPAÑOL: Instrucciones de instalación para túnel solar rígido TGR/THR/TMR FRANÇAIS : Instructions d'installation du tunnel de lumière rigide TGR/THR/TMR 15°-90° 14°-60° VAS 454064-2019-09
ENGLISH: ESPAÑOL: Read installation instructions carefully before proceeding. Lea las instrucciones antes de comenzar. POTENTIAL FIRE HAZARD During installation, the reflective tunnels and components of VELUX® sun tunnels may focus sunlight causing intense heat or fire. Do not remove protective films until immediately before installation. Once protective films have been removed, do not leave tunnels or components unattended or place near combustible materials. Also, avoid skin burns.
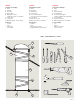
ENGLISH: ESPAÑOL: FRANÇAIS : Contents of packaging: 1 Dome 2 Flashing 3 Pivot ring 4 Upper elbow 5 Rigid tunnel section (additional sections are available) 6 Lower elbow 7 Ceiling ring 8 Diffuser (primary and secondary) Contenido del paquete: 1 Cúpula 2 Tapajuntas 3 Anillo pivotal 4 Codo superior 5 Sección de túnel rígido (secciones adicionales disponibles) 6 Codo inferior 7 Anillo del cielo raso 8 Difusor (principal y secundario) Contenu de l'emballage : 1 Dôme 2 Solin 3 Anneau pivotant 4 Coude sup
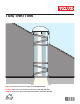
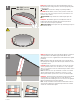
Planning Planification ENGLISH: A B Planificación A ecide desired location of the sun tunnel and mark the location with a wire so that it can D be seen from the attic. B or optimal performance keep the sun tunnel as short and straight as possible, using the F following recommendations: - Pitched flashing (THR/TMR) or vertical tunnel for roof pitches 14˚-45˚ (3:12 - 12:12) and any roof orientation.
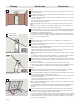
1 ENGLISH: Carefully remove the primary diffuser from the ceiling ring. Rotate the diffuser to disengage. ESPAÑOL: Con mucho cuidado, retire el difusor principal del anillo del cielo raso. Gire el difusor para soltarlo. FRANÇAIS : Désassemblez délicatement le diffuseur primaire de l'anneau de plafond. Effectuez une rotation du diffuseur pour le dégager. 2 ENGLISH: Attach lower elbow to the ceiling ring. Make sure all ceiling ring tabs engage with a click. Remove protective film from the lower elbow.
3 010: 11¼" (286 mm) 014: 15¼" (387 mm) ENGLISH: From the inside, locate the nail indicating the center of the sun tunnel in the ceiling, mark circle and cut rough opening in the ceiling as shown. CAUTION: Be careful not to damage any framing members. ESPAÑOL: Desde adentro, localice el clavo que indica el centro del túnel solar en el cielo raso, marque el círculo y corte un hueco en el cielo raso como se indica. PRECAUCIÓN: Tenga cuidado de no dañar ninguna parte del marco.
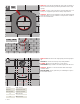
ENGLISH: Tip the plastic pins down into hidden position A . Insert the ceiling ring assembly. Avoid distortion of the ceiling ring causing the diffuser not to fit smoothly B . Secure the ceiling ring, insuring a tight joint between the ceiling ring and the ceiling C . Note: Be careful not to damage parts if using power tools. 5 ESPAÑOL: Gire los pasadores plásticos hasta que queden ocultos A . Inserte el conjunto del anillo del cielo raso.
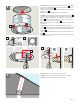
ENGLISH: Locate the nail indicating the center of the sun tunnel on the roof and use the flashing to mark top and bottom of the rough opening. TGR 7 ESPAÑOL: Localice el clavo que indica el centro del túnel solar en el techo y use el tapajuntas para marcar arriba y abajo del hueco. FRANÇAIS : Repérez le clou indiquant le centre de l'emplacement du tunnel de lumière sur le toit et utilisez le solin pour tracer le haut et le bas de l'ouverture brute.
ENGLISH: Remove the roofing material around the upper half of the rough opening as indicated and apply mastic around rough opening as shown. 9 ESPAÑOL: Quite el material de cubierta que rodea la parte superior del hueco y aplique masilla alrededor del hueco como se indica. FRANÇAIS : Enlevez le matériau de toiture autour de la moitié supérieure de l'ouverture brute tel qu'indiqué et appliquez du mastic autour de l'ouverture brute tel qu'illustré ci-contre.
ENGLISH: Apply sealant as shown and seal all fasteners. 11 ESPAÑOL: Aplicar el sellador como se indica y sellar todos los sujetadores. FRANÇAIS : Appliquez le produit d'étanchéité, tel qu'illustré, et scellez les boulons. ENGLISH: Overlap the top of the flange with underlayment to allow for proper drainage. 12 ESPAÑOL: Cubra la parte superior de la brida con lámina de soporte para lograr un drenaje adecuado.
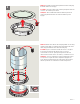
ENGLISH: Attach foam gasket to the pivot ring as shown. 14 ESPAÑOL: Sujete la empaquetadura de gomaespuma al anillo pivotal, como se indica. FRANÇAIS : Apposez le joint en mousse al anillo pivotal, tel qu'illustré. ENGLISH: Attach the upper elbow to the pivot ring. Make sure all pivot ring tabs engage with a click. Remove protective film from the upper elbow. Note: Do not remove protective films until immediately before installation.
17 ENGLISH: Remove protective film from the rigid tunnel section. ESPAÑOL: Quite la película protectora de la sección de túnel rígido. FRANÇAIS : Enlevez le film protecteur de la section de tunnel rigide. 18 ENGLISH: Assemble the rigid tunnel section with tunnel clips provided. ESPAÑOL: Arme la sección de túnel rígido con los sujetadores del túnel suministrados. FRANÇAIS : Assemblez la section de tunnel rigide avec des attaches de tunnel fournies.
ENGLISH: With one rigid tunnel section, cut the section to length. 19 For longer sun tunnels, use VELUX rigid tunnel sections ZTR. ESPAÑOL: Con una sección de túnel rígido, corte la sección de acuerdo con la longitud necesaria. Para túneles solares más largos, use las secciones de túnel rígido ZTR VELUX. X FRANÇAIS : Avec une section de tunnel rigide, coupez la section à la longueur désirée. Pour allonger les tunnels de lumière utilisez les sections de tunnel rigide ZTR VELUX.
ENGLISH: Remove the elbow and remove protective film from upper elbow. 20 ESPAÑOL: Retire el codo y quite la película protectora del codo superior. FRANÇAIS : Enlevez le coude ainsi que le film protecteur du coude supérieur. ENGLISH: Connect the rigid tunnel section with the upper elbow, fitting the rigid tunnel section to go on the outside of the upper elbow. Secure and tape joints with tunnel clips and tape provided 1, 2.
ENGLISH: Connect tunnel assembly with the clips supplied. If tunnel section was trimmed or holes do not align, use the screws supplied as necessary. 22 ESPAÑOL: Conecte el conjunto del túnel con los sujetadores suministrados. Si se recortó la sección de túnel o los orificios no están alineados, use los tornillos suministrados que sean necesarios. FRANÇAIS : Reliez l'assemblage du tunnel avec les attaches fournies.
3x 24 3 " 8 10 mm ENGLISH: Seat the pivot ring with the tunnel assembly into the flashing and secure with three of the 3/8" (10 mm) screws provided. Note: Visually inspect that the tunnel assembly is fully seated on all pivot ring tabs before proceeding. ESPAÑOL: Coloque el anillo pivotal con el conjunto del túnel dentro del tapajuntas y fíjelo con tres de los tornillos de 3/8" (10 mm) suministrados.
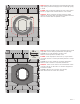
27 ENGLISH: Install the diffuser assembly by aligning the notches and rotate to secure. Note: If installing energy kit ZTC, use instructions enclosed with the kit. ESPAÑOL: Instale el conjunto del difusor alineando las ranuras y gírelo para sujetarlo. Nota: Si va a instalar el kit de energía ZTC, consulte las instrucciones incluidas en el kit. FRANÇAIS : Installez l'ensemble du diffuseur en alignant les encoches et faites-le tourner pour le fixer.
ZTA ENGLISH: ZTA: Optional turret extensions ZTA are available for TGM/TGR in size 014 where domes need to be elevated by 12" (300 mm) or 36" (900 mm). ZTL: Sun tunnel light option – Refer to light kit ZTL 114 for sun tunnel sizes 010 and 014. ESPAÑOL: ZTA: puede solicitar extensiones de la torre ZTA opcionales para TGM/TGR de tamaño 014 si necesita elevar la cúpula 12" (300 mm) o 36" (900 mm).
VELUX® 19
AU: VELUX Australia Pty. Ltd. 1300 859 856 www.velux.com.au JP: CA: VELUX Canada Inc. 1 800 88-VELUX (888-3589) www.velux.ca KR: VELUX International (VELUX A/S) +45 7632 9240 www.velux.co.kr VELUX-Japan Ltd. 0570-00-8141 www.velux.co.jp VELUX New Zealand Ltd. 0800 650 445 www.velux.co.nz US: VELUX America LLC 1-800-88-VELUX www.veluxusa.com www.velux.com INSTALLATION INSTRUCTIONS FOR RIGID SUN TUNNEL TGR/THR/TMR.