TGF/TMF English: Installation instructions for flexible sun tunnel TGF/TMF ESPAÑOL: Instrucciones de instalación para túnel solar flexible TGF/TMF Français : Instructions d'installation du tunnel de lumière flexible TGF/TMF 15°-90° 14°-60° VAS 451635-2013-10
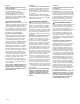
ENGLISH: Read installation instructions carefully before proceeding. VELUX flexible sun tunnels TGF and TMF are designed for roof pitches 14°-60° (3:12-21:12) and for asphalt and wooden shingles (max thickness 5/16" (8 mm)). The tile kit ZTM (available separately) expands the use of TGF and TMF to include profiled roofing materials (tiles) with max profile height 1¾" (45 mm). ESPAÑOL: Lea las instrucciones antes de comenzar.
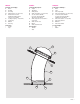
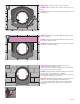
ENGLISH: ESPAÑOL: FRANÇAIS : Contents of packaging: 1. Dome 2. Flashing 3. Pivot ring 4. Aluminum ring - 4" (100 mm) 5. Flexible tunnel section (additional flexible tunnel sections are available) 6. Locking snap ring – 1" (25 mm) 7. Ceiling ring 8. Diffuser 9. Trim ring Contenido del paquete: 1. Cúpula 2. Tapajuntas 3. Anillo pivotal 4. Anillo de aluminio – 4" (100 mm) 5. Sección de túnel flexible (secciónes de túnel flexible adicionales disponibles) 6.
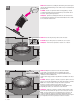
Planning Planificación ENGLISH: A A B Planification B or optimal performance keep the sun tunnel as short and straight as possible, using the F following recommendations: - Pitched flashing (TMF) or vertical tunnel for roof pitches 14°-45° (3:12-12:12) and any roof orientation. - Low profile flashing (TGF) or sloped tunnel for roof pitches 45°-60° (12:12-21:12) and east, south, and west roof orientations. Note: Tunnel length should not exceed 8 ft. (2.4 m).
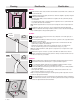
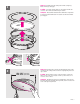
ENGLISH: Carefully remove the other parts from the ceiling ring. Rotate trim ring to disengage. 1 ESPAÑOL: Con mucho cuidado, quite las otras partes del anillo del cielo raso. Gire el anillo de terminación para soltarlo. FRANÇAIS : Désassembler délicatement les différentes composantes de l'anneau de plafond. Effectuer une rotation de l'anneau de finition pour dégager.
ENGLISH: Tip the plastic pins down into hidden position A . Insert the ceiling ring. Avoid distortion of the ceiling ring causing the diffuser not to fit smoothly B . Secure the ceiling ring, insuring a tight joint between the ceiling ring and the ceiling C . Note: Be careful not to damage parts if using power tools. 3 ESPAÑOL: Gire los pasadores plásticos hasta que queden ocultos A . Inserte el anillo del cielo raso.
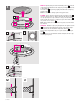
4 ENGLISH: Locate the nail indicating the center of the sun tunnel on the roof and use the flashing to mark top and bottom of the rough opening. TGF ESPAÑOL: Localice el clavo que indica el centro del túnel solar en el techo y use el tapajuntas para marcar arriba y abajo del hueco. FRANÇAIS : Repérer le clou indiquant le centre de l'emplacement du tunnel de lumière sur le toit et utiliser le solin pour tracer le haut et le bas de l'ouverture brute.
6 ENGLISH: Remove the roofing material around the upper half of the rough opening as indicated and apply mastic around rough opening as shown. ESPAÑOL: Quite el material de cubierta que rodea la parte superior del hueco y aplique masilla alrededor del hueco como se indica. FRANÇAIS : Enlever le matériel de toiture autour de la moitié supérieure de l'ouverture brute tel qu'indiqué et appliquer du mastic autour de l'ouverture brute tel qu'illustré ci-contre.
ENGLISH: Apply sealant as shown and seal all fasteners. 8 ESPAÑOL: Aplicar el sellador como se indica y sellar todos los sujetadores. FRANÇAIS : Appliquer le produit d'étanchéité, tel qu'illustré, et sceller les boulons. ENGLISH: Overlap the top of the flange with underlayment to allow for proper drainage. 9 ESPAÑOL: Cubra la parte superior de la brida con lámina de soporte para lograr un drenaje adecuado.
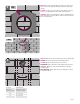
ENGLISH: Insert tunnel assembly into the flashing and seat the pivot ring into the intermediate ring. Secure with screws, if needed. Remove protective film. 11 ESPAÑOL: Inserte el conjunto del túnel en el tapajuntas y coloque el anillo pivotal dentro del anillo intermedio. Fije con tornillos de ser necesario. Quite la película protectora. FRANÇAIS : Ajouter l'assamblage du tunnel au solin et insérer l'anneau pivotant dans l'intérieur de l'anneau intermédiaire. Fixer à l'aide de vis au besoin.
ENGLISH: Pull the flexible tunnel section down through the ceiling ring. 13 ESPAÑOL: Hale la sección de túnel flexible para abajo hacia el anillo del cielo raso. FRANÇAIS : Faire passer la section de tunnel flexible vers le bas à travers l'anneau de plafond. ENGLISH: Pull the flexible tunnel section tight through the ceiling ring and cut flexible tunnel to length as shown.
16 ENGLISH: Move the locking snap ring to final position as shown – 3/8" (10 mm) above the position for the diffuser. ESPAÑOL: Mueva el anillo de presión con cerradura a su posición final como se indica – 3/8" (10 mm) sobre el espacio para el difusor. FRANÇAIS : Tourner l'anneau de retenue jusqu'à sa position finale, tel qu'illustré – 3/8" (10 mm) au-dessus de la position pour le diffuseur. 17 ENGLISH: Cut off excess tunnel flush with the ceiling ring as shown.
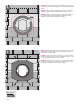
ENGLISH: Secure the loose edge of tunnel with tape provided. 19 ESPAÑOL: Asegure las orillas sueltas del túnel con la cinta suministrada. FRANÇAIS : Fixer l'excédant de tunnel avec le ruban fourni. 1 20 1 ENGLISH: Install the diffuser with the frosted side facing down. Secure the diffuser by rotating the plastic locks into locked position 1. Note: If installing energy kit ZTC, use instructions enclosed with the kit. ESPAÑOL: Instale el difusor con la parte esmerilada hacia abajo.
ENGLISH: If vapor barrier is installed, insure a tight joint between the ceiling ring and the vapor barrier. Reposition the insulation material around the tunnel. In Canada it is necessary to form an air tight seal between the vapor barrier and the VELUX sun tunnel. This can be done by using a vapor barrier tape. It is important that the ceiling area (attic side) around the sun tunnel is well insulated.
VELUX 15
CDN: VELUX Canada Inc. 1 800 88-VELUX (888-3589) www.velux.com Instructions d'installation du tunnel de lumière flexible TGf/TMf. ©2006, 2013 VELUX Group ®VELUX et le logo VELUX sont des marques de commerce déposées et employées sous licence de VELUX Group Installation instructions for flexible sun tunnel TGf/TMf. ©2006, 2013 VELUX Group ®VELUX and the VELUX logo are registered trademarks used under licence by the VELUX Group USA: VELUX America Inc.