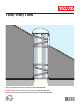
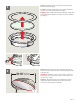
TGR/THR/TMR ENGLISH: Installation instructions for rigid sun tunnel TGR/THR/TMR ESPAÑOL: Instrucciones de instalación para túnel solar rígido TGR/THR/TMR FRANÇAIS : Instructions d'installation du tunnel de lumière rigide TGR/THR/TMR 15°-90° 14°-60° VAS 454064-2016-05
ENGLISH: ESPAÑOL: FRANÇAIS : Read installation instructions carefully before proceeding. VELUX rigid sun tunnels TGR, THR and TMR are designed for roof pitches 14°-60° (3:12 - 21:12) and for asphalt and wooden shingles (max thickness 5/16" (8 mm)). The tile kit ZTM (available separately) expands the use of TMR to include profiled roofing materials (tiles) with max profile height 1¾" (45 mm). Lea las instrucciones antes de comenzar.
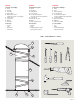
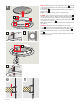
ENGLISH: ESPAÑOL: FRANÇAIS : Contents of packaging: 1 Dome 2 Flashing 3 Pivot ring 4 Upper elbow 5 Rigid tunnel section (additional sections are available) 6 Lower elbow 7 Ceiling ring 8 Diffuser 9 Trim ring Contenido del paquete: 1 Cúpula 2 Tapajuntas 3 Anillo pivotal 4 Codo superior 5 Sección de túnel rígido (secciones adicionales disponibles) 6 Codo inferior 7 Anillo del cielo raso 8 Difusor 9 Anillo de terminación Contenu de l'emballage : 1 Dôme 2 Solin 3 Anneau pivotant 4 Coude supérieur 5 Sec
Planning Planification ENGLISH: A B Planificación A ecide desired location of the sun tunnel and mark the location with a wire so that it can D be seen from the attic. B or optimal performance keep the sun tunnel as short and straight as possible, using the F following recommendations: - Pitched flashing (THR/TMR) or vertical tunnel for roof pitches 14˚-45˚ (3:12 - 12:12) and any roof orientation.
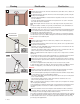
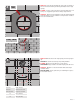
ENGLISH: Carefully remove the other parts from the ceiling ring. Rotate trim ring to disengage. 1 ESPAÑOL: Con mucho cuidado, quite las otras partes del anillo del cielo raso. Gire el anillo de terminación para soltarlo. FRANÇAIS : Désassemblez délicatement les différentes composantes de l'anneau de plafond. Effectuez une rotation de l'anneau de finition pour dégager.
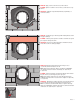
ENGLISH: Tip the plastic pins down into hidden position A . Insert the ceiling ring. Avoid distortion of the ceiling ring causing the diffuser not to fit smoothly B . Secure the ceiling ring, insuring a tight joint between the ceiling ring and the ceiling C . Note: Be careful not to damage parts if using power tools. 3 ESPAÑOL: Gire los pasadores plásticos hasta que queden ocultos A . Inserte el anillo del cielo raso.
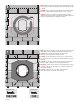
ENGLISH: Locate the nail indicating the center of the sun tunnel on the roof and use the flashing to mark top and bottom of the rough opening. 4 TGR ESPAÑOL: Localice el clavo que indica el centro del túnel solar en el techo y use el tapajuntas para marcar arriba y abajo del hueco. FRANÇAIS : Repérez le clou indiquant le centre de l'emplacement du tunnel de lumière sur le toit et utilisez le solin pour tracer le haut et le bas de l'ouverture brute.
ENGLISH: Remove the roofing material around the upper half of the rough opening as indicated and apply mastic around rough opening as shown. 6 ESPAÑOL: Quite el material de cubierta que rodea la parte superior del hueco y aplique masilla alrededor del hueco como se indica. FRANÇAIS : Enlevez le matériau de toiture autour de la moitié supérieure de l'ouverture brute tel qu'indiqué et appliquez du mastic autour de l'ouverture brute tel qu'illustré ci-contre.
ENGLISH: Apply sealant as shown and seal all fasteners. 8 ESPAÑOL: Aplicar el sellador como se indica y sellar todos los sujetadores. FRANÇAIS : Appliquez le produit d'étanchéité, tel qu'illustré, et scellez les boulons. ENGLISH: Overlap the top of the flange with underlayment to allow for proper drainage. 9 ESPAÑOL: Cubra la parte superior de la brida con lámina de soporte para lograr un drenaje adecuado.
ENGLISH: Attach the upper elbow to the pivot ring. Remove protective film from the upper elbow. Note: Do not remove protective films until immediately before installation. Once protective films have been removed, do not leave tunnels or components unattended or place near combustible materials. 11 ESPAÑOL: Sujete el codo superior al anillo pivotal. Quite la película protectora del codo superior. Nota: No quite la película protectora hasta el momento de la instalación.
13 A ESPAÑOL: Ajuste el ángulo de ambos codos de manera que apunten el uno directamente al otro A , B . Los codos se pueden dañar si se usa fuerza excesiva. Determine la longitud total del conjunto del túnel rígido. Incluya un mínimo 2" (50 mm) para superponer los codos y un mínimo 1½" (40 mm) por cada sección adicional de túnel rígido. X B A ENGLISH: Adjust the angle of both elbows so that they point directly against each other A , B . Elbows can be damaged if excess force is applied.
14 ENGLISH: Remove protective film from the rigid tunnel section. ESPAÑOL: Quite la película protectora de la sección de túnel rígido. FRANÇAIS : Enlevez le film protecteur de la section de tunnel rigide. 15 ENGLISH: Assemble the rigid tunnel section with tunnel clips provided. ESPAÑOL: Arme la sección de túnel rígido con los sujetadores del túnel suministrados. FRANÇAIS : Assemblez la section de tunnel rigide avec des attaches de tunnel fournies.
ENGLISH: With one rigid tunnel section, cut the section to length. 16 For longer sun tunnels, use VELUX rigid tunnel sections ZTR. ESPAÑOL: Con una sección de túnel rígido, corte la sección de acuerdo con la longitud necesaria. Para túneles solares más largos, use las secciones de túnel rígido ZTR VELUX. X FRANÇAIS : Avec une section de tunnel rigide, coupez la section à la longueur désirée. Pour allonger les tunnels de lumière utilisez les sections de tunnel rigide ZTR VELUX.
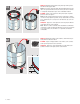
ENGLISH: Install tunnel assembly. 17 ESPAÑOL: Instale el conjunto del túnel. FRANÇAIS : Installez l'assemblage du tunnel. 18 3x 3 " 8 10 mm ENGLISH: Connect tunnel assembly with the clips supplied. If tunnel section was trimmed or holes do not align, use the screws supplied as necessary. ESPAÑOL: Conecte el conjunto del túnel con los sujetadores suministrados. Si se recortó la sección de túnel o los orificios no están alineados, use los tornillos suministrados que sean necesarios.
20 ENGLISH: Seat the pivot ring with the tunnel assembly into the flashing. Secure with screws if needed. 3x 3 " 8 10 mm ESPAÑOL: Coloque el anillo pivotal con el conjunto del túnel dentro del tapajuntas. Fije con tornillos de ser necesario. FRANÇAIS : Insérez l'anneau pivotant dans l'assemblage du tunnel à l'intérieur du solin. Fixez à l'aide des vis au besoin. 21 10" = 4 x 14" = 5 x ENGLISH: Align holes; install and secure the dome with the ¾" (19 mm) screws provided.
23 ENGLISH: Install the diffuser with the frosted side facing down. Note: If installing energy kit ZTC, use instructions enclosed with the kit. ESPAÑOL: Instale el difusor con la parte esmerilada hacia abajo. Nota: Si va a instalar el kit de energía ZTC, consulte las instrucciones incluidas en el kit. FRANÇAIS : Installez le diffuseur avec le côté givré vers le bas. Note : Si vous installez la trousse énergétique ZTC, utilisez les instructions d'installation incluses.
ZTA ZTL ZTM ENGLISH: ZTA: Optional turret extensions ZTA are available for TGM/TGR in size 014 where domes need to be elevated by 12" (300 mm) or 36" (900 mm). ZTL: Sun tunnel light option – Refer to light kit ZTL 114 for sun tunnel sizes 010 and 014. ESPAÑOL: ZTA: puede solicitar extensiones de la torre ZTA opcionales para TGM/TGR de tamaño 014 si necesita elevar la cúpula 12" (300 mm) o 36" (900 mm).
VELUX®
VELUX® 19
CDN: VELUX Canada Inc. 1 800 88-VELUX (888-3589) www.velux.com INSTALLATION INSTRUCTIONS FOR RIGID SUN TUNNEL TGR/THR/TMR. ©2006, 2016 VELUX GROUP ®VELUX AND THE VELUX LOGO ARE REGISTERED TRADEMARKS USED UNDER LICENCE BY THE VELUX GROUP INSTRUCTIONS D’INSTALLATION DU TUNNEL DE LUMIÈRE RIGIDE TGR/THR/TMR.