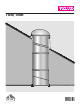
TGR/TMR 14°- 60° VAS 451636 - 0409
English: Read installation instructions carefully before proceeding. TGR and TMR are designed for asphalt shingles and wooden shingles up to 5/16" (8 mm) thick and roof pitches between 14°- 60° (3:12 - 20:12). The tile kits ZTG and ZTM (available separately), expand the use of TGR and TMR to include profiled roofing materials (tiles) with maximum 1 ¾" (45 mm) profile height. Español: Lea las instrucciones antes de comenzar.
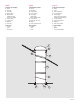
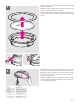
English: Español: Français : Contents of packaging: 1. Dome 2. Flashing 3. Pivot ring 4. Upper elbow 5. Rigid tunnel (additional rigid tunnel is available) 6. Lower elbow 7. Ceiling ring 8. Diffuser 9. Trim ring Contenido del paquete: 1. Cúpula 2. Tapajuntas 3. Anillo pivotal 4. Codo superior 5. Túnel rígido (túnel rígido adicional disponible) 6. Codo inferior 7. Anillo del cielo raso 8. Difusor 9. Anillo de terminación Contenu de l’emballage : 1. Dôme 2. Solin 3. Anneau pivotant 4.
Planning Planificación English A Decide desired location of the Sun Tunnel and mark the location with a wire so that it can be seen from the attic. B For optimal performance keep the Sun Tunnel as short and straight as possible, using the following recommendations: - Pitched flashing or vertical tunnel for roof pitches 14° - 45° (3:12 - 12:12) and any roof orientation. - Low profile flashing or sloped tunnel for roof pitches 45° - 60° (12:12 - 20:12) and east, south, and west roof orientations.
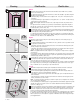
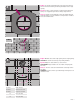
English: Carefully remove the other parts from the ceiling ring. Rotate trim ring to disengage. 1 Español: Con mucho cuidado, quite las otras partes del anillo del cielo raso. Gire el anillo de terminación para soltarlo. Français : Désassembler délicatement les différentes composantes de l’anneau de plafond. Effectuer une rotation de l’anneau de finition pour dégager.
English: Rotate the plastic "plates" into hidden position and insert and secure the ceiling ring, insuring a tight joint between the ceiling ring and the ceiling. Optionally and whenever possible, use hole to attach screw into ceiling joist A . Avoid distortion of the ceiling ring causing the diffuser not to fit smoothly. Note: Be careful not to damage parts if using power tools.
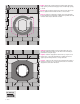
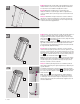
English: Locate the nail indicating the center of the Sun Tunnel on the roof and use the flashing to mark top and bottom of the rough opening. 4 Español: Localice el clavo que indica el centro del Sun Tunnel en el techo y use el tapajuntas para marcar arriba y abajo del hueco. Français : Repérez le clou indiquant le centre de l’emplacement du tunnel de lumière sur le toit et utilisez le solin pour tracer le haut et le bas de l’ouverture brute.
6 English: Remove the roofing material around the upper half of the rough opening as indicated and apply mastic around rough opening as shown. Español: Quite el material de techo que rodea la parte superior del hueco y aplique masilla alrededor del hueco como se indica. Français : Retirez les matériaux de toiture sur la demie supérieure de l’ouverture brute tel qu’indiqué et appliquez du goudron autour de l’ouverture brute tel que démontré ci-contre.
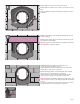
English: Apply sealant as shown and seal all fasteners. 8 Español: Aplicar el sellador como se indica y sellar todos los sujetadores. Français : Appliquer le produit d’étanchéité tel qu’illustré et sceller les boulons. English: Overlap the top of the flange with underlayment to allow for proper drainage. 9 Español: Cubra la parte superior del reborde con lámina de soporte para permitir el drenaje debido.
English: Determine the overall length of the straight tunnel section. Include minimum 3" (80 mm) to overlap the elbows and minimum 1½" (40 mm) for each additional straight tunnel section. 11 Español: Determine la longitud de la sección de túnel recto. Incluya un mínimo de 3" (80 mm) para cubrir los adaptadores de codos y un mínimo de 1½" (40 mm) por cada sección de túnel recto adicional.
English: Install the pivot ring on the upper elbow and remove the protective film. 13 Español: Instale el anillo pivotal en el adaptador del ángulo superior y quite la cinta protectora. Français : Installez l’anneau intermédiaire sur le dessus du coude et retirez la pellicule protectrice. English: Adjust angle of both elbows. Elbow can be damaged if excess force is applied. 14 Español: Ajuste el ángulo de ambos adaptadores. El adaptador puede dañarse si se usa exceso de fuerza.
English: Insert and connect tunnel assembly. Note: For rigid Sun Tunnel assemblies, it is generally recommended to secure transmittance of loads to the roofing structure by supplementary suspension provided by installer (headers, screws, wires etc.). 16 Español: Inserte y conecte el montaje del túnel.
18 4 x English: Secure tunnel assembly to ceiling ring with four of the 3/8" (10 mm) screws provided. Español: Asegure el montaje del túnel al anillo del cielo raso con cuatro de los tornillos de 3/8" (10 mm) suministrados. Français : Sécurisez l’assemblage du tunnel à l’anneau de plafond avec quatre des vis de 3/8" (10 mm) fournies. ½ ½ ½ 1 19 English: Install the diffuser with the frosted/prismatic side facing down. Secure the diffuser by rotating the plastic locks into locked position 1 .
( (U.S/I-P) 0.X Air Leaka Infiltracion de Coeficiente; Ganancia de 0.XX 0.XX (Metrico/SI) 0.XX Factor-U U-Factor EVALUACION SUPLEMENTARIA DE RENDIMIEN Transmision de Luz Visible (U.S/I-P) Visible Transmittance 0.XX ADDITIONAL PERFORMANCE RA VELUX® Model TMF Acrylic 0000 VEL-N-015-00001 Tubular Daylighting Devic EVALUACION DE RENDIMIENTO ENERGETICO ENERGY PERFORMANCE RATI ENERGY STAR®qualified for highlighte Répond aux exigences pour les régions Canada Zone - A B C D U.S.A.
English: If vapor barrier is installed, insure a tight joint between the ceiling ring and the vapor barrier. Reposition the insulation material around the tunnel. In Canada it is necessary to form an air tight seal between the vapor barrier and the VELUX Sun Tunnel. This can be done by using a vapor barrier tape.
CDN: VELUX Canada Inc. 1 800 88-VELUX (888-3589) www.velux.com Installation instructions for rigid Sun Tunne TGR/TMR. ©2006, 2009 VELUX Group ®VELUX and the VELUX logo are registered trademarks used under licence by the VELUX Group Instructions d’installation du tunnel de lumière rigide TGR/TMR. ©2006, 2009 VELUX Group ®VELUX et le logo VELUX sont des marques de commerce déposées et employées sous licence de VELUX Group USA: VELUX America Inc.