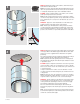
TSR ENGLISH: Installation instructions for rigid sun tunnel TSR ESPAÑOL: Instrucciones de instalación para túnel solar rígido TSR FRANÇAIS : Instructions d'installation du tunnel de lumière rigide TSR 15°-90° 14°-60° VAS 451389-2016-06
ENGLISH: ESPAÑOL: FRANÇAIS : Read installation instructions carefully before proceeding. VELUX rigid sun tunnel TSR is designed for roof pitches 14°-60° (3:12 - 21:12) and for asphalt shingles (max thickness 5/16" (8 mm)). Lea las instrucciones antes de comenzar. El túnel solar rigído TSR VELUX está diseñado para techos con inclinación de 14°-60° (3:12 - 21:12) y para tejas de asfalto (grosor máximo 5/16" (8 mm)). Lisez attentivement les instructions avant de commencer.
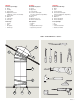
ENGLISH: Contents of packaging 1 Dome 2 Flashing 3 Upper elbow 4 Rigid tunnel section (additional sections are available) 5 Lower elbow 6 Diffuser 7 Ceiling ring 8 Trim ring ESPAÑOL: Contenido del paquete 1 Cúpula 2 Tapajuntas 3 Codo superior 4 Sección de túnel rígido (secciones adicionales disponibles) 5 Codo inferior 6 Difusor 7 Anillo del cielo raso 8 Anillo de terminación FRANÇAIS : Contenu de l'emballage 1 Dôme 2 Solin 3 Coude supérieur 4 Section de tunnel rigide (sections additionnels
Planning Planificación Planification ENGLISH: A A ecide desired location of the sun tunnel and mark the location with a wire so that it can D be seen from the attic. B For optimal performance keep the sun tunnel as short and straight as possible. C se the lower elbow to angle the tunnel towards the sun and to avoid obstructions in the U attic. Note: Tunnel length should not exceed 30 ft. (9 m). Exposure to the sun provides more light.
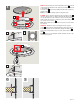
ENGLISH: Carefully remove the other parts from the ceiling ring. Rotate trim ring to disengage. 1 ESPAÑOL: Con mucho cuidado, quite las otras partes del anillo del cielo raso. Gire el anillo de terminación para soltarlo. FRANÇAIS : Désassemblez délicatement les différentes composantes de l'anneau de plafond. Effectuez une rotation de l'anneau de finition pour dégager.
ENGLISH: Attach pile gasket to lower elbow as shown. Remove protective film from the lower elbow. Note: Do not remove protective films until immediately before installation. Once protective films have been removed, do not leave tunnels or components unattended or place near combustible materials. 3 ESPAÑOL: Sujete la empaquetadura al codo inferior, como se indica. Quite la película protectora del codo inferior. Nota: No quite la película protectora hasta el momento de la instalación.
ENGLISH: Tip the plastic pins down into hidden position A . Insert the ceiling ring. Avoid distortion of the ceiling ring causing the diffuser not to fit smoothly B . Secure the ceiling ring, insuring a tight joint between the ceiling ring and the ceiling C . Note: Be careful not to damage parts if using power tools. 5 ESPAÑOL: Gire los pasadores plásticos hasta que queden ocultos A . Inserte el anillo del cielo raso.
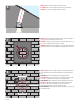
12" 1 /8" ENGLISH: These are the desired results at this point. 6 ESPAÑOL: Éstos son los resultados deseados en este momento. FRANÇAIS : Ce sont les résultats désirés à ce point. ENGLISH: Locate the nail indicating the center of the sun tunnel on the roof and use the flashing to mark a circle. 7 ESPAÑOL: Localice el clavo que indica el centro del túnel solar en el techo y use el tapajuntas para marcar un círculo.
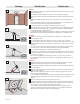
ENGLISH: Remove the roofing material around the upper half of the rough opening as indicated. ESPAÑOL: Quite el material de cubierta que rodea la parte superior del hueco como se indica. FRANÇAIS : Enlevez le matériau de toiture autour de la moitié supérieure de l'ouverture brute tel qu'indiqué. 10 ENGLISH: Temporarily install the flashing over the rough opening. ESPAÑOL: Instale el tapajuntas sobre el hueco de manera provisoria. FRANÇAIS : Installez le solin temporairement sur l'ouverture brute.
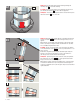
12 A ENGLISH: Insert the upper elbow into the flashing allowing the retaining edge A to rest on the flashing. ESPAÑOL: Inserte el codo superior en el tapajuntas de manera tal que el borde de retención A descanse sobre el tapajuntas. FRANÇAIS : Insérez le coude supérieur dans le solin de manière que le rebord de retenue A repose sur le solin. 13 A ESPAÑOL: Ajuste el ángulo de ambos codos de manera que apunten el uno directamente al otro A , B . Los codos se pueden dañar si se usa fuerza excesiva.
14 ENGLISH: Remove protective film from the rigid tunnel section. ESPAÑOL: Quite la película protectora de la sección de túnel rígido. FRANÇAIS : Enlevez le film protecteur de la section de tunnel rigide. 15 ENGLISH: Assemble the rigid tunnel section with tunnel clips provided. ESPAÑOL: Arme la sección de túnel rígido con los sujetadores del túnel suministrados. FRANÇAIS : Assemblez la section de tunnel rigide avec des attaches de tunnel fournies.
ENGLISH: With one rigid tunnel section, cut the section to length. 16 For longer sun tunnels, use VELUX rigid tunnel sections ZTR. ESPAÑOL: Con una sección de túnel rígido, corte la sección de acuerdo con la longitud necesaria. Para túneles solares más largos, use las secciones de túnel rígido ZTR VELUX. X FRANÇAIS : Avec une section de tunnel rigide, coupez la section à la longueur désirée. Pour allonger les tunnels de lumière utilisez les sections de tunnel rigide ZTR VELUX.
ENGLISH: Remove flashing with elbow and remove protective film from upper elbow. 17 ESPAÑOL: Quite el tapajuntas con codo y quite la película protectora del codo superior. FRANÇAIS : Enlevez le solin avec coude ainsi que le film protecteur du coude supérieur. ENGLISH: Connect the rigid tunnel section with upper elbow, fitting the rigid tunnel section to go on the outside of the upper elbow. Secure and tape joints with tunnel clips and tape provided 1 , 2.
19 3x 3 " 8 10 mm ENGLISH: Connect tunnel assembly with the clips supplied. If tunnel section was trimmed or holes do not align, use the screws supplied as necessary. ESPAÑOL: Conecte el conjunto del túnel con los sujetadores suministrados. Si se recortó la sección de túnel o los orificios no están alineados, use los tornillos suministrados que sean necesarios. FRANÇAIS : Reliez l'assemblage du tunnel avec les attaches fournies.
21 X=3" (75 mm) Y=6" (150 mm) X 1½" (40 mm) ENGLISH: Center the flashing over the rough opening and secure the flange with nails along the sides. Seal all exposed nail heads. ESPAÑOL: Centre el tapajuntas sobre el hueco y asegure la brida con clavos a los lados. Selle todas las cabezas de clavos expuestas. FRANÇAIS : Centrez le solin sur l'ouverture brute et fixez le rebord à l'aide de clous le long des côtés. Scellez toutes les têtes de clou exposées.
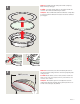
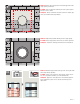
24 4x ENGLISH: Install and secure the dome with four of the 1" (25 mm) screws provided. Note: Do not overtighten the screws. ESPAÑOL: Instale y asegure la cúpula con cuatro de los tornillos de 1" (25 mm) suministrados. Nota: No apriete demasiado los tornillos. FRANÇAIS : Installez le dôme et le fixez avec quatre des vis de 1" (25 mm) fournies. Note : Ne pas serrez les vis de façon excessive. 25 4x ENGLISH: Secure tunnel assembly to ceiling ring with four of the 3/8" (10 mm) screws provided.
27 ENGLISH: Install the trim ring by aligning notches and rotate to secure. ESPAÑOL: Instale el anillo de terminación alineando las ranuras y gírelo para una correcta sujeción. FRANÇAIS : Installez l'anneau de finition en alignant les enclenches et pivotez pour fixer en place. 28 ENGLISH: If vapor barrier is installed, insure a tight joint between the ceiling ring and the vapor barrier. Reposition the insulation material around the tunnel.
VELUX®
VELUX® 19
CDN: VELUX Canada Inc. 1 800 88-VELUX (888-3589) www.velux.com INSTALLATION INSTRUCTIONS FOR RIGID SUN TUNNEL TSR. ©2010, 2015 VELUX GROUP ®VELUX AND THE VELUX LOGO ARE REGISTERED TRADEMARKS USED UNDER LICENSE BY THE VELUX GROUP INSTRUCTIONS D’INSTALLATION DU TUNNEL DE LUMIÈRE RIGIDE TSR.