
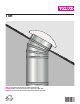
Installation Instructions


4 VELUX
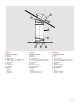
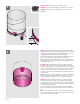
14°-40°
15°-90°
14°-40°
15°-90°
40°-60°
15°-90°
A
B
C
D
E
ENGLISH: Planning
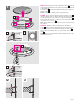
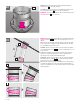
A
Decide desired location of the sun tunnel and mark the location with a wire so that it can
be seen from the attic.
B
For optimal performance keep the sun tunnel as short and straight as possible.
C
Use the lower elbow to angle the tunnel towards the sun and to avoid obstructions in the
attic.
Note: Tunnel length should not exceed 20 ft. (6 m). Exposure to the sun provides more
light.
D
Use the lower elbow to accommodate roof pitches between 40° and 60°.
E
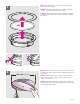
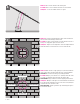
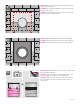
Check that the attic space and roof is clear of all obstructions before beginning the instal-
lation. In between the framing members, mark the center of the sun tunnel by tapping a
nail through the ceiling and through the roof.
To estimate the length of the tunnel, measure from ceiling to roof and add 4" (100 mm) for
fitting the tunnel into the flashing and minimum 1½" (40 mm) for each additional joint.
ESPAÑOL: Planificación
A
Decida la localización deseada para el túnel solar y márquela con un cable para que se
pueda ver desde el ático.
B
Para función óptima mantenga el túnel solar tan corto y derecho como sea posible.
C
Use el codo inferior para inclinar el túnel hacia el sol y para evitar obstrucciones en el ático.
Nota: La longitud del túnel no debe superar los 20 pies (6 m). La exposición al sol suminis-
tra más luz.
D
Use el codo inferior para techos con inclinación entre 40° y 60°.
E
Verifique que el espacio del ático y techo estén libres de obstrucciones antes de comenzar
la instalación. Entre las partes del marco marque el centro del túnel solar con un clavo en
el cielo raso y en el techo.
Para estimar la longitud del túnel, mida desde el cielo raso hasta el techo y añada 4"
(100 mm) para instalar el túnel en el tapajuntas y como mínimo 1½" (40 mm) para cada
junta adicional.
FRANÇAIS : Planification
A
Déterminer l'emplacement souhaité pour l'installation du tunnel de lumière et marquer
l'emplacement à l'aide d'un cable de façon à ce qu'il soit visible du grenier.
B
Pour un rendement optimal, privilégier une installation du tunnel de lumière en ligne droite
sur courte distance.
C
Utiliser le coude inférieur pour positionner le tunnel en angle vers le soleil et éviter toute
obstruction dans le grenier.
Note : La longueur de tunnel ne doit pas excéder 20 pieds (6 m). L'exposition au soleil
procure une plus grande luminosité.
D
Utiliser le coude inférieur pour les toits à pente de 40° à 60°.
E
Vérifier que l'entretoit et le toit sont exempts de toute obstruction avant de commencer
l'installation. Entre les éléments de structure, fixer un clou dans le plafond et dans le toit
pour marquer le centre de l'emplacement du tunnel de lumière.
Pour estimer la longueur du tunnel, mesurer la distance entre le plafond et le toit et ajou-
ter 4" (100mm) afin de bien installer le tunnel avec le solin et ajouter un minimum de 1½"
(40 mm) pour chaque joint supplémentaire.