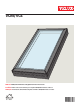
VCM/VCE English: VCM/VCE Curb Mounted Skylight Installation Instructions Español: Instrucciones de instalación para tragaluz VCM/VCE montado en brocal Français : Instructions d'installation du puits de lumière VCM/VCE monté sur cadre 0°-60° VAS 452864-2011-12
English: Index Pages 2-4 Important installation requirements Page 5 Warnings Pages 7-8 Planning Pages 9-10 Installing underlayment Page 11 Flashing Page 12 Mounting skylight Pages 13-14 Electrical connection (VCE only) English: Installation check list Installer should verify: • Curb mounted skylights VCM/VCE are installed on roof pitches from 0° to 60°. • Skylight curb is constructed correctly according to dimensions in these installation instructions.
English: Importance of proper installation Satisfactory product performance depends on proper installation. Seller accepts no responsibility whatsoever for failure of an installer to install VELUX® roof windows and skylights in accordance with these installation instructions.
2 English: Important installation requirements for the USA Español: Requisitos importantes de instalación para los Estados Unidos Français : Spécifications d'installation importantes pour les États-Unis VELUX® series A21 skylights are designed and engineered to be installed with VELUX flashing systems. VELUX flashing systems include VELUX adhesive skylight underlayment in a quantity sufficient to install one skylight of the size for which the flashing system was designed.
2 English: Español: Français : WARNING Electrical connection It is customer's responsibility: • To contact a qualified electrical installer. • To assure that the electrical installation is adequate and in conformity with National Electric Code, ANSI/NFPA 70 - latest edition*, and all local codes and ordinances. Failure to do so could result in fire, electrical shock, other serious personal injury or death. Curb mounted skylight VCE is designed for use in both in-reach and out-of-reach places.
VELUX
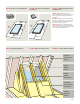
2 English: Clearance around installations Español: Espacio libre alrededor de las instalaciones Français : Dégagement requis autour de l'installation English: Maintain illustrated clearances between skylight frame and critical areas such as valleys, ridges, slope changes and roof-to-wallintersections.
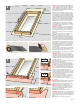
1 English: Build curb according to measurements in the chart. Use lumber with an actual thickness of 1½" (38 mm) and a minimum height of 3½" (90 mm). Curb height and attachment should comply with building codes and regulations and be secure enough to transfer the skylight loads to the framing members. Note: Skylight VCM/VCE cannot be rotated. The skylight operator has to be installed at the bottom of skylight curb. Español: Construya el brocal de acuerdo con las mediciones de la tabla.
2 7" 180 mm 3" 75 mm 3" 75 mm 2x4 3 3" / 75 mm 6" 150 mm 6" 150 mm 3" / 75 mm 3" / 75 mm 6" 150 mm ½" 13 mm 2x6 6" 150 mm English: To ensure waterproofing, skylight curbs shall be completely wrapped in VELUX adhesive skylight underlayment as indicated. Underlayment must be applied before installing the flashing. Remove existing roofing underlayment around the rough opening as shown.
4 6" 150 mm 6" 150 mm English: Wrap the sides and the corners of the skylight curb with VELUX adhesive skylight underlayment and create water-shedding laps over roofing underlayment. Note: Observe the measurements stated. Español: Envuelva los lados y esquinas del brocal del tragaluz con la lámina de soporte autoadhesiva para tragaluz VELUX para crear solapas impermeabilizantes sobre la lámina de soporte del techo. Nota: Respete las medidas especificadas.
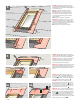
English: For thin roofing materials, use flashing ECL. ECL is designed for roof pitches 10° - 60° (2:12 - 21:12). For profiled roofing materials, use flashing ECW. ECW is designed for roof pitches 14° - 60° (3:12 - 21:12). 2 7 ECW ECW ECW Español: Para materiales de cubierta delgados, use tapajuntas ECL. ECL está diseñado para techos con inclinación de 10° - 60° (2:12 - 21:12). Para materiales de cubierta ondulados, use tapajuntas ECW.
8 English: Center the skylight on top of the curb and secure with #8 1¾" (45 mm) pan head stainless steel screws provided. Screws will penetrate the curb by at least ¾" (19 mm). Apply downward pressure to the top of the skylight frame while securing the screws. Español: Centre el tragaluz sobre el brocal y fíjelo con los tornillos de acero inoxidable de cabeza chanfleada de #8 1¾" (45 mm) suministrados. Los tornillos penetrarán el brocal un mínimo de ¾" (19 mm).
VCE 9" / 225 mm English: Prepare the framing for electrical wire (applies to VCE only). All wiring shall be done with factory attached power cable. Wiring of power cable shall be done in accordance with the latest edition of the National Electrical Code (NFPA 70) and all local codes and ordinances. ESPAÑOL: Prepare el marco para el cableado eléctrico (para VCE únicamente). Todo el cableado debe realizarse con el cable de alimentación que viene sujeto de fábrica.
VCE English: A junction box or an outlet box (not provided with skylight) is required for permanent connection of the 20 ft (6 m) skylight power cable. A single phase 120 V, 60 Hz, 40 W branch circuit (continuous electrical feed) is required. The branch circuit must be protected by a 15 A circuit breaker or time delay fuse. The junction or outlet box in which the skylight power cable is terminated must be accessible for inspection after installation is complete.
Français : Information pour le propriétaire occupant Veuillez compléter et remettre au propriétaire occupant. Date : .................................................................................................................................................................................................................................................................. Numéro de produit : ....................................................................................................................