VS/VSE English: VS/VSE Deck Mounted Skylight Installation Instructions Español: Instrucciones de instalación para tragaluz VS/VSE montado sobre tablero Français : Instruction d'installation du puits de lumière VS/VSE à cadre intégré monté directement sur la toiture 14°- 85° VAS 452198-2010-01
English: Index Español: Índice Français : Index Page 2 Página 2 Installation check list Page 3 Important installation requirements Lista de verificación de instalación Page 2 Liste de vérification préinstallation Page 3 Spécifications importantes Page 4 Avertissement Planification Page 4 Warning Página 3 Requisitos importantes de instalación Page 5 Planning Página 4 Advertencia Page 5 Página 5 Planificación Pages 6-8 Préparation de la toiture et montage du puits de lumière Page
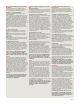
English: Important installation requirements Roof pitch VS/VSE is designed for roof pitches 14°-85° (3:12 - 137:12). In case of roof pitches below 14° (3:12), call VELUX for installation guidelines. Importance of proper installation Satisfactory product performance depends on proper installation. Seller accepts no responsibility whatsoever for failure of an installer to install VELUX® roof windows and skylights in accordance with these installation instructions.
English: WARNING Electrical connection It is customer's responsibility: • To contact a qualified electrical installer. • To assure that the electrical installation is adequate and in conformity with National Electric Code, ANSI/NFPA 70 - latest edition*, and all local codes and ordinances. Failure to do so could result in fire, electrical shock, other serious personal injury or death. Deck mounted skylight VSE is designed for use in both in-reach and out-of-reach places.
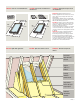
English: Clearance around installations Español: Espacio libre alrededor de las instalaciones 18"/450 mm 12" 300 mm 12" 300 mm 18"/450 mm English: Light shaft application 24"/600 mm 12" 300 mm 12" 300 mm 24"/600 mm Español: Aplicación del hueco de luz Français : Dégagement requis autour de l'installation English: Maintain illustrated clearances between skylight frame and critical areas such as valleys, ridges, slope changes and roof-to-wallintersections.
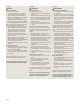
ENGLISH: Cut rough opening according to the measurements in the chart. Roof with battens: Clear battens away from rough opening to allow for proper installation of underlayment. H Español: Corte el hueco de acuerdo a las medidas en la tabla. Techo con rastreles: Quite los rastreles del hueco para permitir la correcta instalación de la lámina de soporte. Français : Couper l'ouverture brute selon les dimensions du tableau.
2 English: Remove existing roofing underlayment around the rough opening as shown. 7" 180 mm Español: Retire la lámina de soporte existente de la zona alrededor del hueco tal como se muestra. Français : Retirer la membrane de toiture existante autour de l'ouverture brute, tel qu'illustré. 4½" 113 mm 4½" 113 mm English: Mark corners of the rough opening. 3 Español: Marque las esquinas alrededor del hueco. Français : Marquer les coins de l'ouverture brute.
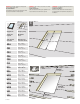
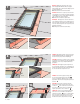
4 ⁄8"/10 mm 3 11⁄4"/30 mm UP 3 Skylight size Nails C01 C04 C06 C08 M04 M06 M08 S01 S06 18 20 22 24 22 24 26 22 26 Español: Coloque la tragaluz encima el hueco preparado y use las muescas como mostrado en el dibujo. Sujete la tragaluz con 1-¼"(30mm) clavos sumistrado en la caja. Asegurase que cada rincon de la metal reborde alrededor la tragaluz tiene a menos uno clavo. Los clavos son sumerido dos veces en zinc acero de carbono.
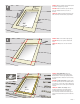
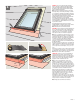
6 6" 150 mm 6" 150 mm ½" 13 mm English: To ensure waterproofing, skylight frames should be completely wrapped in VELUX adhesive skylight underlayment supplied with the flashing. This underlayment must be applied before installing the flashing. Note: If snow accumulation on the roof is likely, waterproofing is achieved by installing a continuous self-adhesive waterproof membrane beneath the roofing material and flashing material.
English: Wrap the side frames and corners of the skylight with VELUX adhesive skylight underlayment and create water-shedding laps over roofing underlayment. Note: Observe the measurements stated. 7 6" 150 mm Español: Envuelva las esquinas y lados del marco del tragaluz con la lámina de soporte autoadhesiva VELUX para crear solapas impermeabilizantes sobre la lámina de soporte del techo. Nota: Observe las medidas especificadas.
English: Installing VELUX adhesive skylight underlayment on roof with battens: Refer to installation instructions included with VELUX adhesive skylight underlayment. Español: Instalación de la lámina de soporte autoadhesiva para tragaluz VELUX en techos con rastreles: Consulte las instrucciones de instalación incluidas con la lámina de soporte autoadhesiva VELUX.
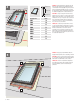
English: You are now ready to install the flashing. If the flashing is not to be installed immediately, reinstall cladding. 10 2 2 Español: Ya puede instalar el tapajuntas. Si no va a instalar el tapajuntas inmediatamente, vuelva a colocar el recubrimiento. Français : Vous êtes maintenant prêt à installer les solins. Si les solins ne sont pas installés immédiatement, réinstaller le revêtement. 1 English: For flashing information, see instructions supplied with the relevant flashing.
VSE English: Connect the rain sensor as shown and leave the bag with with its contents on exterior side for attachment during installation of flashing. Make sure that the wire and the bag is protected while installing the skylight, wrapping the frame and installing the flashing. Español: Conecte el sensor de lluvia como se indica y deje la bolsa con su contenido en la parte exterior para sujetarlo cuando se instale el tapajuntas.
VSE English: Prepare the framing for electrical wire (applies to VSE only). Refer to national Electric Code for wire routing details. 9"/225 mm Español: Preparar el marco para el cableado eléctrico (para VSE únicamente). Consultar el Código eléctrico nacional para verificar los detalles del trazado eléctrico. Français : Préparer le cadrage pour l'installation du câblage électrique (pour VSE seulement). Veuillez vous référer au Code national du bâtiment pour les détails sur l'acheminement du câblage.
VsE English: A junction box or an outlet box (not provided with skylight) is required for connection of the 20 ft/6 m skylight wire. A single phase 120 V, 60 Hz, 60 W branch circuit (continuous electrical feed) is required. The branch circuit must be protected by a 15 A circuit breaker or time delay fuse. The junction or outlet box in which the skylight power supply cable is terminated must be accessible for inspection after installation is complete.
Français : Information pour le propriétaire occupant Veuillez compléter et remettre au propriétaire occupant. Date : .................................................................................................................................................................................................................................................................. Numéro de produit : ....................................................................................................................