GAS HOBS USER AND INSTALLATION INSTRUCTIONS
Dear Customer, Congratulations on purchasing your new product from Think Appliances. To register your parts and labour warranty (some conditions apply please refer to your warranty card for more details) please contact out Customer Care team on: 1800 444 357 Our Customer Care centre is there to ensure you get the most out of your appliance.
For future reference please record the following information which can be found on the Rating Plate and the date of purchase which can be found in the invoice: Model Number ……………………. Serial Number ……………………. Date of Purchase …………………….
CONTENTS General Information page 4 Warning and Safety Instructions page 5 Instructions for Use Instructions for Installation Technical Data pages 6–7 Pages 8–12 Pages 12–13 3
GENERAL INFORMATION Please read this booklet thoroughly before you use this appliance. It is important that you understand all the control functions before commencing to cook with your new appliance. Please remember the advice and warnings shown on page 5, which is headed ‘IMPORTANT – Warning and Safety Instructions’. This appliance is designed for domestic household use when built into a kitchen worktop.
IMPORTANT NOTE – WARNING and SAFETY INSTRUCTIONS This appliance complies with all current European safety legislation and Australian Standards, however we do wish to emphasise that compliance does not remove the fact that surfaces will become hot during use and retain heat after operation. We advise that the appliance is not intended for use by young children or infirm persons without supervision. Young children should be supervised to ensure that they do not play with the appliance.
USER INSTRUCTIONS INSTRUCTIONS FOR USE These User Instructions should be retained for future reference and for use by a person who is perhaps unfamiliar with the appliance. The following models are covered by these instructions: V4GC6 VECG6003 V3G1WC6 VECG6004 VECG6006 VECG6007 VECG7001 VECG9002 VE0260011.2 USING THE HOB The symbols on the Control Panel fascias show which burner the Control Knob operates. Dependent on the model there are two methods for igniting the burners. 1.
USER INSTRUCTIONS HELPFUL HINTS Abnormal Operation Any of the following are considered to be abnormal operation and may require servicing: Yellow tipping of the burner flame. Sooting up of cooking utensils. Burners not igniting properly. Burners failing to remain alight. Burners extinguished by cupboard doors. Gas valves, which are difficult to turn.
INSTALLATION INSTRUCTIONS INSTRUCTIONS FOR INSTALLATION This appliance shall be installed only by authorised personnel and in accordance with the manufacturer's installation instructions, local gas fitting regulations, municipal building codes, water supply regulations, electrical wiring regulations, AS 5601/AG 601 - Gas Installations and any other statutory regulations.
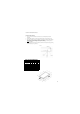
INSTALLATION INSTRUCTIONS INSTALLATION NOTES 1. Cut the aperture to the dimensions shown below or use the template if printed on the packaging. 2. Invert the Hob and apply the sealing agent provided to match the outer perimeter edge. 3. If the sealing agent is a strip type, the protective covering must be removed from both sides. Do not leave a gap in the sealing agent or overlap the thickness. NOTE: do not use any Silicone based sealant, as this can damage the worktop surface if repairs are required. 4.
INSTALLATION INSTRUCTIONS VENTILATION OF ROOMS The room in which this appliance is installed must be well ventilated by natural or mechanical means, or a combination of both to ensure correct combustion and the removal of spent air. The minimum quantity of air for combustion will depend on the room volume, number of appliances and their total power rating. The power rating of your appliance can be found by reference to the Rating Plate.
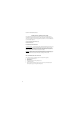
INSTALLATION INSTRUCTIONS GAS FLOW ADJUSTMENT In order to adjust the minimum gas flow proceed as follows: x Ignite the burner and turn down to the minimum setting. x Remove the control knob from the gas tap. x Adjust the flow either clockwise to decrease or anti-clockwise to increase the flame. Use a screwdriver inserted down the gas tap rod or via the screw head adjacent to the rod for models fitted with a Flame Supervision Device.
INSTALLATION INSTRUCTIONS ELECTRICAL CONNECTION Before connecting the appliance, make sure the supply voltage marked on the rating Plate corresponds with the mains supply voltage. WARNING – THIS APPLIANCE MUST BE EARTHED Ensure the appliance is plugged into a 10 amp GPO.
INSTALLATION INSTRUCTIONS MAINTENANCE WARNING: SERVICING SHOULD BE CARRIED OUT ONLY BY AUTHORISED PERSONNEL During the guarantee period, in case of need all service intervention should be referred back to the Service Department. Please note that intervention or repair by any unauthorised personnel will invalidate such guarantee, Before carrying out any maintenance, disconnect the appliance from the gas and electricity supplies.
NATURAL GAS BURNER TYPES AND POWER INPUTS : MJ/h Model VE0260011.2 VGC6 VGCWS6 V4GC6 V3G1WC6 VECG6003 VECG6006 VECG6004 VECG6007 VECG7001 VECG9002 Large max 11.9 11.9 11.9 11.9 11.9 11.9 11.9 Medium max 7 7 7 7 7 7 7 7 7 7 7 Small max 4 4 4 4 4 4 4 4 4 4 4 Wok max 12.7 12.7 12.7 12.7 12.7 12.7 Fish max - Total max 29.9 29.9 30.7 29.9 30.7 29.9 29.9 30.7 30.7 41.8 41.8 Fish max - Total max 27 27 28.7 27 28.7 27 27 28.7 28.7 39.5 39.5 PROPANE GAS BURNER TYPES AND POWER INPUTS : MJ/h Model VE0260011.
15