VENom night ranger 3D pilot’s Handbook Read Before Flight! VENF-6225-1
I. Introduction The Venom Night Ranger 3D is a high performance Ready-to-Fly Collective Pitch (CP) Aerobatic Electric Helicopter for indoor flying and outdoors on calm days. At about 400 grams, the Venom Night Ranger 3D will fly for 5-8 minutes on the 9 Cell 650mAh Ni-MH battery, depending on the type of flight. Although the Venom Night Ranger 3D is not difficult to operate, it does take more skill and practice to master than a fixed pitch heli.
. Plug in the supplied wall charger and attach the battery pack. Caution: The battery will be fully charged in about 2 hours if it’s completely discharged. Do not overcharge! Overcharging the battery will cause serious damage or may cause the battery to explode! The battery has finished charging when it is warm to the touch. If the battery gets hot during charging, discontinue charging immediately and disconnect the battery from the charger. Never leave the battery unattended while charging.
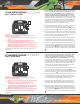
IV. Adjustments & Tuning Mode i - Europe & Australia Pitch Adjustment Throttle Adjustment 2 3D Mode Switch Throttle Up 3 Throttle Down 4 1 Attention: Before connecting the battery to the control board, you must confirm the following settings: A. The crystals on the transmitter and receiver must match each other. B. Antenna is screwed in and extended, batteries are fully charged and transmitter has been turned on. C.
6. The VNR 3D is equipped with a gyro that controls the RPM of the tail rotor to compensate for main rotor torque. To adjust the sensitivity of the gyros effect, use a micro flat blade screwdriver to rotate the Limit and Delay Adjustment Pot (Fig. d). Limit Adjustment Pot Fig. d (Adjusts amount of Gyro response to stick input) Limit Adjustment Pot: The Limit Adjustment Pot adjusts how fast the tail rotor rotates the heli around its axis.
V. Controlling the VNR 3D Mode I (Europe/ Australia) Mode II (North/South America) Lift the Helicopter Push Right control stick forward. Push Left control stick forward. Pull Right control stick backward. Pull Left control stick backward. Lower the Helicopter Flying Environments: The VNR 3D will fly in a spacious room without any obstacles or outdoors with calm winds up to 5-7 mph. Make sure that the air is calm. Drafts caused by open windows or doors should be avoided.
V. Controlling the VNR 3D (CONT) Mode I (Europe/ Australia) 4. Push the throttle up gradually until the VNR 3D starts to become light. The VNR 3D may initially swing to the left when you increase throttle. This is because of the thrust of the tail rotor and the rotation of the main rotor (this is an unavoidable deviation during take off). Open the throttle gradually until the VNR 3D becomes light, and then carefully move the throttle stick further until it is ready to lift off.
Note: You should master basic flying skills BEFORE attempting 3D aerobatic flying! FLIGHT MODE 1 N vI. 3D Aerobatic Flying Fig. g Now that you have mastered the basic flying skills, it’s time to learn some aerobatic maneuvers. When learning to fly 3D maneuvers, altitude is extremely important. If a problem occurs, the more altitude you have, the more time you’ll have to correct and recover. 3D Flying Mode: To fly aerobatic maneuvers, the heli must be in 3D Flight Mode.
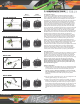
The Roll and Inverted Hovering Mode I Stick Inputs: Start from Fast Forward Flight (FFF) in 3D mode. vI. 3D Aerobatic Flying (Cont) Elevator/Rudder 0% 0% Mode II Stick Inputs: Throttle/Aileron +75% Throttle/Rudder 0% +75% 0% Elevator/Aileron 0% 0% Note: You should master basic flying skills BEFORE attempting 3D aerobatic flying! 3D Maneuvers: There are many advanced aerobatic 3D maneuvers that you will be able to perform with your VNR 3D as your skill level increases.
Fig. j Canopy Modification & Brushless Wiring Diagram viI. BRUSHLESS UPGRADE Items Needed: 1. 2. 3. 4. 5. 6. 10 mm diameter Y-Harness - Part # VENF-7750 Brushless Motor - Part # VENF-7748 Brushless ESC 20 amp - Part # VENF-7749 (25 amp max) LiPO - Part # VEN-1573 (1500mAh max, 3S max, 12.6v) Recommend option part heatsinks - Part # VENF-7747 Cooling holes on windshield over 4/1 unit Setup: Tail Motor 1. Plug Brushless ESC in Ch4 of RX(4/1) 2.
IX. Parts List VENF-7709 VENF-7710 Main Rotor Blades VENF-7715 VENF-7711 Flybar Paddles VENF-7716 Flybar See Saw VENF-7721 VENF-7727 See Saw Holder VENF-7733 VENF-7739 Tail Stabilizer Set Main Frame Crystal Set: Ch.51 72.81MHz FM Crystal Set: Ch.52 72.83MHz FM Crystal Set: Ch.53 72.85MHz FM Crystal Set: Ch.54 72.87MHz FM Crystal Set: Ch.55 72.89MHz FM Crystal Set: Ch.56 72.
EASY HIGH PERFORMANCE UPGRADES: VENF-7748 VEN-1573 LiPo BATTERY VENF-7749 BRUSHLESS MOTOR & ESC VENF-7746 VENF-7747 HIGH PERFORMANCE CARBON FIBER BLADES HIGH PERFORMANCE HEAT SINK SET Venom Air Corps North America 600 west buckles road hayden, id 83815 Australia 16 underwood avenue botany, nsw 2019 customer service tel 800.705.0620 customerservice@venom-aircorps.